So Sew Fun

Our children have been into competition shows for quite some time, cooking competitions (well in addition to the boys’ sports shows). On the rare occasion that I watch TV, watching one of these cooking competitions with them is usually what I do. But I’ve discovered something far more fun than Iron Chef, the Great British Sewing Bee. (Not available on our BBC TV station here, just online.)

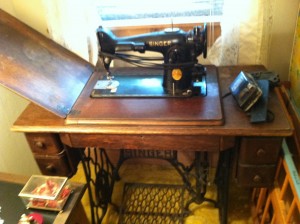
The episode below introduced me to the Bee. It’s the perfect episode for me, probably no other would have intrigued me. In it, the competitors are required to use traditional sewing techniques, and even the greatest sewing machine built (minus all the bells and whistles we have today), the Singer 201, the “Cadillac” of traditional (vintage) machines in their day (just at the turn from treadle to electric, a beauty in her day). Just like one that will someday be mine. (I am so looking forward to getting it running again. It is not a treadle machine, just in a treadle cabinet. Love it.)

Singer 201 in Treadle Table ~ from Me & My House

Here’s the show. Sewists will love watching this. Take a peek, and perhaps be tempted to watch other episodes.

SaveSaveSaveSave

What Goes Around Comes Around {How-to}

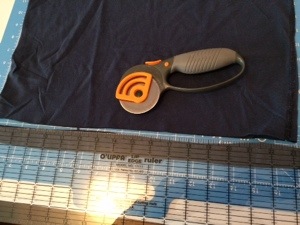
Years ago I crocheted many baskets, rugs, and other accessories from fabric strips. The rotary cutter, mat and acrylic rulers made it sew easy to create yarn from fabric. That trend ended and I haven’t cut fabric yarn since.

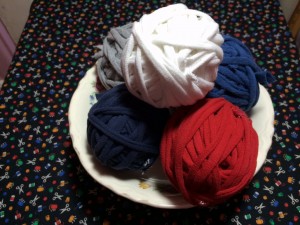
T-shirt Yarn How-to ~ from Me & My HouseBut it’s back! especially in the form of the new trendy T-shirt yarn. Same idea. New twist. With a stretchier yarn. And an even newer tool that can help (even though I don’t have one yet.)

T-shirts. They seem to multiply in the drawers. Our children (hopefully not we) outgrow them. The images start to fade or flake off. They stretch out into weird shapes. So what to do with them? You hate to throw them away, unless they have holes or huge stains.

You could throw them in the rag bag. But there are some better uses. We’ll look at one today, since we’ve kind of been on the yarn theme, and some others at another time.

Just like I strip cut those woven cottons, years ago, we can strip cut these cotton jerseys today, and not even have to buy new fabric yardage to do it.

Here’s how:

1. Line up the bottom of the hem and cut the hem off.

T-shirt Yarn How-to (1) ~ from Me & My House

Tip: T-shirts without side seams are best, but ones with side seams work too.

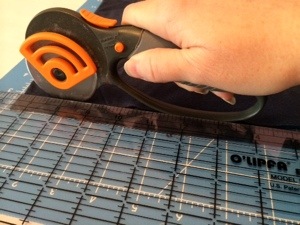
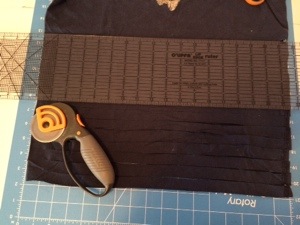
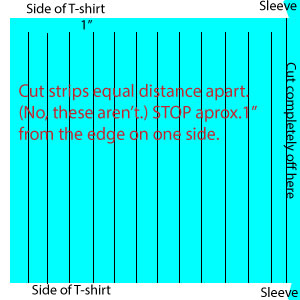
2. Cut evenly spaced strips (1/2″ – 2″ wide, but 1.5-2″ better for braiding than knit or crochet) across the width of the T-shirt. BUT! stop the cuts 1″ from the side furthest from you. IOW, do NOT cut clear across the T-shirt to produce individual rings of fabric.

T-shirt Yarn How-to (2) ~ from Me & My House

I’ve cut at 1″ and 3/4″. I measured the “Fettucini” jersey knit “yarn” by Lion that I purchased, and it is 3/4″. I think that is a good size. 1/2″ will give you even thinner yarn, and more yards of yarn per T-shirt.

T-shirt Yarn How-to (3) ~ from Me & My House

Realize, the size of the T-shirt will determine the yardage you get from it. Using small children’s T-shirts will require quite a few to get enough yardage to make something. So if you don’t have a lot of T-shirts the same color, you will get a scrappy striped effect. From a men’s small T-shirt, I get about 25 yards of 1″ wide, and 36 yards of 3/4″ wide strips.

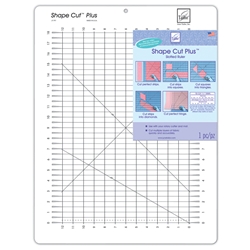
shape cut plus
Oh, I about forgot to tell you about a great tool that can help make this go really fast and give great results. (Perhaps I about forgot because I don’t have one yet.) The Shape Cut Plus is a slotted rotary cutting guide with slits every 1/2″ to guide your rotary cutter. Make your strips 1/2″ wide or in any multiple of 1/2″ that you desire. If you plan on cutting a LOT of T-shirts into yarn, or if you do strip piece quilting, you’ll find this ruler (and others in this line) invaluable. The Quarter Cut Slotted Ruler will cut at 1/4″ increments, but is smaller, for a smaller area.


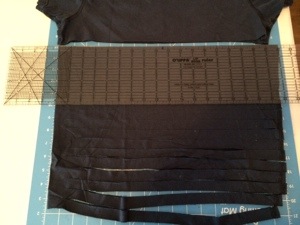
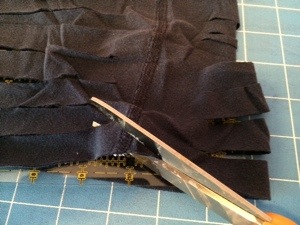
3. When you get about to the arm pit or where an image begins, cut your strip clear through to the end, cutting the top part of the T-shirt apart from your connected strips. The ink from the images will not create a good yarn. Don’t include them. This also goes for if their is any small logo at the bottom or such, cut it off before beginning your strips. And one more note, same goes for if there is a tag in the side seam. Cut it completely off, or you’ll have a hard lump there.

T-shirt Yarn How-to (4) ~ from Me & My House

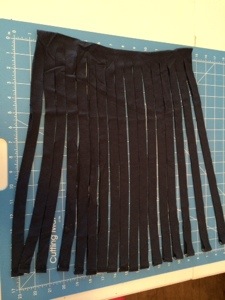
4. Now you have several fringe-y looking strips all connected on one side.

T-shirt Yarn How-to (5) ~ from Me & My House

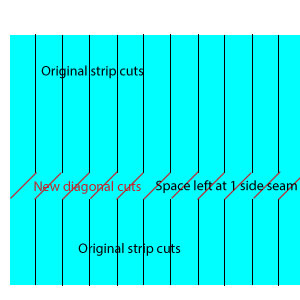
My poor illustration that may be clearer than the pics.

tshirt-yarn-1

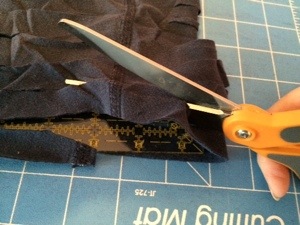
The magic happens with our next cuts to make one continuous long strip of yarn. Lay your cut piece out so you can see the whole part that is hooked together, (turn so side seams are in middle, not at top and bottom.) Begin at the left edge (where the hem was) and cut (beginning even with where the lower cuts start,) at a diagonal to the first cut where the upper cuts end.

T-shirt Yarn How-to (6) ~ from Me & My House

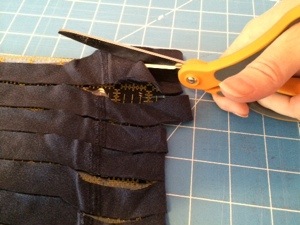
Then diagonally lower cut #1 to upper cut #2, lower cut #2 to upper cut #3, and so on.

T-shirt Yarn How-to (7) ~ from Me & My House

When you reach the last bottom cut, you will cut diagonally off the edge, and you will have 1 long continuous strip. (I also cut the seams off the ends, if the t-shirt has side seams like this one does.)

T-shirt Yarn How-to (8) ~ from Me & My HouseMy poor illustration that may be clearer than the pics. The shirt is turned here so the side seam (where connected), is in the middle, not along the top.

tshirt-yarn-2

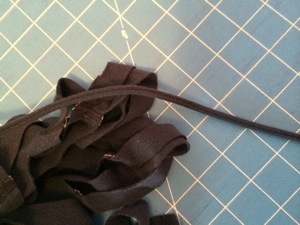
5. Stretch out your yarn, really stretch it out. The edges will curl. I grab from side seam to side seam and pull, just like taffy. Then move on to the next side seam, stretch, across the whole length of the yarn.

T-shirt Yarn How-to (9) ~ from Me & My HouseT-shirt Yarn How-to (10) ~ from Me & My House

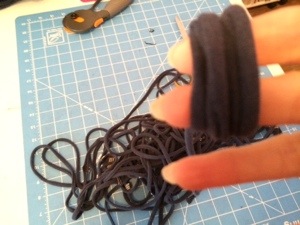
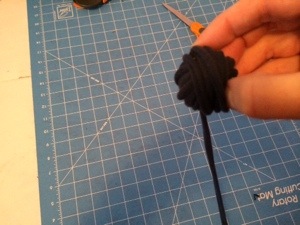
6. Then wind yarn into a ball. Start by wrapping around a couple fingers. Wind.

T-shirt Yarn How-to (11) ~ from Me & My House

And wind.

T-shirt Yarn How-to (12) ~ from Me & My House

And wind.

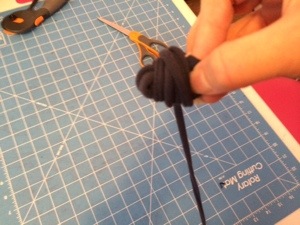
T-shirt Yarn How-to (13) ~ from Me & My House

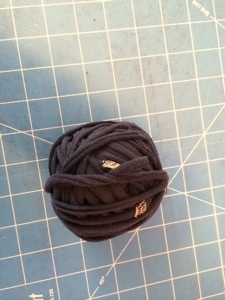
And wind. Now you have a ball of yarn to crochet or knit into all kinds of useful things.

T-shirt Yarn How-to (14) ~ from Me & My House

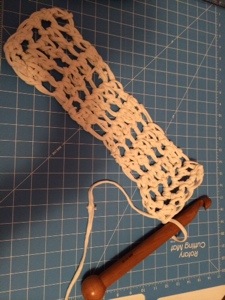
A scarf (or the beginnings of one pictured here.) Crocheted with a size 50 crochet hook! (6 stitches per row. First row single crochet, rest double crochet.)

T-shirt Yarn How-to (15) ~ from Me & My House

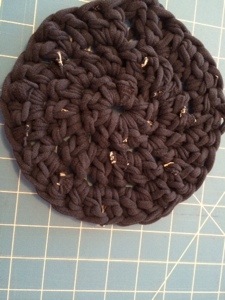
A trivet for a hot pan, or a mug rug, or the beginnings of a floor rug. (Chain 5, slip stitch into ring, ch 3 dc 9 (making 10 stitches), join, ch 3 dc in same stitch and 2 dc in each stitch around (making 20 stitches), join, ch 3, *2 dc in next, dc in next* around, 2 dc in last. Finish off or continue for larger circle.)

T-shirt Yarn How-to (16) ~ from Me & My House

Or dish rags.

Or a purse or tote bag.

Or ….

Don’t throw the tops and sleeves of your shirts away yet. I’ll be back with more tips for repurposing those into useful things too.

Do you make T-shirt yarn? What have you knit or crocheted with it?

Created to Create

Created to Create ~ from Me & My House“In the beginning God created…” And “God made man (male and female) in His own image.” We were created to create!

Are you sometimes stressed? All mamas are, in fact everyone is, at times. Did you know creativity reduces stress? We tend to think that when we’re stressed we should just veg out (or resort to “retail therapy”). Neither are good solutions, and neither really reduces stress. In God’s design, stress is reduced through being creative, not through consuming without productivity.

Many times in our stress though, we think we don’t have time to be creative. We think of creativity as something that drains our time and energy, when in reality it does the opposite. It uses time productively and calms us, without tiring us. I know the times that I’ve quit creative endeavors for a season, usually because I thought I didn’t have enough time for such, I’ve only become more stressed, and gained no more time. I didn’t get any more other things done.

Granted, there is a balance. We can’t just stop doing necessities in our home making and other responsibilities to be free spirited in our creative areas of desires-at-the-moment. But, we can add creativity into just about everything we do. We can make even most mundane chores more fun, with a little creativity. Even if its just a creative way of getting it done more efficiently, so we have more time for our more fun creative projects (where the results will last a little longer than a clean toilet).

What type of creativity de-stresses you will be different for each person. There are creative activities that can add more stress–for us. They aren’t our “outlet”. If you’ve never really released your creativity, it may take some time to find what your creative outlet is (outlets are.) But you can have fun experimenting. Try various things until you find which ones are relaxing (calming/de-stressing) to you. Some people develop one creative passion, and it becomes a lifelong focus. Others prefer a variety of creative activities. At various times, various creative activities may be the one for that moment.

I believe the various home arts can be great creative outlets for many of us. They are much more than a hobby (which could be more consumptive than productive.) They are a way to bless our families, and beautify our homes–while enjoying what we do. We can also use that creative productivity to make gifts to bless others. There is so much variety in the home arts, we don’t have to look elsewhere for our expression, there is probably a place in what is considered “home arts” that fits us.

Women in days of old needed to be fairly proficient in all of the home arts–well many, at least. Today, women have much more “freedom” to not be creative. We can pay someone else (more likely, some company) to do it all for us. Yet, there remains a more true freedom in not only knowing how to do for ourselves, but also in actually doing it. And, we receive that added benefit of stress reduction. We are blessed to be able to pick and choose which home arts we will work at.  If we want, we can be a Jill-of-all-trades, like our foremothers were, doing a bit of this and a bit of that. But we don’t have to do a certain amount of “this”, to ensure our families will be clothed (or whatever). We are free-er to focus on the areas we prefer. We may thrive in the fabric arts but only dabble in the paper arts. We may decorate but not produce yarn work. We may love to make creative food arts but not do much needle work. The form of the home art is not as important as the creative aspect and just doing it–using your mind and your hands to express the creativity God has placed in your heart.

One last point, for those who feel they are not creative. Like many things in life, you use it or you lose it. Just start somewhere. Start small. Try different things. You will benefit as you learn many different things on your way to finding the ones that fit you. Some may not be a good fit now, but will be in the future. The more you exercise your creativity, the more creative you will become. As you are just beginning, it may seem like you are wasting time and not really accomplishing much–that’s OK!! You are expressing creativity! But, as you practice/play, you will soon find your stress level decreasing and your creativity level–and productivity–increasing. And yourself, your home, your family will be blessed with the results, and you will have gifts for others, and perhaps things to sell to others. Such a win-win-win situation!

Why don’t you give it a try? Instead of spending your time  just browsing Pinterest for cool projects you’ll never actually make (creativity consumption), why don’t you find just one thing (to start) that you’d really like to try, and actually get started on it (creative production)? Looking for inspiration is good (and there is much of it to be found on Pinterest,) but finding a project and getting started doing it is better.

What are your creative outlets in the home arts? What do you enjoy doing creatively to bless yourself, your home, family, and friends? Join us on Pinterest, on our Created to Create board for Home Arts we’re actually creating.

SaveSave

Yarn, Round 2

When mama starts making things it doesn’t take long till she starts hearing, “Make me one too?” It doesn’t matter what you are making, whatever it is that you make, your lovies will want you to make them one.

While I was completing the scarves in the last post, and another as a gift, the requests came in. “Is that for me? Will you make me a pink one?” “I need a warm, winter scarf.” And that led to 4 requests.

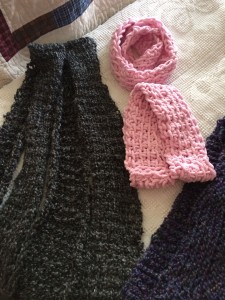
Kid’s scarves. Little yarn. Quick and easy. I can do that. But of course, I needed a different design. The arm knit produced too large of loops for small children, and wasn’t exactly a manly look. I decided on Tunisian stitch for all of them.

Tunisian Crochet Scarves ~ from Me & My House

A few months ago, a fellow yarny asked if I did Tunisian crochet, and told me I’d probably like it since it is a knit look with crochet speed. I finally decided to take a look at it. Oh! it’s just the same thing as what we used to call the afghan stitch.  Yes, I’ve done that. And yes, that’d be great for 4 quick children’s scarves. (So glad I didn’t have to learn something new to do these.) (Youtube how to videos for Tunisian foundation row and Afghan/simple stitch.)

The pink girls’ scarves are Infinity (circular) scarves in Bernat Baby Blanket, a soft minky-like yarn. The grey, boys’ scarves are done in Lion’s Homespun (Edwardian). To the right, the purple scarf, is my “practice” run in Lion’s Homespun (Barrington). Although you usually use a Afghan Crochet Hook for Tunisian crochet, since I wanted a larger stitch, I used a straight Q Crochet Hook (that I use for crocheting fabric rugs, baskets, and such.) Since I was only doing a few stitches wide, I figured the short length would be OK, and it was. (You can always wrap a rubber band around the end to keep your stitches from coming off, if you have that trouble.) The girls’ scarves are 4 and 6 stitches wide and the smaller one a little over 2.5 feet, and the larger close to 4′. The boys’ scarves are 6 and 8 stitches wide. To do it again, I’d go 8 and 10, as the Homespun yarn really curls up. The smaller boys’ is 4+’ long and the larger 5+’.

Happy. Happy. Mama gets to create. Children love what they get.

Do you do Tunisian crochet? What do you like to make with it?

What do your children/grandchildren ask you to make them?


[subscribe2]

A Yarn About Yarn

Whoever got the idea that being a homemaker is boring must not have been one or around one. We have one of the most diverse jobs in the world. It is anything but boring. Always new situations, new problems to solve, new joys to celebrate, and new projects to work on. Whatever that may be.

That said, I interrupt my posts on quilts to interject some yarn work–fancy yarn, at that.

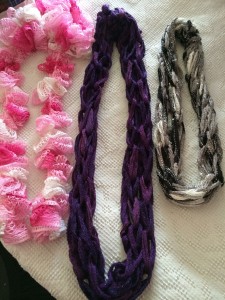
sashayscarves

After successfully tackling a scarf for a Christmas present, a couple weeks ago I wanted to figure out what to do with some specialty yarns I have. I bought them because they were so pretty, but I didn’t have a clue what I’d do with them. I decided they’ve been sitting in my stash too long and it was time to figure that out. In trying to decide what they’d be good for, I decided to learn a new technique. Arm knitting. {Link to a youtube video that is pretty close to how I do the actual arm knitting. My scarves are my own pattern.}

Now, I’ve done plenty of knitting before, but it’s not one of my most used skills. I usually prefer to crochet, because I can complete projects quicker with it. But I have to admit, I’d never used my arms as knitting needles before. I was game to try when I saw you could complete a scarf in a half an hour. (Quick, cute, useful projects are usually good motivation for me.)

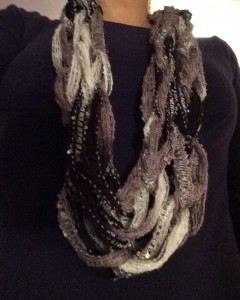
Panda Arm Knit Infinity Scarf ~ from Me & My House

20 yards Sashay Sequins. Knit 6 chains wide, approx. 45″ long. Leave an arm span+ length for binding off, and connecting the ends for Infinity style.

I also don’t wear a lot of scarves, mainly because many of them are too bulky for me. I feel buried in them. But we all know the solution to not finding styles you like is to create your own. Necessity is the mother of invention, they say.

So I set out to solve all these problems. And I’m quite pleased with the results.

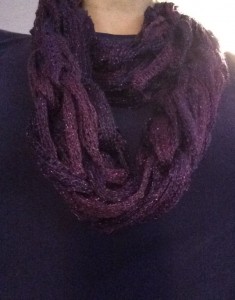
Amethyst Arm Knit Infinity Scarf ~ from Me & My House

30 yards Sashay Metallic. Knit 6 chains wide, approx. 5′ long. Leave an arm span+ length for binding off and connecting ends to make Infinity style scarf.

The yarns I started with were Sashay (Tutu – Pink), Sashay Sequins (Panda- Black & Grey) and Sashay Metallic (Amethyst). I saw that yes, arm knitting is pretty much like regular knitting, only using your arms as knitting needles. And yes, you really could complete a scarf in 1/2 hour. And yes, I could modify them to suit my style and I’d actually wear them. Talk about win-win-win!

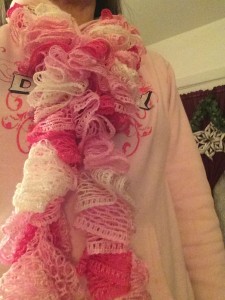
After doing a couple arm knit infinity scarves–a longer one that would double loop, and a shorter one that will just single, I decided I wanted to do something different with a third Sashay (the “plain” one) I had on hand. I wanted for more of its own design to show through, so decided to crochet it into a ruffle scarf. I love the way it turned out too. {A youtube video on how to crochet Sashay yarn. I didn’t lock the chains or use near as many loops as she did.}

Chrocheted Ruffle Scarf ~ from Me & My House

30 yards “Tutu”, I *think* I did every other hole, and 5 links per single crochet. (10 made it way too full and short.)

All this playing with yarn even motivated me to organize all my yarn and gather all my needles/hooks and patterns back together into one place. Which led to a couple little girls asking when I was going to make scarves for them, pink ones. And a couple boys saying they could really use scarves for the cold weather. So stay tuned for part 2 of this “yarn”.

Have you ever arm knit? If so, what did you make?

Rag Quilts {How to}

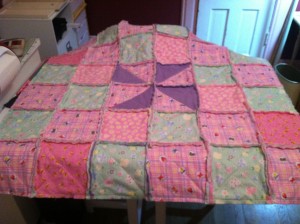
Baby Girl's Rag Quilt ~ from Me & My HouseMy babes aren’t the only ones that can snuggle in a soft and cuddly, homemade with love blanket. Even if you’ve never quilted before, you can make a baby rag quilt, like the ones I pictured in my last post–easily and quickly. No intricate cutting. No tricky piecing. No fancy sewing. Just straight cuts and seams.
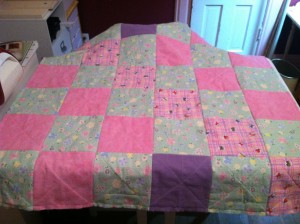
Baby Girl's Rag Quilt {back} ~ from Me & My House

You’ll need:

(See note at end.)

Planning:

For a baby sized quilt either a 6×6 or 7×7 pattern works well. With finished squares of either 6″ (for the 7×7 pattern) or 7″ (for either), your blanket turns out at 42″ or 49″ square. 42″ is a good “normal” size for a baby blanket, and 49″ is a nice large baby blanket. (Smaller blankets can be made, but babe will outgrow them soon. I prefer these larger sizes, to wrap babe in, not just throw over.)

A 7×7 pattern requires 49 front squares, 49 back squares, and 49 “batting” (middle layer) squares. A 6×6 pattern requires 36 for each of the 3 layers. I use flannel for all 3 layers. (For a regular quilt, you could use actual batting for your middle layer.)  The squares are each cut 1″ larger than the finished square size for the front and back, and at the finished size each for the middle layer.

For a 42″ finished 6×6 pattern, you need to cut a total of 36  8″ squares for the front, 36 8″ squares for the back, 36 7″ squares for the middle/ batting layer.

For a 42″ finished 7×7 pattern, you need to cut 49 7″ squares for the front, 49 7″ squares for the back, 49 6″ squares for the middle/ batting layer.

For a 49″ finished 7×7 size, you need to cut a total of 49 8″ squares for the front, 49 8″ squares for the back, 49 7″ squares for the middle/ batting layer.

You could also make a larger 6×6 pattern with 9″ top and bottom squares that finish at 8″, (and 8″ middle layer squares,)  for a 48″ square quilt.

For a smaller, 6×6 36″, cut a total of 36  7″ squares for the front, 36 7″ squares for the back, 36 6″ squares for the middle/ batting layer.
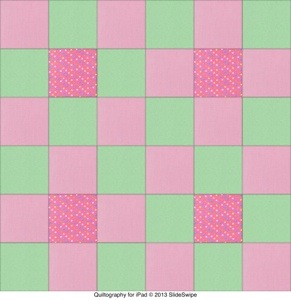
9 Patch Quilt Pattern ~ from Me & My House.jpg

9 Patch

To determine how many squares you’ll need of each for different colors/patterns, you will need to either find a 6×6 or 7×7 pattern, or draw one out. (Some are included here. The patterns of my finished quilts pictured here are not exact, due to the amounts of fabric I had. i.e. the inclusion of the purple squares in the first pic.)

If your fabric is wider than 42″ (not counting selvages, and less than 48″) after pre-shrinking, you will get seven 6″ squares, or six 7″ squares, or five 8″ squares across the width.

Use this to determine how many rows of squares you need to cut from each fabric for your pattern. (Remember you need 1 more whole row, even if you only have one more square than the previous row. So depending on how many colors you are using, it may end up more than the base amount listed.) Then multiply the number of rows needed by the size of your squares to get the length you need. Remember that this amount will be needed after your fabric is pre-shrunk, so add a bit extra. Flannel usually shrinks a few inches.

The back of the quilt can either be all one color/pattern, or varied as my baby girl’s quilt is. If you are using all 1 fabric, you will need about 1 7/8 yards for a 42″ quilt, and 2 1/4 yards for a 49″ quilt. (This is after pre-shrinking, and if the fabric is 43+” wide.)

The middle/batting layer can be any color that doesn’t show through your top or bottom layers. You will need about 1 1/4 yards for a 42″ quilt, and 1 7/8 yards for a 49″ quilt.

Need ideas for layout? You can use a “scrappy” pattern, just randomly placing blocks, usually making sure that none that are the same are touching. Diagonal stripes is an easy one, that can be done with any number of rows – first picture this post. Or a 9 Patch (4 times for a 6×6 – repeat, or vary as above). Or a Trip Around the World pattern (shown in 7×7).

If you know how or learn to make Half Square Triangles, you will be able to do many other designs. (It will take just a bit longer.) I’ll show you how to do that with an easy technique in a future post – and many other designs. You can also take a peek on my Pinterest page. Many of the patterns there are just squares and HSTs.


Cutting:

When cutting from new fabric yardage, these quilts can be cut very quickly with a rotary cutter, ruler and mat. When using leftover/scrap fabric, that is not even strips, it takes a little longer, but the rotary cutter makes it much faster than cutting each square with scissors.

So, lay that fabric out, and start cutting squares. Be sure to cut on the grain of your fabric, and be sure your squares are squared up.

If you’ve not cut with a rotary cutter, mat and ruler before. Lay your fabric, folded in half with selvedges meeting (as it comes off the bolt,) making sure it hangs straight. Fold the fold up toward the selvedge making sure to keep this fold straight – use the lines on your mat. Lay your ruler across, perpendicular to your selvedges, near the end, and cut to line your end up straight. Then move  your ruler over the number of inches required, again lining up at top and bottom for a straight cut. Continue cutting these strips until you have as many as you need. Then take each strip and turn it sideways and cut at the same measurements to get your squares. Keep your cuts on your mat (or you’ll ruin your table) and keep your fingers out of the way.
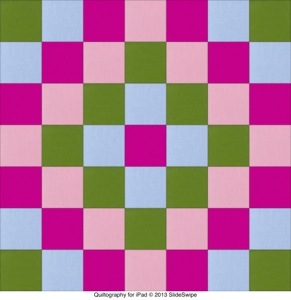
Trip Around the World Quilt Pattern ~ from Me & My House.jpg

Trip Around the World

Stack ’em up:

If your back is all one color, you can just make a big stack of your back squares, and a big stack of your middle/batting squares. Your top squares will need to be stacked in the order they will be on the quilt. I turn each row catty-wompous in the stack, just to help me keep track. If your back will also have a pattern, you will need to lay it out with the fronts, to make sure you get the right ones together. (i.e. Make your 3 layer sandwiches ahead of time, and lay them on top of each other according to order in row.)

Sewing the Squares:

You will begin by sewing the layers of the individual squares together. This forms the “quilting”. You will make a sandwich of 1 back square face down, 1 middle/batting square centered on it, 1 top square face up.  You will stitch each “sandwich” diagonally, from one corner, through the center, to the opposite corner. And then stitch again, with the other 2 corners, forming an X across the square.

Tip: I sew all the squares of a row, in a string, with the first diagonal. Then, I go back and sew the second diagonal, all in a string again. I think this is faster than sewing an X on each square individually. I don’t worry about backstitching since these stitches will be sewn over.

Also, I just eyeball my diagonal seams. If you don’t trust yourself to get accurate diagonals, press the top square of each sandwich along the diagonal, then open back up. This press mark will create a line for you to sew along to get straight seams.


Sewing the Rows:

After sewing X’s through each square sandwich, grab a row of squares and stitch the sides together with 1/2″ seams, with backs facing, according to your pattern. (Since I sew mine in a string, I already have them in the order of the pattern for the row.)

Take the top right square of the pattern, put it face down, (making sure the top is at the top, if it has a pattern). Lay the next square for the top row on top of it, with backs together, lining up edges, (making sure its top is at the top.) Stitch the two squares together on the right edge with a 1/2″ seam.

Open these up and lay face down. Put the next square for the row on top of the previous one (at the right), lining up right edges (and tops and bottoms), stitch with 1/2″ seam. Repeat till you get to the end of the row.
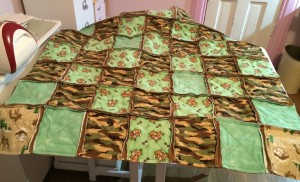
 

Baby Boy's Rag Quilt ~ from Me & My House


Sewing the Columns:

After stitching the squares together for each row, lay out your rows in the proper order for your quilt. Grab the top row and the next row, and put their backs together, lining up long edges. I open the seams between squares, and pin through each intersection of the squares, before sewing, sew my intersections line up nicely. Sew with 1/2″ seams. Add the rest of the rows the same way.

If my seams are off a bit, I line up the center ones, then work my way out with pins, then sew.

After all the rows are sewn together, stitch around all 4 sides of the quilt with 1/2″ seam.

Cutting the Fringe:

Now comes the most time consuming step of the whole thing. Put on some music, an audiobook, or  a movie. 🙂 Snip (with good, sharp, pointed scissors – spring loaded ergonomic ones are best) about every 1/4 – 1/2″ along each and every seam, being careful to not cut through the stitching. (Like you are cutting fringe.) This creates the “ragged” look, after the blanket is washed a couple of times.

In fact, after snipping, run it through the washer and dryer a time or two, by itself, to begin this fraying.

Done!

There you have it. All done. Quick. Easy. Soft. Cuddly.


Note: Links are affiliate links to what I have/like. I’ve found these to be better quality that last, don’t have to be replaced, work well, prevent strain better than other brands I’ve tried.) Use what you have available.


[subscribe2]

Baby Quilts

This mama used to crochet afghans for all the babies, beginning with my first. I loved them having something special, handmade with love, that was soft and cuddly, that they could keep for years to come. I still have my own handmade baby blanket.

Over the years, my styles varied, and I didn’t always have a crochet hook in hand. Some got sewn blankets, some embroidered, some quilts. Lately, since my own baby is no longer a baby and I now have a little more time for other projects (sometimes), I’ve gone back into a quilting phase–quick and easy machine quilting that is, on baby sized blankets only–made of soft flannel.

I love working with patchwork. But I’ve not developed the patience for intricate patterns made of hundreds of small pieces. So large squares with simple patterns, or one pronounced pattern, usually define my designs.

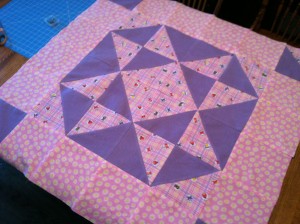
The Ohio Star is one of my favorite quilting patterns, so 2 years ago I designed this “star” girly baby quilt for one of our new grand girls. (I think it is technically a Ribbon Star.) I loved it! And it got me primed for making more baby quilts.

Ohio Star Baby Quilt ~ from Me & My House

This past year I had 2 new babes to sew for, so I decided to do “rag” quilts, with exposed edges between the squares and around the sides. These wash up into such soft cuddly blankets with their frayed edges.

The girl’s rag quilt is a 6×6, like the Star. But the pattern focuses on a smaller center design, a pinwheel, with a more “planned random” pattern around it. (Only 4 half square blocks to work with instead of the 20 on the Ohio Star.)

Baby Girl's Rag Quilt ~ from Me & My House

The back of this one got a fun diagonal stripe pattern. (So that added the challenge to this one.) 🙂

Baby Girl's Rag Quilt {back} ~ from Me & My House

The boy’s rag quilt is a 7×7 varied pattern. Though there is an order to it, there is no pronounced design (and no half square blocks). A fitting pattern to go with the camo, I figured. 🙂 The back of this one is solid brown squares, except the center one, which is the green with the dogs. Just a fun little surprise in the middle.

Baby Boy's Rag Quilt ~ from Me & My House

I’ve really enjoyed working with the rag quilts. They go together pretty quickly, and are more forgiving than most quilts when it comes to lining up all those bazillion (it seems) corners. Not having to bind the edges also saves a lot of time. But also adds much to the cuddliness of these quilts.

In my next post, I’ll give instructions for the rag quilts. Even if you’ve never made a quilt before, these are easy enough for anyone that can sew a straight (or relatively straight) seam. (I told you they’re forgiving.)

Do you make quilts? Do you quilt by hand or machine (or send it out for the quilting)?

[subscribe2]
Valentine’s Super Shake

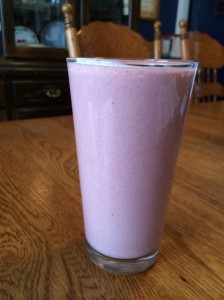
I interrupt all these fun paper arts ideas with an easy, awesomely yummy, super good for you recipe in honor of Valentine’s day. I made this wonderful Valentines Shake for breakfast (after my Barley Max – so I did get my greens, even though I didn’t put them in this, this time.)

Valentine's Shake (Strawberry Cacao) ~ from Me & My House (recipe at link)

  •  1 cup raw milk (homemade Almond milk or if you use, raw Goat’s Milk)
  • heaping Tbl. Hemp Seed
  •  big handful frozen Strawberries (organic)
  • frozen Banana (mine was huge, so actually about 2/3 banana)
  • a tidge of raw Cacao Powder (overfull tsp.)
  • homemade Vanilla (about a tsp.)

Mmmmmmm good.

Make and enjoy!

See my Valentine’s post on my B4God.org site.

Valentine’s Day Cards

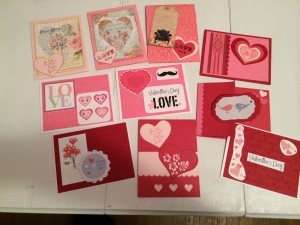
A few of the simple cards I made for Valentine’s Day. The stamps I ordered were back ordered, so I decided to primarily use print outs. Makes for very fast and simple cards.

Valentine's Cards ~ from Me & My House

Most of the cards have an embossed layer with the word love repeated all over the layer. 3rd from the left in the top row has argyle embossing. The larger hearts were cut out on my Cricut, smaller ones (or better IMO) and minis were punched. The card with the birds is a swing fold made with the shim I designed last week and Spellbinders Labels 4 die. Scallop edge is EK Success (my favorite punches.) [affiliate links] The print outs are from:  (sorry I don’t have a link for the first 2), 3rd top Ephemeras Vintage Garden, I think the rest are all from Happy & Blessed Home. (Upper right and middle bottom have no printables.)
Many more Valentine’s printables linked on my Pinterest page, if you still need to make some quick Val’s Day cards.


[subscribe2]