Revisiting Not Milk

It’s been several years since I posted our experiments in making milk substitutes. We have been dairy-free for close to 20 years. Over those years we have tried soy milks, rice milks, raw goat’s milk and many others. For the last at least couple of years we have landed at homemade Almond Milk, (with raw goat’s milk being my 2nd choice.) So it’s time to do an update on making Not Milk, in this case, the easiest and highly healthful Almond Milk.

  • 1 cup Raw (organic) Almonds
  • 6 cups Purified Water

Soak Almonds in 2 cups Water several hours (overnight).

Drain and rinse well.

Put soaked Almonds and 4 cups water in high performance blender, and blend 45-60 seconds.

Pour through a Nut Milk Bag (or Unbleached Cheesecloth) into large bowl (I use an 8 cup Pyrex / Anchor Hocking measuring pitcher). Squeeze all the Milk out and pour into a 1 qt. covered pitcher or jar and Refrigerate.

Almond Pulp (remaining in bag/cloth) can be sealed in a container and refrigerated or frozen to be used in desserts, or dehydrated and ground into Almond Meal/Flour.

Options:

Tip! If you desire a “whiter” milk you can peel the almonds after draining and rinsing. Rub each almond between your fingers to remove the peel.

Tip! You can flavor the milk with Real Vanilla (bean, extract, flavor) if you desire.

You can also sweeten it with Raw Honey, Real Maple Syrup, or Dates. Just stir in the Honey or Maple Syrup after blending – about 2 tsp. – 2 Tbl. depending on how sweet you want it. Some also like to add just a dash of unrefined salt.

To sweeten with Dates, add 3-4 pitted dates, cut up, to the blender and blend with the almonds. If adding the dates, you will get more of a cream color, even if you peel the Almonds.

[subscribe2]

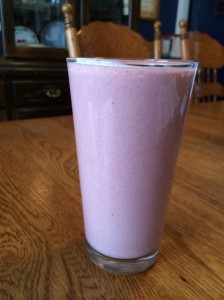
Valentine’s Super Shake

I interrupt all these fun paper arts ideas with an easy, awesomely yummy, super good for you recipe in honor of Valentine’s day. I made this wonderful Valentines Shake for breakfast (after my Barley Max – so I did get my greens, even though I didn’t put them in this, this time.)

Valentine's Shake (Strawberry Cacao) ~ from Me & My House (recipe at link)

  •  1 cup raw milk (homemade Almond milk or if you use, raw Goat’s Milk)
  • heaping Tbl. Hemp Seed
  •  big handful frozen Strawberries (organic)
  • frozen Banana (mine was huge, so actually about 2/3 banana)
  • a tidge of raw Cacao Powder (overfull tsp.)
  • homemade Vanilla (about a tsp.)

Mmmmmmm good.

Make and enjoy!

See my Valentine’s post on my B4God.org site.

Food Friday: Coco Balls

These are one of my good-goodies, meaning they taste great and are a great treat, but are also Good for You-Naturally!™ These are a great holiday treat, taken from Good for You-Naturally!™ Weekly Menu & Recipes ~ Level 1 – with over 60 recipes and complete menu for transitioning to whole foods that are Good for You-Naturally!™ – and Holiday Delights.

Coco Balls

Yield: about 20 1″ balls

  • 1 cup Raw Almonds
  • 1 cups Dates
  • Purified Water, to cover Dates
  • 2 Tbl. Raw Carob Powder (or Raw Cacao Powder)
  • 1 teaspoon Real Vanilla
  • ¾ cup dried Coconut +
  • ¼ cup dried Coconut
  • Optional: 2 Tbl. Raw Honey
  • Optional: 1/2 tsp. ground Cinnamon

1. Soak pitted Dates in Water to cover for 1-2 hours.

2.Remove Dates from Water. (You can save the water and use it in a Smoothie or other sweet recipe.

3.Grind Almonds to a coarse powder in food processor or blender. (Processor recommended if you have it.)

4.Blend in Carob Powder, and Cinnamon, if using.

5.Add Vanilla, Honey, and Dates,. Process till smooth. In the Food Processor, this will form into a ball after adding Dates

6.Add 3/4 cup Coconut. Stir (squish) or process in.

7.Roll into approx. 1” or so balls.

8.Roll balls in remaining Coconut.

9.Refrigerate or eat.

Tip! If you prefer a non-Coconut version, leave it and the honey out. Make a very simple version with just Almonds, Carob Powder and Dates.

Tip! This can be done in the blender, but I’d recommend doing your Almonds first. Removing them from blender. Then blending your Dates, Honey, and Vanilla (along with any of the soak water needed to make a paste.) Then mixing Almonds and Dates together by hand (truly by hand, kneading together.)


Food Friday: Cream of Broccoli Soup

Creamy soup for cold nights. A family fave with whole wheat bread straight from the oven, and a veggie tray. As always, a quick and easy, family friendly recipe that is Good for You-Naturally!™

Cream of Broccoli Soup

Serves approx. 3 (we triple this for our family of 8)

  • 3 cups veggie (or chicken) broth
  • 1 head broccoli, diced
  • 1 small onion, diced
  • 3 Tbl. real organic butter
  • 3 cups milk, homemade almond or raw goat
  • ⅓ cup whole wheat flour, fresh ground

1.Prepare veggies.

2.Cook broccoli in broth.

3.Saute onion in butter.

4.Blend above with 1 cup cold milk, till smooth.

5.Add to one more cup of milk and heat until bubbly.

6.Shake flour with last cup of milk.

7.Whisk flour and milk into soup. Cook until thickened.

If you like the cheese thing, grate a little on top of each bowl after dishing up.


Food Friday: Apple Crisp

It’s getting cold and that means some mornings we want more than just our fresh juice or green smoothies. We want warm belly. One of our favorites is Apple Crisp. I say this recipe makes 4-6 servings; we double it for our family of 7-8. But that’s for eating it by itself for breakfast, not as a dessert after supper, which you also could do. Recipe from Good for You-Naturally!™ Weekly Menu & Recipes ~ Level 1 – over 60 recipes and complete menu for transitioning to whole foods that are Good for You-Naturally!™

Apple Crisp

  • ⅓ cup Raw Coconut Oil or Organic Butter
  • ¼ cup Raw Honey
  • ⅓ cup fresh-ground Whole Wheat Flour OR **fresh ground Oat Flour
  • 1 cup rolled Oats
  • ½ teaspoon ground Cinnamon
  • 2 – 2 1/2 cups Apples, cored and sliced (about 1/4” thick) (or other fruit)

Cream Coconut Oil and Honey Lightly cut in Flour, Oats and Cinnamon (with fork – or mix with hands) Spread Apples evenly over bottom of 2 qt. rectangle baking pan (about 7×11) or square cake pan Crumble Topping over Apples Bake at 350° for 25-35 min. until Apples are tender.


Tip! Oat Flour is simple to make with Rolled Oats. Just toss Oats into the blender and blend until flour.

Tip! Double or Triple this recipe will fit in a 9X13 pan.

Tip! Make very cute individual servings, by dividing ingredients out into 1/2 pint, wide mouth canning jars to bake and serve.

Bon Appétit!


Recipe Help

Yesterday I told you that I have a ton of recipes  (no surprise, I’m sure) and that I decided I wanted “an app for that” and what I was looking for in an app. (This article will make more sense if you go back and read that one first.)

What’d I find?

After paying for the one that had no trial (Ouch!), that I like a lot of features on but it doesn’t have the customization I need, I went back to one that I really liked when I was using trial versions. But it doesn’t have ability to add new info on the iPhone and iPad versions–which are 2 different apps to pay for. Again, double Ouch! I hate paying for things double, triple–5 different apps! It was really hard to decide as various ones had various features, but no one app had all of them. So I had to work on trade-offs.

The app that had the most features for doing what I want on the computer is MacGourmet. So I went with it (as my second, make that third, paid recipe management app.) The Meal Planner, Nutritional Info, and a Cookbook Builder are “add-ons” to it; or come all together as MacGourmet Deluxe. (So glad I got a free gift card to the App Store.)

In MacGourmet, I LOVE the ease of adding recipes that are already on my computer or online. Just utilize “Services” to clip and add, making it very easy to put the right info in the right place in the template. I LOVE the ease of putting together Meal Plans–just drag ‘n drop.

Some of the added features, that I wasn’t looking for but are nice, are:

  • I can add pictures, not only of the finished product, but also of each step of preparation, if I want. I’m REALLY glad it has this feature.
  • I can mark equipment needed for preparing the recipe.
  • I can divide out prep times as needed.
  • I can add notes–including pics.
  • I can divide out the recipe ingredients into groups, such as salad and dressing, or a sauce to be added, or layers, etc.
  • I can rank recipes, and note if I’ve prepared them or not. (Good for having a category of “want to try”.)
  • I can even export the recipes and import them to the other app I bought. 🙂 (But sadly, not vice versa.)

One of my FAVORITE features is Relationships Manager. I can add Relationships between recipes. Each recipe that has “Relationships”, such as is served with, or needs another recipe to complete this one, includes links to the other Related recipes. This is great for things like: Ranch Valley Dressing calls for homemade Mayonnaise (recipe linked).  Or Chicken ‘n Noodles linked to the Noodle recipe. Or Salads linked to their best Dressing recipe. Or even “serve with”. I LOVE this unexpected feature!

I have loved quickly adding most of my own recipes that are on my computer or online. And quickly adding new recipes I find online that I’d like to try. I’ve also added several of our family favorites that from recipe cards. Adding all the recipes we prepare, that are in cookbooks or on cards, will take quite some time. But I’m thinking it’s a project for children and teens that need typing practice. 🙂

What don’t I like? If I only wanted a computer app, I don’t think I’d be unhappy about anything about MacGourmet. BUT… A key thing for me was having cross platform apps, so I could add recipes or make meal plans on my mobile devices when I wasn’t at my computer, and so I could take everything with me to the kitchen or the store.

The other app I bought does allow this, but doesn’t have the customizable features. So at this point there is not a good app group (computer and mobile) for just what I’m looking for. But I’m happy with the computer version of MacGourmet, and hoping the mobile versions have some updates in the future to allow more versatility.

More to come on the other apps I bought – and the mobile MacGourmet ones, if I decide to give them a try, even with their low reviews and the above drawback.


Recipes Recipes

I’m a true foodie. I love cookbooks. I love developing recipes. But today I’m not sharing a recipe. I’m sharing ABOUT recipes.

I’ve been cooking and collecting since I was a child. I’ve been writing and publishing recipe books since 1990.  I have an entire bookcase of cookbooks and recipes–not counting the untold files on my computer that have never been printed out.

It’s time to find a more automated way of keeping track of them. I knew there had to be “an App for that”. I went looking. I tried all the free trials I could find. I downloaded the free iPhone/ iPad ones. I paid for one that didn’t have a trial–both for Mac and iPad version. Ouch!

My perfect app would be one that:

  • is designed for very easily adding my own recipes. (I don’t need a ton more recipes that don’t fit the way I cook. But I do need a FAST way to get my recipes in.)
  • allows me to add my own categories. (I don’t prepare food traditionally, so I don’t organize by traditional categories.)
  • allows me to customize the look and layout. (at least to some degree. Visuals are very important to me.)
  • allows me to very easily pull together meal plans, for all meals (and, ideally, for me to be able to customize those meals.)
  • works cross platform, with corresponding iPhone/iPad app, so I can add recipes and meal plans to those and have them automatically all sync together, and so I can prep food from my iPad in the kitchen. (Reading the recipe to me would be nice, but not a deal breaker.)
  • includes a grocery list maker. This is not a deal breaker for me, since I mainly “cook” from our pantry, since we shop monthly from a natural food delivery. But it would be a nice, and probably expected, feature.
  • includes nutritional information? This is not a deal breaker for me at all, but again it could be a nice feature for writing my recipe books.
  • links back to original recipe, if online? Again, not a deal breaker, but nice to be able to go back to the source, especially for sharing with others.

What’d I find?

Come back tomorrow and find out!

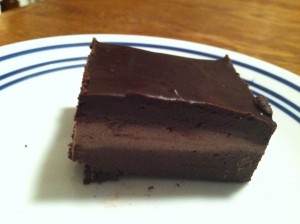
Decadent 3 Layer “Raw” Brownies

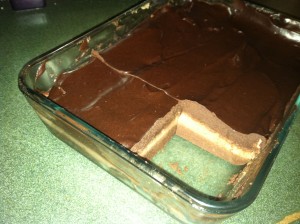
I just made the yummiest “death by chocolate” type, 3 Layer brownies. The base layer is brownie. The middle layer is a cream (almost mousse like) with peppermint. The top is ganache.  I adapted a recipe I found online. Oh, and it’s a “raw food” recipe – no baking – and Good for You-Naturally!™

It’s close enough to Friday to make this a Friday Food post, especially since so many have asked for the recipe. So here goes….

Decadent 3 Layer “Raw” Brownies

Brownie Layer

  • 3/4+ cup raw almond flour* (see below)
  • 1/2 cup raw cacao powder
  • pinch nutmeg
  • very small pinch unrefined salt

Mix together. Add:

  • 1/4 pure maple syrup
  • 1/4 tsp. pure vanilla extract (mine’s homemade)
  • approx. 2 Tbl. pure water

In food processor, add maple syrup and extract to dry ingredients, process. Gradually add water to get just wet enough to be all mixed and hold together – brownie consistency. Press into small pyrex rectangle pan.

(This is a bit different than my regular bRAWnie recipe, which would also work as a base – but the maple syrup in these is yum.)

Cream Layer

(This makes twice as much as needed for this small pan. But my food processor wouldn’t do the half-size recipe. I left half of this cashew cream without the cacao in it for another use.)

  • 1/4 cup fresh coconut milk (blend coconut meat with coconut water)
  • 2 Tbl coconut butter (Artisana brand is what I have)
  • 1 cup raw cashews, soaked
  • approx. 20-25 drops Sweet Leaf stevia drops (plain or peppermint) and
  • 4-6 drops doTerra Peppermint Essential Oil  (whatever to get the right sweetness and as pepperminty as you like – since this was my first time making this, I used a combination of these trying to get just the right mix. Next time I’ll get more precise.)
  • 2 Tbl. raw cacao powder

Process until smooth and creamy. Spread about 1/2 on top of brownies and refrigerate to set.

Ganache Topping

    • 1/2 cup pure maple syrup
    • 1/2 cup + 1-2 Tbl. raw cacao powder (told you this was death by chocolate!) 🙂
    • 2-3 Tbl. raw extra virgin coconut oil
    • 1/2 tsp pure vanilla extract
    • 1 Tbl  coconut butter

(Again I had to do a bit of adjusting, by adding a bit more cacao and the coconut butter to get a thicker consistency. You want a soft creamy spreadable texture. Not as stiff as frosting, but not runny.)

Process till soft and creamy. Spread on top and return to refrigerator.

(This Ganache would make a scrumptious fudge topping for ice cream, or frosting for cupcakes, or just eat it with a spoon.) 🙂

You could also double the brownie recipe, and omit the cream layer for a plain “frosted” brownie.

Mm-mm good.

* Almond flour – Get 2 for the price of one. I make almond flour from the pulp leftover from making almond milk. (Almond milk instructions in Good for You Naturally!™ Weekly Menu & Recipes – Level 1.) Dehydrate almond pulp till dry, then blend/process into flour.

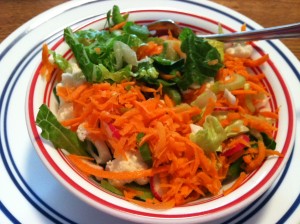
4 Day Old Salad

Yep, this salad was made 4 days ago. And it still looks and tastes as fresh as the day I made it. No rust/browning. No wilting. Great taste.

I know nutrients have been lost. How much? I don’t know; I’m not a scientist. But I do know that not as much was lost as would have been if the ingredients were still sitting in my refrigerator and then got thrown away for going bad. (OK, we’re really not that bad. We do eat fresh salads everyday. But, with baseball season upon us sometimes it is hard to find time to get them made EVERYday. This is the solution for those days.)

Want to know how? So easy! So convenient! So money and time saving!

Get the details in our NEW Freedom & Simplicity™ Guide  Salads in a Jar. A Dirt Cheap Guide that can make all the difference in the world to your health.

Get the Instructions! Give it a try! Enjoy God’s great food!

8 Guidelines for Real Food

Dr. Mercola’s 

Eight Guidelines for REAL Healthful Food

In your search for healthy food to feed your family, here is what to look for, whether you’re at the grocery store or farmers’ market. Foods that meet these standards will almost always be a wise choice:

  1. Grown without pesticides and chemical fertilizers (organic foods fit this description, but so do some non-organic foods)
  2. Not genetically modified
  3. Contains no added growth hormones, antibiotics, or other drugs
  4. Does not contain artificial anything, nor any preservatives (for fresh produce, you can now add the presence of MAP coatings or ‘edible packaging’)
  5. Fresh (if you have to choose between wilted organic produce or fresh conventional produce, the latter may be the better option)
  6. Did not come from a confined animal feeding operation (CAFO, a.k.a. factory farm)
  7. Grown with the laws of nature in mind (meaning animals are fed their native diets, not a mix of grains and animal byproducts, and have free-range access to the outdoors)
  8. Grown in a sustainable way (using minimal amounts of water, protecting the soil from burnout, and turning animal wastes into natural fertilizers instead of environmental pollutants)