Red Felt Circles or Pretty Pink Flowers {Tutorial}

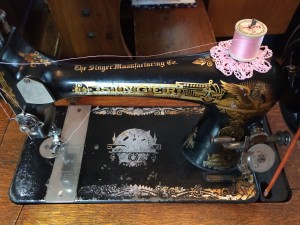
You know those little round circles of red felt on a sewing machine spool pin? Did you ever wonder what they are there for? Mine disappeared long ago, and I never worried about replacing them. Most machines I’ve ever seen or used didn’t have them, so I figured it wasn’t a big deal. I wasn’t too long ago that I found out they are to protect the paint under your spool of thread, as that spool constantly spins there. Ok, I knew it before, but I didn’t think it really mattered until I got old machines.

Now if you have a new plastic machine, your machine may not have them or need them. If you have a “modern” metal machine with the spool pin on the back, you may not care. But if you have an old metal machine with the spool pin on the top, you may decide it is worth protecting that paint. You don’t want to wear down that 75-100 year old paint any further. But perhaps you don’t really want an ugly red felt circle there either.

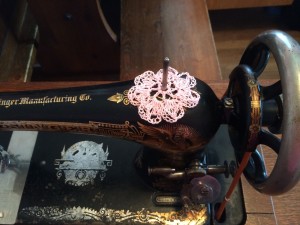
I prefer a pretty pink flower. I’d heard about and seen pictures of spool pin doilies. So much prettier than that red circle! So I decided to make some to dress up my old ladies. Even when those ladies themselves have seen better days, like Jocabed, my 122 year old Singer 27, this pretty little doily can dress her up far better than a red felt circle could.

Spool Pin Doily {crochet} ~ from Me & My House

Spool Pin Doily {crochet - tutorial} ~ from Me & My House

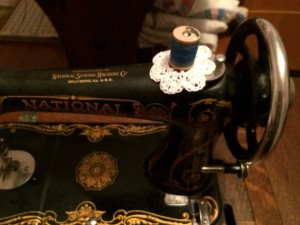
Perhaps you think there should be other flowers in this garden. I didn’t stop at just pretty pink flowers. I decided to make some white ones out of #10 bamboo crochet thread (on Natalie, my 90 year old National 2 Spool).

Spool Pin Doily {crochet - tutorial} ~ from Me & My House

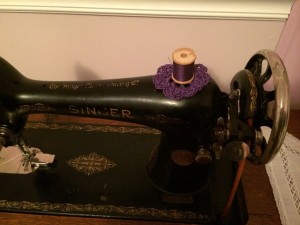
And I tried a purple one out of #3 cotton crochet thread, because that’s the only size they had of purple, (on Ruthie, my 85 year old Singer 66). I wasn’t as thrilled with the #3 thread. Too thick, IMO.

Spool Pin Doily {crochet - tutorial} ~ from Me & My House

If you’d like to make some Spool Pin Doilies for your sewing machine – new or old, you will need #10 crochet thread and a size D crochet hook. You can download my instructions /pattern. FREE to use, just don’t copy, repost, or claim it as yours. Instead share a link to this post (not to the file) so your friends can get their own Free Pattern. Thanks.

Enjoy!

[subscribe2]

SaveSave

What Goes Around Comes Around {How-to}

Years ago I crocheted many baskets, rugs, and other accessories from fabric strips. The rotary cutter, mat and acrylic rulers made it sew easy to create yarn from fabric. That trend ended and I haven’t cut fabric yarn since.
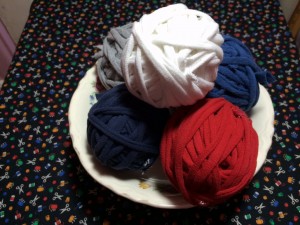
T-shirt Yarn How-to ~ from Me & My HouseBut it’s back! especially in the form of the new trendy T-shirt yarn. Same idea. New twist. With a stretchier yarn. And an even newer tool that can help (even though I don’t have one yet.)

T-shirts. They seem to multiply in the drawers. Our children (hopefully not we) outgrow them. The images start to fade or flake off. They stretch out into weird shapes. So what to do with them? You hate to throw them away, unless they have holes or huge stains.

You could throw them in the rag bag. But there are some better uses. We’ll look at one today, since we’ve kind of been on the yarn theme, and some others at another time.

Just like I strip cut those woven cottons, years ago, we can strip cut these cotton jerseys today, and not even have to buy new fabric yardage to do it.

Here’s how:

1. Line up the bottom of the hem and cut the hem off.
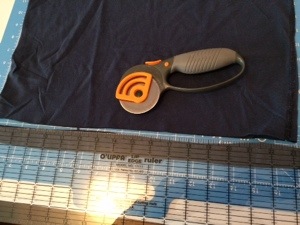
T-shirt Yarn How-to (1) ~ from Me & My House

Tip: T-shirts without side seams are best, but ones with side seams work too.

2. Cut evenly spaced strips (1/2″ – 2″ wide, but 1.5-2″ better for braiding than knit or crochet) across the width of the T-shirt. BUT! stop the cuts 1″ from the side furthest from you. IOW, do NOT cut clear across the T-shirt to produce individual rings of fabric.
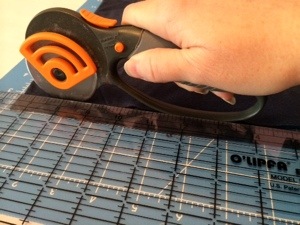
T-shirt Yarn How-to (2) ~ from Me & My House

I’ve cut at 1″ and 3/4″. I measured the “Fettucini” jersey knit “yarn” by Lion that I purchased, and it is 3/4″. I think that is a good size. 1/2″ will give you even thinner yarn, and more yards of yarn per T-shirt.
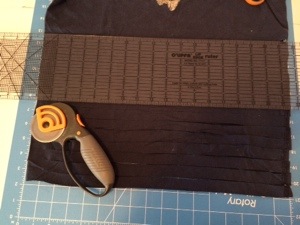
T-shirt Yarn How-to (3) ~ from Me & My House

Realize, the size of the T-shirt will determine the yardage you get from it. Using small children’s T-shirts will require quite a few to get enough yardage to make something. So if you don’t have a lot of T-shirts the same color, you will get a scrappy striped effect. From a men’s small T-shirt, I get about 25 yards of 1″ wide, and 36 yards of 3/4″ wide strips.
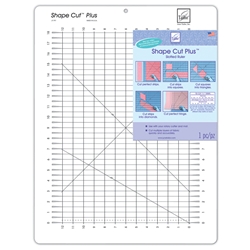
shape cut plus
Oh, I about forgot to tell you about a great tool that can help make this go really fast and give great results. (Perhaps I about forgot because I don’t have one yet.) The Shape Cut Plus is a slotted rotary cutting guide with slits every 1/2″ to guide your rotary cutter. Make your strips 1/2″ wide or in any multiple of 1/2″ that you desire. If you plan on cutting a LOT of T-shirts into yarn, or if you do strip piece quilting, you’ll find this ruler (and others in this line) invaluable. The Quarter Cut Slotted Ruler will cut at 1/4″ increments, but is smaller, for a smaller area.


3. When you get about to the arm pit or where an image begins, cut your strip clear through to the end, cutting the top part of the T-shirt apart from your connected strips. The ink from the images will not create a good yarn. Don’t include them. This also goes for if their is any small logo at the bottom or such, cut it off before beginning your strips. And one more note, same goes for if there is a tag in the side seam. Cut it completely off, or you’ll have a hard lump there.
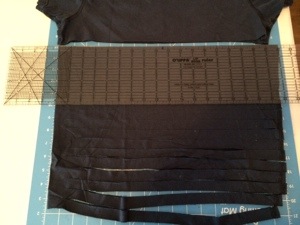
T-shirt Yarn How-to (4) ~ from Me & My House

4. Now you have several fringe-y looking strips all connected on one side.
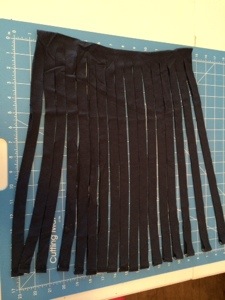
T-shirt Yarn How-to (5) ~ from Me & My House

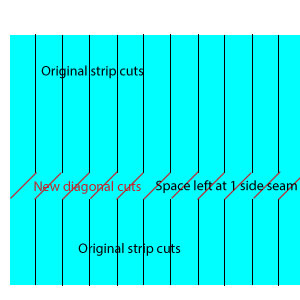
My poor illustration that may be clearer than the pics.
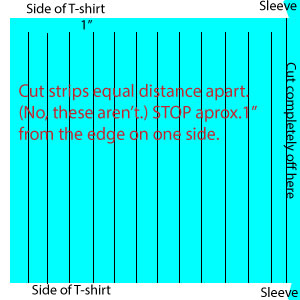
tshirt-yarn-1

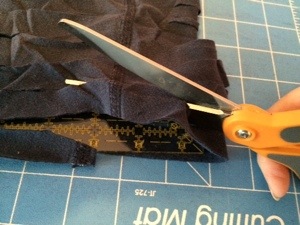
The magic happens with our next cuts to make one continuous long strip of yarn. Lay your cut piece out so you can see the whole part that is hooked together, (turn so side seams are in middle, not at top and bottom.) Begin at the left edge (where the hem was) and cut (beginning even with where the lower cuts start,) at a diagonal to the first cut where the upper cuts end.
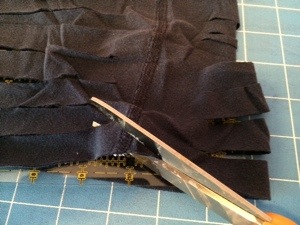
T-shirt Yarn How-to (6) ~ from Me & My House

Then diagonally lower cut #1 to upper cut #2, lower cut #2 to upper cut #3, and so on.
T-shirt Yarn How-to (7) ~ from Me & My House

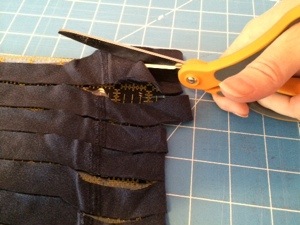
When you reach the last bottom cut, you will cut diagonally off the edge, and you will have 1 long continuous strip. (I also cut the seams off the ends, if the t-shirt has side seams like this one does.)
T-shirt Yarn How-to (8) ~ from Me & My HouseMy poor illustration that may be clearer than the pics. The shirt is turned here so the side seam (where connected), is in the middle, not along the top.
tshirt-yarn-2

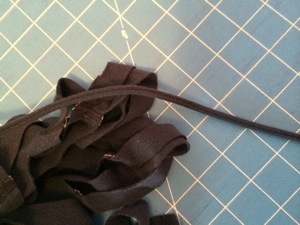
5. Stretch out your yarn, really stretch it out. The edges will curl. I grab from side seam to side seam and pull, just like taffy. Then move on to the next side seam, stretch, across the whole length of the yarn.
T-shirt Yarn How-to (9) ~ from Me & My HouseT-shirt Yarn How-to (10) ~ from Me & My House

6. Then wind yarn into a ball. Start by wrapping around a couple fingers. Wind.
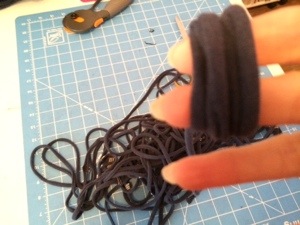
T-shirt Yarn How-to (11) ~ from Me & My House

And wind.

T-shirt Yarn How-to (12) ~ from Me & My House

And wind.

T-shirt Yarn How-to (13) ~ from Me & My House

And wind. Now you have a ball of yarn to crochet or knit into all kinds of useful things.
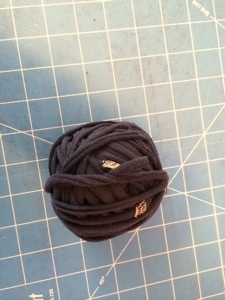
T-shirt Yarn How-to (14) ~ from Me & My House

A scarf (or the beginnings of one pictured here.) Crocheted with a size 50 crochet hook! (6 stitches per row. First row single crochet, rest double crochet.)
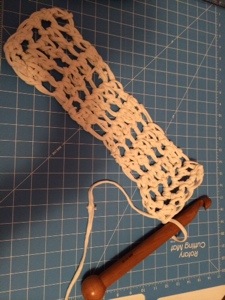
T-shirt Yarn How-to (15) ~ from Me & My House

A trivet for a hot pan, or a mug rug, or the beginnings of a floor rug. (Chain 5, slip stitch into ring, ch 3 dc 9 (making 10 stitches), join, ch 3 dc in same stitch and 2 dc in each stitch around (making 20 stitches), join, ch 3, *2 dc in next, dc in next* around, 2 dc in last. Finish off or continue for larger circle.)
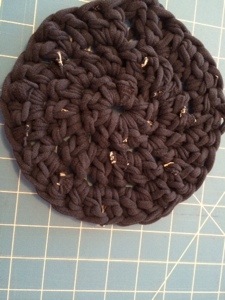
T-shirt Yarn How-to (16) ~ from Me & My House

Or dish rags.

Or a purse or tote bag.

Or ….

Don’t throw the tops and sleeves of your shirts away yet. I’ll be back with more tips for repurposing those into useful things too.

Do you make T-shirt yarn? What have you knit or crocheted with it?

Yarn, Round 2

When mama starts making things it doesn’t take long till she starts hearing, “Make me one too?” It doesn’t matter what you are making, whatever it is that you make, your lovies will want you to make them one.

While I was completing the scarves in the last post, and another as a gift, the requests came in. “Is that for me? Will you make me a pink one?” “I need a warm, winter scarf.” And that led to 4 requests.

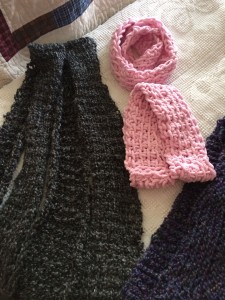
Kid’s scarves. Little yarn. Quick and easy. I can do that. But of course, I needed a different design. The arm knit produced too large of loops for small children, and wasn’t exactly a manly look. I decided on Tunisian stitch for all of them.

Tunisian Crochet Scarves ~ from Me & My House

A few months ago, a fellow yarny asked if I did Tunisian crochet, and told me I’d probably like it since it is a knit look with crochet speed. I finally decided to take a look at it. Oh! it’s just the same thing as what we used to call the afghan stitch.  Yes, I’ve done that. And yes, that’d be great for 4 quick children’s scarves. (So glad I didn’t have to learn something new to do these.) (Youtube how to videos for Tunisian foundation row and Afghan/simple stitch.)

The pink girls’ scarves are Infinity (circular) scarves in Bernat Baby Blanket, a soft minky-like yarn. The grey, boys’ scarves are done in Lion’s Homespun (Edwardian). To the right, the purple scarf, is my “practice” run in Lion’s Homespun (Barrington). Although you usually use a Afghan Crochet Hook for Tunisian crochet, since I wanted a larger stitch, I used a straight Q Crochet Hook (that I use for crocheting fabric rugs, baskets, and such.) Since I was only doing a few stitches wide, I figured the short length would be OK, and it was. (You can always wrap a rubber band around the end to keep your stitches from coming off, if you have that trouble.) The girls’ scarves are 4 and 6 stitches wide and the smaller one a little over 2.5 feet, and the larger close to 4′. The boys’ scarves are 6 and 8 stitches wide. To do it again, I’d go 8 and 10, as the Homespun yarn really curls up. The smaller boys’ is 4+’ long and the larger 5+’.

Happy. Happy. Mama gets to create. Children love what they get.

Do you do Tunisian crochet? What do you like to make with it?
What do your children/grandchildren ask you to make them?


[subscribe2]

A Yarn About Yarn

Whoever got the idea that being a homemaker is boring must not have been one or around one. We have one of the most diverse jobs in the world. It is anything but boring. Always new situations, new problems to solve, new joys to celebrate, and new projects to work on. Whatever that may be.

That said, I interrupt my posts on quilts to interject some yarn work–fancy yarn, at that.

sashayscarves

After successfully tackling a scarf for a Christmas present, a couple weeks ago I wanted to figure out what to do with some specialty yarns I have. I bought them because they were so pretty, but I didn’t have a clue what I’d do with them. I decided they’ve been sitting in my stash too long and it was time to figure that out. In trying to decide what they’d be good for, I decided to learn a new technique. Arm knitting. {Link to a youtube video that is pretty close to how I do the actual arm knitting. My scarves are my own pattern.}

Now, I’ve done plenty of knitting before, but it’s not one of my most used skills. I usually prefer to crochet, because I can complete projects quicker with it. But I have to admit, I’d never used my arms as knitting needles before. I was game to try when I saw you could complete a scarf in a half an hour. (Quick, cute, useful projects are usually good motivation for me.)

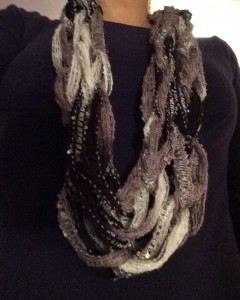
Panda Arm Knit Infinity Scarf ~ from Me & My House

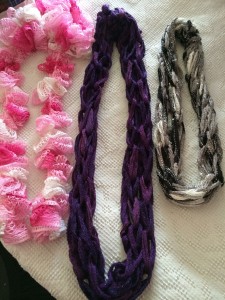
20 yards Sashay Sequins. Knit 6 chains wide, approx. 45″ long. Leave an arm span+ length for binding off, and connecting the ends for Infinity style.

I also don’t wear a lot of scarves, mainly because many of them are too bulky for me. I feel buried in them. But we all know the solution to not finding styles you like is to create your own. Necessity is the mother of invention, they say.

So I set out to solve all these problems. And I’m quite pleased with the results.

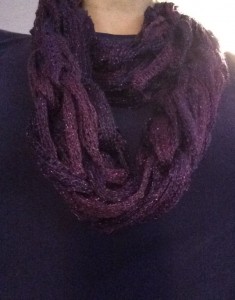
Amethyst Arm Knit Infinity Scarf ~ from Me & My House

30 yards Sashay Metallic. Knit 6 chains wide, approx. 5′ long. Leave an arm span+ length for binding off and connecting ends to make Infinity style scarf.

The yarns I started with were Sashay (Tutu – Pink), Sashay Sequins (Panda- Black & Grey) and Sashay Metallic (Amethyst). I saw that yes, arm knitting is pretty much like regular knitting, only using your arms as knitting needles. And yes, you really could complete a scarf in 1/2 hour. And yes, I could modify them to suit my style and I’d actually wear them. Talk about win-win-win!

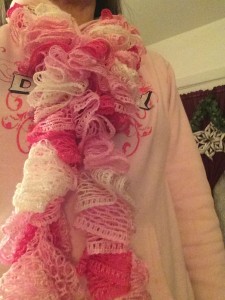
After doing a couple arm knit infinity scarves–a longer one that would double loop, and a shorter one that will just single, I decided I wanted to do something different with a third Sashay (the “plain” one) I had on hand. I wanted for more of its own design to show through, so decided to crochet it into a ruffle scarf. I love the way it turned out too. {A youtube video on how to crochet Sashay yarn. I didn’t lock the chains or use near as many loops as she did.}

Chrocheted Ruffle Scarf ~ from Me & My House

30 yards “Tutu”, I *think* I did every other hole, and 5 links per single crochet. (10 made it way too full and short.)

All this playing with yarn even motivated me to organize all my yarn and gather all my needles/hooks and patterns back together into one place. Which led to a couple little girls asking when I was going to make scarves for them, pink ones. And a couple boys saying they could really use scarves for the cold weather. So stay tuned for part 2 of this “yarn”.

Have you ever arm knit? If so, what did you make?

Helpful Hearts

I’m taking a little detour from paper crafting in this post. The cards I need for this month are done, and I need to prepare for a crochet class I’m teaching. In keeping with the Valentine’s theme that I started with cards last month, (but didn’t get pics of,) I’ve designed a fun Valentine’s project.

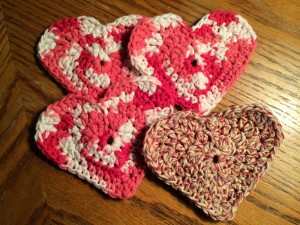
I’ll be teaching beginners how to crochet, and we’ll be making Heart Coasters. They’re easy enough for anyone who has learned the basic stitches, and a fast project for beginners to complete without getting overwhelmed. And they provide a handy, furniture-saving place to put your glass or mug. They’re crocheted with Peaches & Cream cotton yarn.

Crocheted Heart Coasters ~ from Me & My House

You can make some too. Download my instructions here. FREE to use, just don’t copy, repost, or claim it as yours. Instead provide a link to this post (not to the file). Thanks.

Hope you enjoy them.

Entered at the All Things Valentines Link Up at Joyous Notions. Check it out for All Things Valentines.


[subscribe2]