Valentine’s Day Cards

A few of the simple cards I made for Valentine’s Day. The stamps I ordered were back ordered, so I decided to primarily use print outs. Makes for very fast and simple cards.

Valentine's Cards ~ from Me & My House

Most of the cards have an embossed layer with the word love repeated all over the layer. 3rd from the left in the top row has argyle embossing. The larger hearts were cut out on my Cricut, smaller ones (or better IMO) and minis were punched. The card with the birds is a swing fold made with the shim I designed last week and Spellbinders Labels 4 die. Scallop edge is EK Success (my favorite punches.) [affiliate links] The print outs are from:  (sorry I don’t have a link for the first 2), 3rd top Ephemeras Vintage Garden, I think the rest are all from Happy & Blessed Home. (Upper right and middle bottom have no printables.)

Many more Valentine’s printables linked on my Pinterest page, if you still need to make some quick Val’s Day cards.


[subscribe2]


Flash Cards

I’ve been having fun making flash cards this week – and I don’t mean the kind you drill children in educational facts with. I’ve been making greeting cards with the Flash Card and Flash Card 2.0 templates by Connie Stewart. Flash Cards are rectangles of card stock that you pre-cut and have on hand to create cards in a flash. You’re able to create 8 cards from 1 sheet of colored card stock and 1 sheet of neutral card stock (plus card bases).

I’ve created a few of each – modifying Connie’s designs to fit my supplies and likes. Take a peek at some of them.

Flash Cards

"Flash Cards" made with Connie Stewart's template ~ from Me & My House

Connie’s videos that provided inspiration for these: left to right –  (gatefold)  Tri-Fun Fold, (shadowbox) Stand-Up.

Flash Cards 2.0

"Flash Cards 2.0" made with Connie Stewart's template ~ from Me & My House

Top row, my own design. Links to Connie’s videos that provided inspiration for cards on the bottom row, left to right: Amazing FriendSoft n SweetHappy Valentines.

Where do you get inspiration, when making cards? Have you ever used Connie’s Flash Card templates. If so, post below.


[subscribe2]

Men’s Cards – Birthday & Sympathy

The beginning of the new year brought a birthday and a death that we wanted to send our thoughts and prayers for, both for men. I designed the cards in a similar way, and with some of the same supplies, but appropriate for each. Both were simple, classic, “manly” designs.

Simple, classic, Man's Birthday Card ~ from Me & My House

Sympathy card - masculine, simple, classic - from Me & My House

I really like the deckled rectangle dies (Spellbinders Nestabilities) for using on men’s cards in particular. The classic vertical and horizontal lines work well for men’s cards also. Embellishments are kept very non-intrusive, leaving the sentiment to take the focal point.

Products used for these cards are:

Top card: Cream card stock (Recollections) base and rectangle, green plaid layer and woodgrain vertical strip from Christmas & Winter Stack DCWV. Memento Rich Cocoa ink. Inakadinkado stamps: “Crosses Inchies”, and “Birthday Wishes” sentiment.

Bottom card: Pure Chocolate Card base, Cream layer and rectangle, Old World Card Stock Stack layer (DCWV), Heirloom Stack (DCWV) vertical strip. Rich Cocoa ink. Stampabilities “Card Phrases” sentiment. Brown satin 3/8″ ribbon.

[subscribe2]

Tri-shutter Shoes Card

My almost final card for 2013 is for another daughter’s birthday. (Still one more to go before the end of the year.) I’ve been wanting to use the Tri-shutter fold for a while now, so that was the easy part. Choosing paper wasn’t as easy. I wasn’t able to get anything specific for this (oh, the ideas I have,) so had to go with what I had. (Yep, need to use the wonderful stash on hand.) I was happy to find something with shoes on it in the stack (I love,) Kellerkurtz & Company by Paper Studio. (All my girls love shoes. So does their mama.) Anyhow, I started with shoe paper and just started adding pretties that I thought she’d like.

Tri-shutter Shoe Card ~ from Me & My House

The card base is from the Old World stack from DCWV. I liked the combo of the red and neutrals. (They are generally her faves.) To make the Tri-shutter, cut the 12×12″ in half (6″x12″), then score on the short side at 2″, 4″, 8″ and 10″. Accordion fold the card and crease with your bone folder. (Look familiar? Same as Double Z card, up to this point.) Then open, and cut (on the long side) between the 2″ score and the 10″ score at 1.5″ inches from both long edges. Then refold with your middle section going the opposite direction as your top and bottom ones. Re-crease with your bone folder.

Tri-shutter Card ~ from Me & My House

You may choose to mat different places or sizes than I did (measurements above). They aren’t all standard, but I had my reasons. I rounded the corners and inked the edges of the mats, and inked the card base too.

The embellishments on the front start with a metal flower from Queen & Co. with a flat back pearl center, and 4 small tags from a printable from Eclectic Anthology, attached with a “Love” brad from the Prima Engravers collection. The stamped key is from Prima Engravers collection. It is heat embossed and has a flat back pearl also.

Tri-shutter Shoe Card ~ from Me & My House

Inside, the “31” number tiles and gemstone with a shoe on it are both from Paper Studio. I took the postcard from a printable from The Graphics Fairy and added the Scripture verse to it and printed it out, then stamped it with Birthday Wishes from Inkadinkado and Flourishy from Recollections. It is mounted with foam “pop” squares on the Kraft card stock (from Recollections). The “Cherish” and “Memories” stamps are from Studio G. All the above are stamped in Rich Cocoa from Memento. The flowers are from the same Prima set as the key and are stamped in Bright Pink Stampabilities dye ink.

On the last page, the chandelier is from the same stamp set as “Cherish”. It is heat embossed, and it and the shoe are blinged with “diamond” gems. (I had every intention of putting these shoes on the front and the others on the back, but mis-glued and didn’t want to start over. Shh. Don’t tell her.) The bookmark and the pocket for it (cut from another bookmark) are a free printable from Janet K Design. I Mod Podged the  bookmark so it would hold up better. The red bling is from Queen & Co. Everything is inked in, you guessed it, Vintage Photo Distress Ink from Tim Holtz.

I think I was getting predictable this week, but it goes to show you that you can reuse the same paper stacks, stamps, inks and even embellishment packs and get totally different looks from them. You don’t have to have a lot to do a lot.

What is your current go-to–whether that be paper stack, ink, stamps, punches or whatever? What do you find yourself grabbing time after time?

[subscribe2]

ThanksGiving Place Cards

ThanksGiving Place Cards ~ from Me & My HouseThis afternoon, my only daughter left at home and I started nailing down details for ThanksGiving dinner. We will have 29 people at our house, so we have to pre-think the logistics a bit. She commented that we should get the place cards done today, so it wouldn’t be a last minute rush. My girls enjoy doing things like that. I’m glad.

I told her I had a few new little stamps for Fall/Thanksgiving, that I’d picked up from the dollar bins, that we could use. So we started designing.

We worked together, but I was also working on other (Christmas) projects, so she did all the stamping, inking and gluing. (I made the name labels, cut and scored.) So THANK YOU Shekynah, for all your help making some great place cards for this year’s table.

The card base is dark brown card stock (Colorbok) cut 7×3.5″, scored and folded in half. The mat and label are cut from Ampad Earth Tones card stock. The mat is 3.25″ square. The Harvest-Give Thanks and Be Merry stamp, and the pumpkins and leaves stamps are Studio 112 (2 different mini sets). Edges are inked in Vintage Photo (Tim Holtz Distress Ink,) and corners of the mat punched with Tonic Studio ticket-tag punch. I typed all the names into a table in Pages on my computer, (with the rectangles a bit larger than my punch,) then printed them and punched them out with the EK Success Photo Labels punch. All layered together with my ATG gun.

I was actually pretty impressed with how fast these all went together. I told her, “Wow, if we can do these this fast, maybe we could make homemade Christmas cards.” 🙂 She agreed. She likes to make cards.

So much for having all my cards for the year (except that one last one for the very end of the year) done last week. But we had a great afternoon doing it. And it took far less time to make all those cards today than the one card that I will be sharing with you next week. Well, actually, the one next week took a lot longer design time than the design and making of all of today’s cards.

See all the cards I’ve posted.

[subscribe2]

Happy Birthday Dad

Typing Memories Card ~ from Me & My House

Some of my earliest memories are of my father typing. My dad was a pastor and when I was a child, when asked what I wanted to do when I grew up, I’d reply, “I’m going to type, type, type, and work, work, work and shut the door and not let anyone in.” Evidently I remembered the times when dad needed some peace and quiet in our home with 5 children, but I wanted to be like him. 🙂

Thus the inspiration for my card for my dad’s birthday today. My dad is also an avid reader, so the “book page” background was a natural too.

Inside I included a few other goodies that remind me of him or seemed to go well, the car 3¢ stamp, bicycle, and compass gem with “Enjoy the Journey” stamped. I also had to color the bicycle seat red (just because.)

Typing Memories Card (inside) ~ from Me & My House

The front paper mat is from the same stack I used on the last card, Heirlooms from DCWV. I cut the corners of it and the inside mat with the ticket punch from Tonic Studio. (Yep, I must’ve had it before I did the tags on the last card. It is a double punch–tag and ticket.) Card base is Recollections Kraft card stock from Michael’s. Card stock for stamps and interior is from Ampad Earth Tones (from Walmart). Edging in Tim Holtz Vintage Photo Distress Ink. Stamping with Rich Cocoa from Memento, (I think. See previous post.) Christmas Green is only dark green I have, a Stampabilities pigment ink from Hobby Lobby. Most of the stamps are Stampabilities from Hobby Lobby: Typewriter and “TYPE” from Typewriter set, 3¢ car stamp from Time & Travel set, bicycle from Vintage Outdoor set. “Enjoy the Journey” is from Recollections (I don’t see a name on it). “Memories” is from Studio G. “Happy Birthday” is from Hero Arts Many Birthday Messages. The Compass brad is from the Prima Engravers collection. The wood buttons are Hobby Lobby (see last post.) I tend to not mention ribbons, but they are usually from Walmart, Hobby Lobby, or JoAnn’s.

Again, being a man’s card, I didn’t heavily embellish it (even though I know this one will be saved.) I love that it so represents my dad, and hope he enjoys it (and doesn’t open his internet until after he opens his card today.)

I’d love to see the men’s cards you’ve made.

See other cards I’ve made and posted.


http://teachinggoodthings.com/blog

[subscribe2]

Twist & Turn Card

I’ve finished the last (3) of the cards for a while. (One left for this year, at the very end of the year, and I’m not making it ahead of time, because she lives here and crafts with me.) 🙂  I can only share one today though, because the other two haven’t been given yet, and are both to people who may possibly see these posts. So stay tuned.

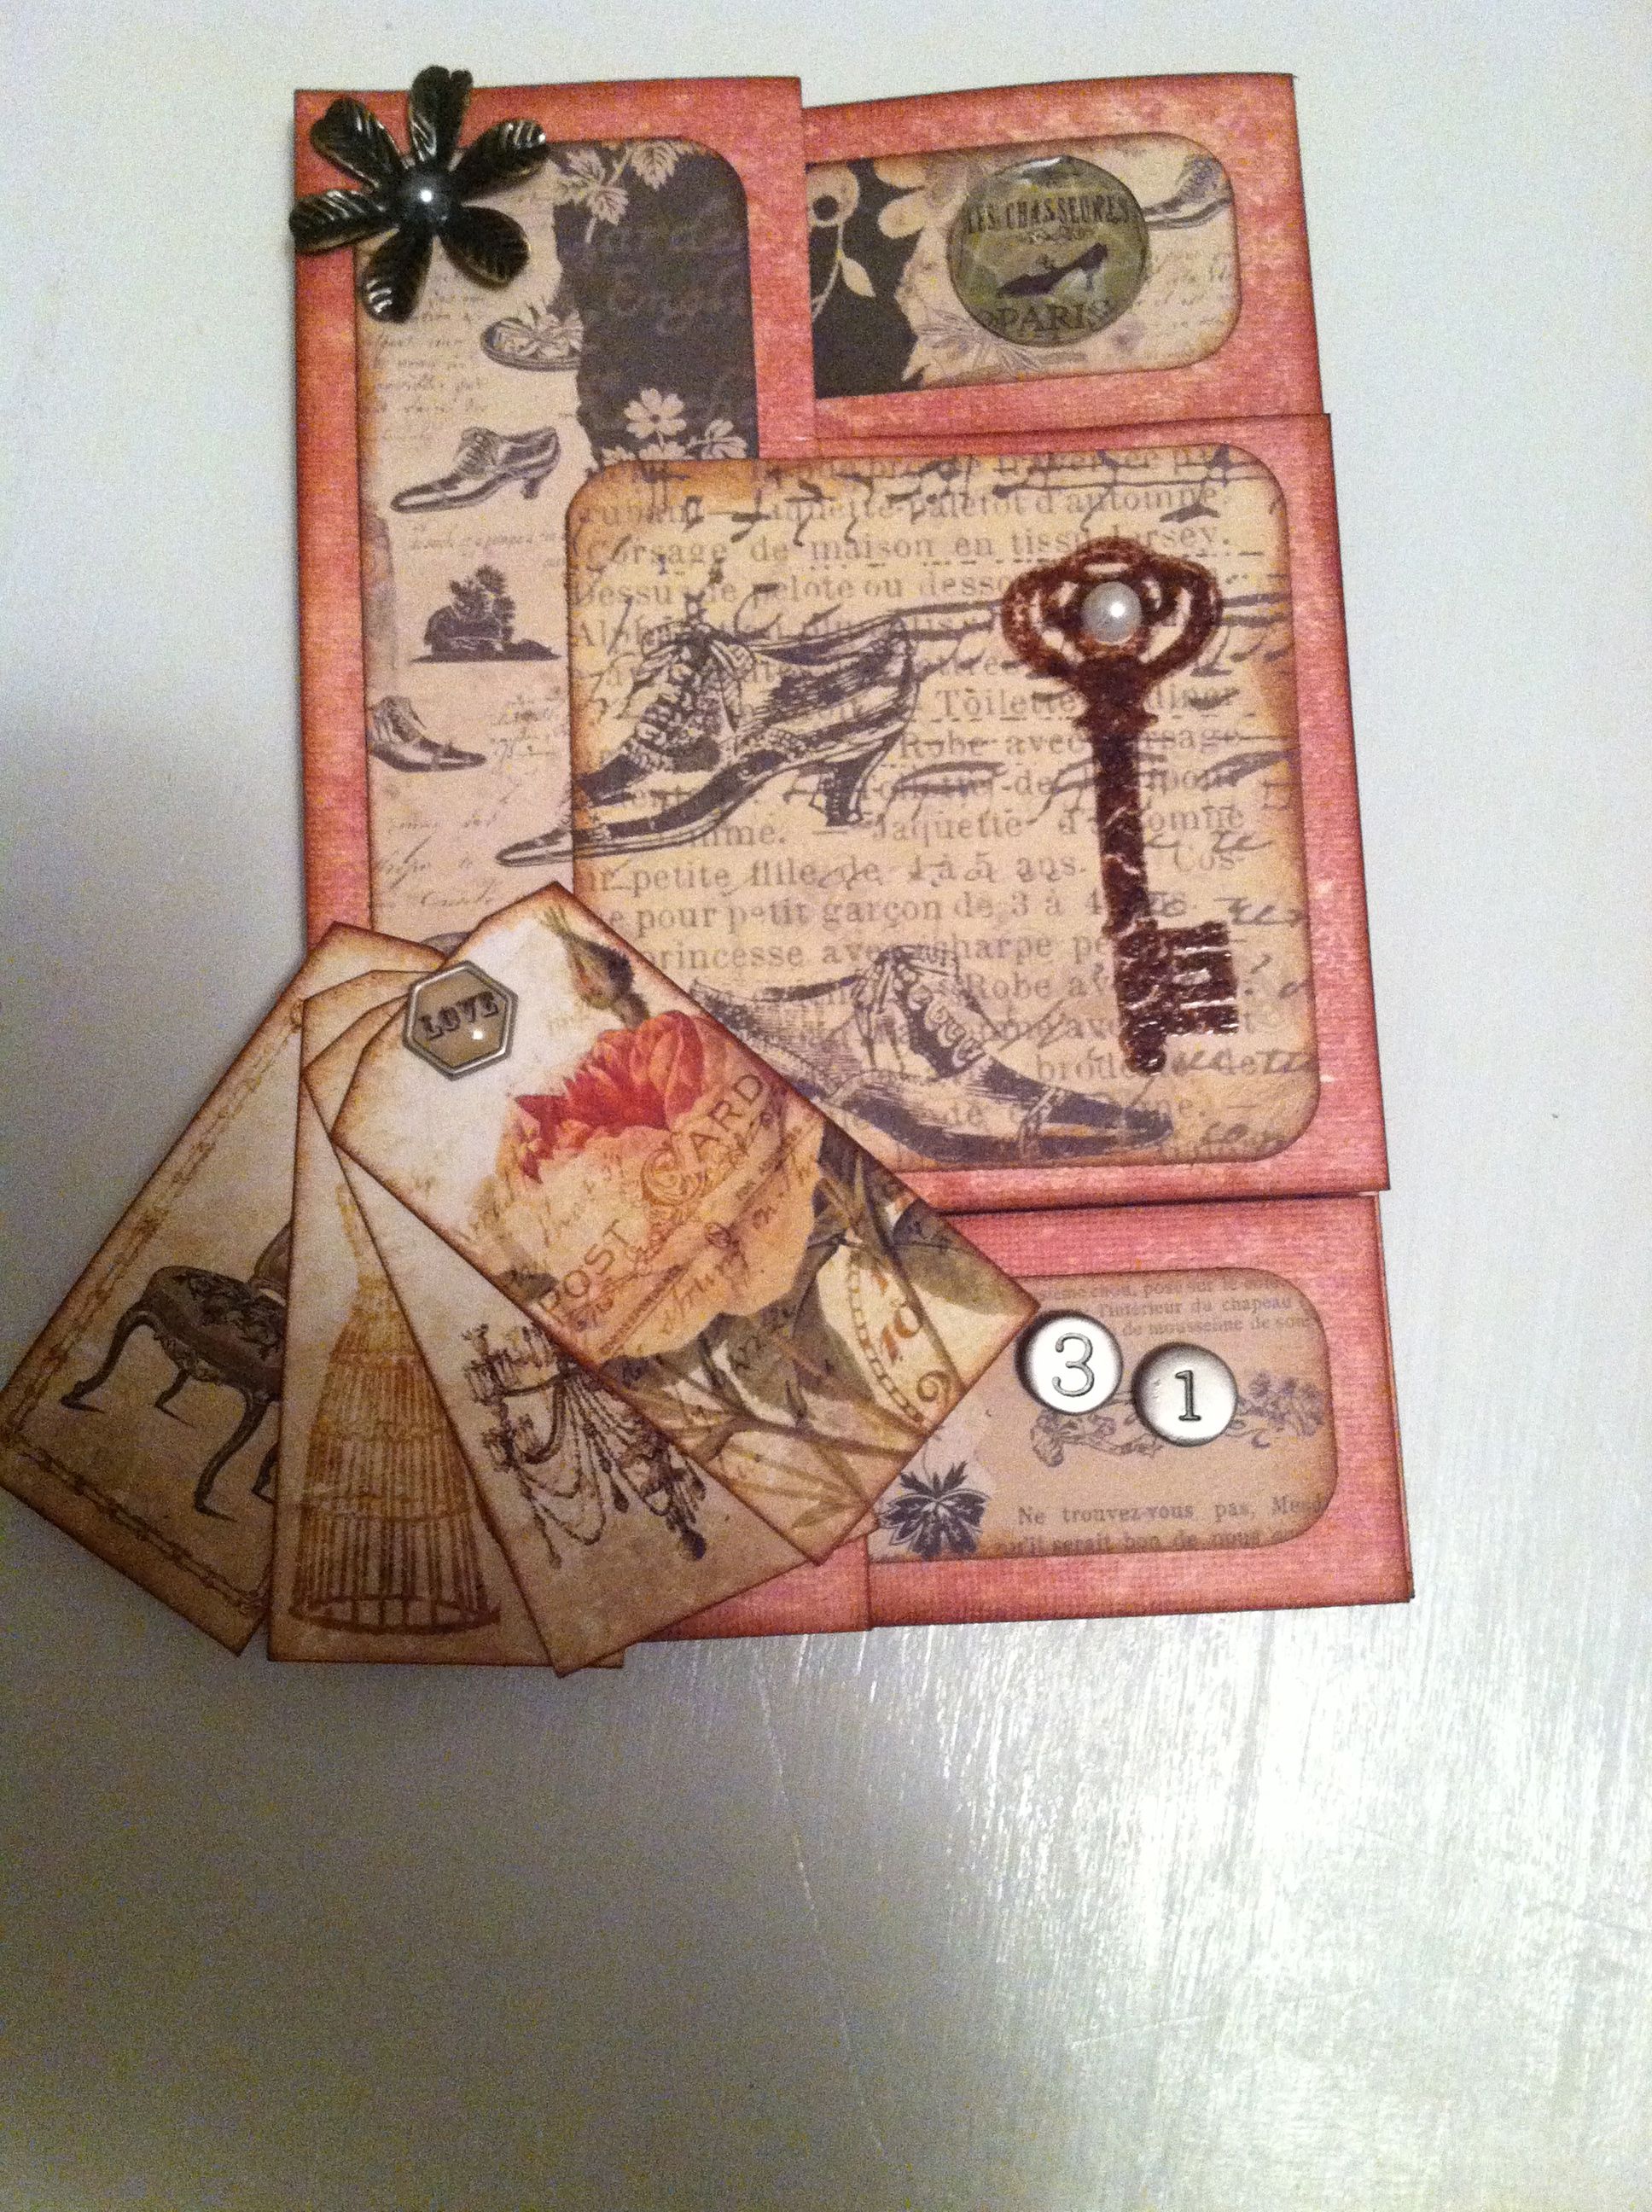
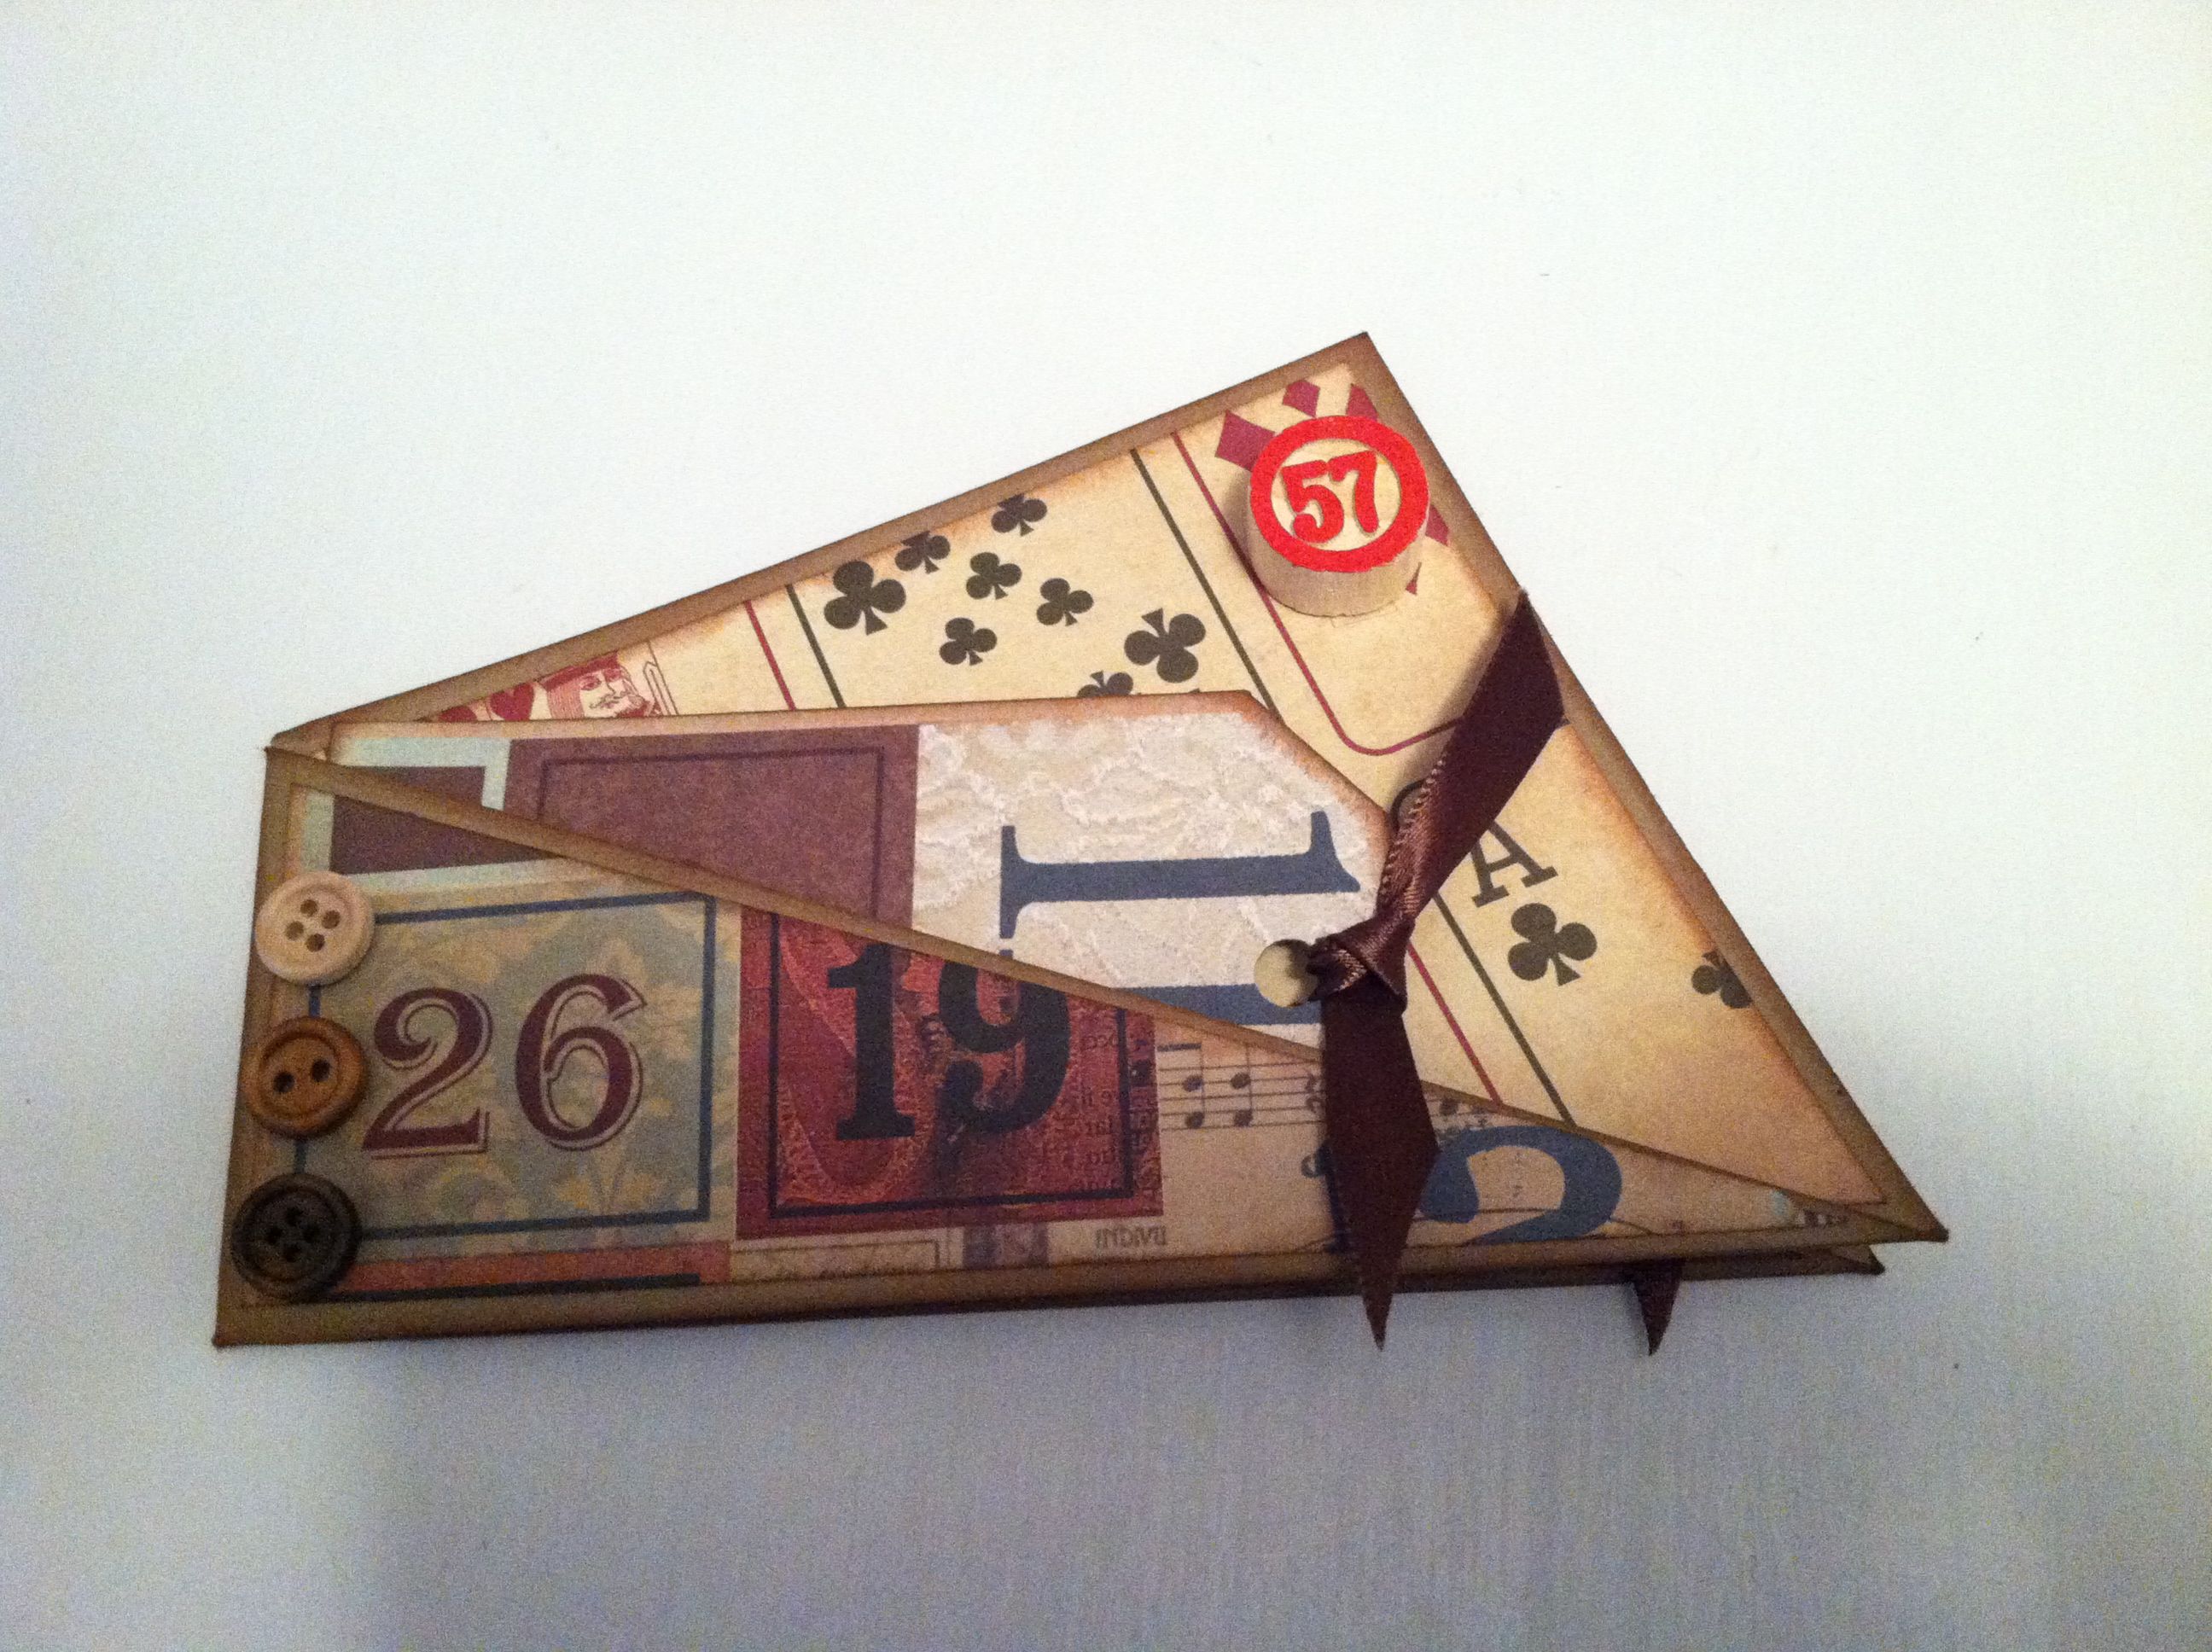
Today’s card was a fun one to make. It’s a twist and turn card, that is easy to do but creates a unique, fun shape and design. It just opens normally, (but people wonder and try to do differently.) 😉 I put tags in both pockets, but it is great for a gift card too. I’ve also seen it online with a large die cut on the front, rather than using it as a pocket.

Number Twist Card ~ from Me & My House

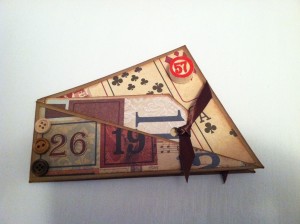
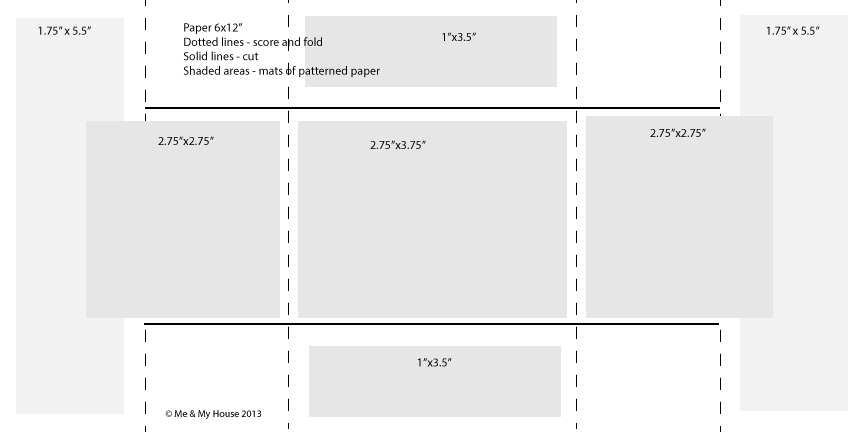
The base is a simple half-sheet of 8.5×11″ card stock, cut 4.25×11″. (I used Recollections Kraft from Michael’s.) Score on the diagonal. Lay so the length is horizontal, then fold left (large) side up and crease with bone folder. Then score in half vertically, fold and crease with your bone folder.

Need a visual?

Twist 'n Turn Card ~ from Me & My House

I matted all 4 sections with “pretty paper”. The lower mats are cut from 2 pieces, each 2×5.5″, cut on the diagonal from top left corner to lower right corner. If your paper does not have any directional pattern to it, you can use just one piece and use the 2 cuts, 1 for the front, one for the inside. My paper had direction, and I wanted 2 different designs, so 2 pieces. (And yes, I wanted the Bingo board to go sideways, so you could better see what it is.)


The upper mats are cut from 2 pieces, each 4.5×4″. The cut is made on the 4″ side at 2″ (the middle) of the left side down to the lower corner of the right side. You will use the top part of this piece. You can use plain (instead of patterned) paper or card stock on the inside if you’d like to put your sentiment there. I put my sentiments on the back of my tags.

I also chose to mat the left of the inside of the card. Typical you may not do that, but if you’re like me and want to, you’ll need a piece 5.5×4″ and will need to cut off the bottom and the right side at angles. (I don’t have measurements, I just marked and cut it to fit.) And I chose to make tags for the pockets. I believe they were 2.125×4.25″ and cut 1/2″ over and down on the diagonal–or maybe I had my Tonic Studios tag (angle) punch by then and used it. The mats for them were 1/4″ smaller in length and width.

Number Twist Card ~ from Me & My House

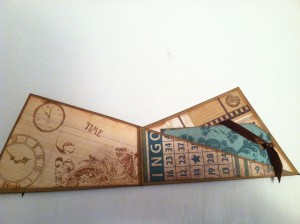
I matted each place with a different patterned paper, as my emphasis was numbers. The receiver and their family continually joke about age, so the sentiment on the back side of the tag in the front pocket was “It’s just a number! Happy 57th.” (The other tag has our signatures on the back.)

The papers I chose are from DCWV Heirlooms stack. Edges are inked in Tim Holtz Vintage Photo Distress Ink. The embellishments are: Bingo number, brown buttons (in a glass bottle, so cute,) and Clock gemstone from Paper Studio. The stamps (on the left inside) are from 3 different sets, and stamped in Rich Cocoa from Memento. (I think. If not, they’re also Vintage Photo) Pocket watch: Stampabilities “Time & Travel” set, “Time” and clock: Fiskars “Journey” set, 36 and #25 with flowers in urn: Kaisercraft “36” edge stamp.

Hope you enjoy my fun little “Numbers” card. If you make (have made) a Twist and Turn card, I’d love to see it.


[subscribe2]

SaveSave

Amazing Grace Card

There’s something about being constrained to letter writing, not texting, not emailing, but real paper, envelope and stamp letters. More time, thought, and prayer goes into the process. The same can be said when that time and thought goes into designing a special card that is uniquely for that person. Today I did both for someone special to me and my family (a relative.)

I designed and made this card today for a new believer. No embellishments, just printed out and stamped, because 1) it’s for a man, 2) situation.

Amazing Grace Card - from Me & My HouseAmazing Grace Card - from Me & My House

Cards can be just as meaningful whether they are elaborate like the one from yesterday or simple like this one.


[subscribe2]


Victorian Card

Our daughter’s card was my design challenge this past week. I knew I had to use the buggy stamp set for the baby card. Grandma’s card came together pretty easily, although I did change it at the last. But I didn’t know at all what I was going to do for this one, except I wanted 2 things, a different fold to it and to make it Victorian-y–I had new tea pot and birdcage with bird stamps I knew were “her”.

Victorian Birthday Card - from Me & My House

I began with the double Z fold card foundation from a damask looking card stock (Old World collection from DCWV). (See scoring measurements at this post.) Next I began looking through my printable downloads, and decided rather than just matting the sections of the card, to add some elements instead. The card on a card and tags just grew from there.

Victorian Birthday Card - from Me & My House

The front has a card on the card, with a teapot (Michael’s–Timeless Traditions) and sentiment (Fiskars–Latte Love) stamped inside (and colored with my Copics). I also aged the paper with Antique Linen, (Tim Holtz Distress Ink). Pink ribbon and flat back pearls finish that part.

Victorian Birthday Card - from Me & My House

In the first opening, I cut out the tags from this printable, from Astrid’s Artistic Efforts, Freebie page. I stamped the birdcage, birds (Stampabilities–Vintage Outdoor), and sentiment (Inkadinkado–Birthday Wishes), and colored with Copics, added the key (7 Gypsies,) ribbons, flower (Paper Studio), and gems.

Victorian Birthday Card - from Me & My House

The next opening got 3 stamped and colored roses, a narrow side pocket (cut from printout) for 2 tags (also printouts), that I dressed up with some ribbon and pearls, then aged the backs with Vintage Photo Distress Ink, and signed.

Here’s the whole card opened out.

Victorian Birthday Card - from Me & My House

I loved working on this card, and probably could have continued dressing it up. But it was a card after all. 🙂

[subscribe2]

Girly Cards

Yes, a few more cards this month–all girls–a new grandbabe, our daughter, and my dad’s wife.

These cards gave me a chance to use my new Copic markers (that I said I would never get) that I got at an insanely cheap price, so did.

Baby Girl Card - from Me & My House

Baby Girl Card inside - from Me & My HouseI love this old buggy stamp (TPC Here Comes Baby set) that I used for our new grandgirl’s card. I cut the frame with my large floral oval die in my Cuttlebug, then stamped the buggy and colored it with my Copics. Inside I used the dress, shoes, bow and “Bundle of Joy” stamps from the same set, coloring the dress, bow and shoes.  I printed the Welcome on another small floral oval die cut, and popped it up with a foam square. The rattle on the envelope is from the same stamp set and colored. I LOVE this card and how it turned out, and was OK with my first attempt at using the Copics.

Lady's Birthday Card - from Me & My House

Lady's Birthday Card inside - from Me & My HouseGrandma’s card was stamped with a large rose background stamp (InkadinkaClings Vintage Flora) and floral frame with sentiment (Inkadinkadoo Birthday Wishes). The corners were cut with a Fiskars fancy corner cutter (3 in 1 Corner Punch – Lace), and the popped up flower is a K & Company (Susan Winget Floral Layered Accents) die cut. I finished the outside with pink ribbon tied around the card, and flat back pearls. Inside the card I stamped another sentiment, and a smaller rose that I colored with my Copics.

The back of each card received the Handmade with Love stamp. 🙂

Check back tomorrow for our daughter’s Victorian card.


http://teachinggoodthings.com/blog

[subscribe2]