For our daughter’s bridal shower I made a triangle fold card. Easy, but elegant simplicity.
Pull the opposing corners and the card opens to a long rectangle.
Do you prefer simple or elaborate cards?
[subscribe2]
Lest you’re beginning to think that all my cards are super creative, fun and interactive, let me assure you that many of them are just plain jane. Not super creative, but fun to make just the same.
This one was made for one of our grown children’s anniversary. Sometimes mom just doesn’t have a lot of time for fancy and creative. Just plain embossing with my Cuttlebug and a couple Cricut cut-outs.
Do you have a Cuttlebug or other embossing machine?
[subscribe2]
Some of those cards I’d been making were a bit too complicated for little ones. I wanted a simple interactive card for our grandgirl turning 5. I decided a slider card was perfect. Easy for her to operate, and easy for me to make. With this paper, no real extra embellishing necessary when you’re in a hurry.
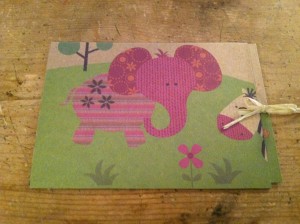 Simply pull the tab (or ribbon) and out slides the rest of the card, with greeting.
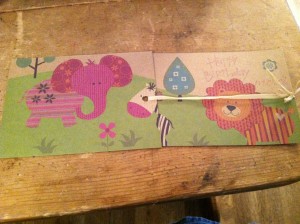 Do you use a lot of embellishments on cards?
[subscribe2]
I began my card-making-athon with a never-ending card for a granddaughter. I showed our 2 youngest sons how to make these and they had so much fun with them. After I’d made this one I found a tutorial for making them easier here.
This card opens, and opens again, and again, and again, until its back to the beginning and you keep on going.
This was the front.
The 2 center flaps lift up/down to reveal this.
These two center flaps open out to reveal this.
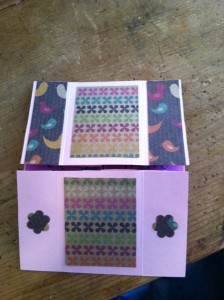 Then these 2 open up/down to reveal this. Which then opens out to reveal the beginning again.
Have you ever made a never-ending card?
[subscribe2]
I love interactive greeting cards. They are so fun. I’ve had a lot of chances to make many of them lately.
With the wedding coming soon, I’d made all the cards I was going to need for the rest of the summer, each one a different interaction. That was 3 birthday cards and an anniversary one.
Here’s the waterfall birthday card I made for our oldest granddaughter.
When you pull on the bottom tab, the others cascade – revealing the underside of each in turn.
After all my cards for the month were done, 3 of our grandchildren had to have quite a bit of dental work done. So I made them all waterfall get well cards too. I figured they’d be something fun to play with. (I had to do a sympathy card in there too – but not a waterfall, so not pictured here.)
Sorry these aren’t real clear.
Do you make interactive cards?
* This post shared on Teach Me Tuesday Homemaking link-up

[subscribe2]
I have so many projects to catch up on here, but I’m going to work backwards, from the latest – back, and hopefully some new ones scattered throughout too.
Last month, right after our daughter’s wedding, was our granddaughter’s 5th birthday. My intentions were to make her a set of paper dolls (was thinking probably magnetic) but I didn’t have all the supplies (because – after I ordered the Cricut cartridges – I couldn’t find all the other things I still needed here in town, and didn’t know that in time to order them.) That led me to the night before her party and still not knowing what to do.
At 10:30 p.m. I went to Walmart for supplies, then came home to start on a fabric doll house with purse-type handles for carrying along. If I’d had more time I had more ideas for decorating, but was happy enough with it to call it good and give it to her. It’s the perfect size for small dolls, like Polly Pocket or such. I think it turned out really cute.
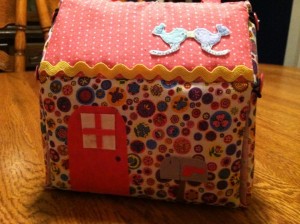 The frame is plastic canvas, covered with batting. The fabric insides and out are sewn together, then the frame inserted. 4 different “fat quarters”, plus scraps for the decorating, are needed.
I love the mail box. My door – was just OK, IMO. The love birds on the roof are fussy cut from a flannel print.
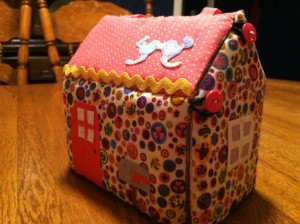 This side has a window, backed by the same fabric I used for curtains inside. The house is “closed” by 2 buttons on each side and one at the top. The loops are small covered pony tail holders.
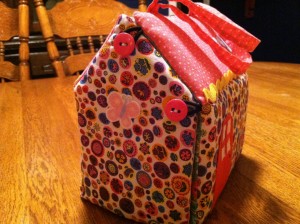 This side only has a butterfly (another flannel cut out), but you can see the handles better.
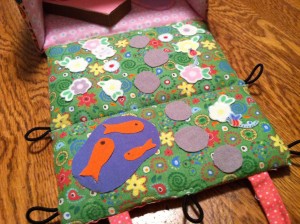 When you open it up, you’re greeted with a lovely garden, with a stepping stone path, flowers (more flannel cutouts) on either side, and a goldfish pond.
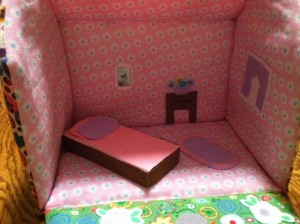 Inside we have the inside of the window with curtains, a rug on the floor, a table with drawer and a bowl of flowers on it, a mirror on the wall, and a bed with pillows. The bed is a box I made from card stock, then covered with fabric. The pillows “puffed” with batting. The mirror was made by using silver heat embossing powder.
What was your last sewing/craft project?
* This post shared on Teach Me Tuesday Homemaking link-up

[subscribe2]
I’ve always wanted a treadle sewing machine. I know. Weird. Not that I want to give up my modern (but not computerized) Riccar or serger. But just have that love of old things. I think a lot of it has to do with things that last – unlike most things today. I like quality.
Well, that dream for a treadle hasn’t come true yet, but close. Yesterday I was given a great-grandmother’s sewing machine. It’s 100 years old (or very close), a White Rotary, and electric. But, it was originally a treadle. The original owner had it converted along the way. The motor is a 1920 Hamilton Beach Sewing Motor.
I cleaned it up a little (it didn’t need a lot, just a bit dusty.) And I figured out how to thread it. Moment of truth. It worked! Produced a beautiful even stitch. I didn’t even have to adjust the tension. (I’ll do a more thorough cleaning and oiling.) I found out I can call Viking (who bought White out about 30 years ago) and give them the serial number and they can give me the exact age. (Last patent date on it is 1913.)
I am so excited to have this. Still hope to have a treadle some day though.
[subscribe2]
Many old things bring a smile to my face. I love the time I live in, with all the technology and convenience. (I’m sure not complaining.) But I also love old things. My design studio is slowly becoming new with more old things.
I picked this up at a thrift store for $2. It was trashed, but I saw potential. May not be the quality of an old oak piece, but it will make a great craft/ design work table, with a little TLC.
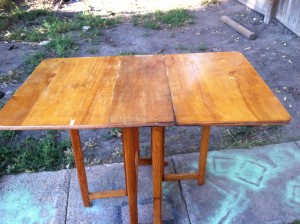 A little paint later and it’s about there. (Still need to sand and add another coat.) In the background you can see another new/old find. The white rolling cart, from an antique store, also needs some TLC – sanding and fresh paint. I’m considering doing it in pink. You can also see my newest old thing behind the table. No not the pink chair – it’s new – and getting a slip cover. Behind that. Come back tomorrow to read about it.
[subscribe2]
I just realized I haven’t updated this blog all summer. It’s been a whirlwind. I planned a mini-family reunion when my dad’s half-sisters came to visit, shortly after my last post.
I’ve spent many hours in the orthodontist with our son – and a couple at the dentist with another son, and the Dr. with yet another son. Many hours on the baseball fields watching all our sons.
Attended Teach Them Diligently conference with our whole family. YEA!! It was great! Stopped to spend some time with my dad and his wife at the hospital, when she went in for surgery 3.5 hours away from us, on our way for vacation to see our second daughter. (Miss those grandbabes.) Did a bi-monthly Bible Study with a friend.
Celebrated more family birthdays in 2 months than most families have total. Planned, prepared for, made a lot of out of town trips for, made a lot of necessities for and did a lot of consulting for our 5th daughter’s wedding. At the end of June they decided to get married in August. We did everything ourselves – except sew the clothes, and daughter did much of the decor making herself. But that’s where my summer mainly went.
But all of that is old news now. Daughter is happily married as of last Saturday, and on Monday the furniture moving began. We changed up some bedrooms. The bedroom for our 2 youngest, that also held my office desk and some sewing supplies, became my studio/office – no longer shared with children. That’s my something new.
Here’s a couple pictures of the very beginnings. There is much to do – paint, shelves, storage, etc. That will take much time. But I figured this is a good start to sharing much more in this category of sewing and craft projects – fabric, yarn, paper crafts, DIY, etc. I’ve done so many projects (with all those birthdays) but never think – or take time – to post them. I’m beginning today.
Notice the missing serger. It’s been out of commission all summer too.
Oh, and exercise room too! (Note the Rebounder. My choice for exercise.)
My Cricut and Cuttlebug have been getting lots of workouts with all the birthdays this summer. The drawers are new, to house many new papercrafting supplies this summer.
[subscribe2]
Homestead Blessings: The Art of Sewing
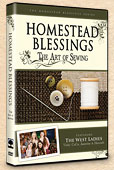 The West Ladies are back—Vicki, Jasmine, Hannah, and CeCe—in The Art of Sewing. This inspiring and educational DVD teaches a wide-range of fun and useful sewing skills.
Expand your knowledge of sewing with the helpful and down-to-earth instruction The West Ladies are known for, and develop a wide assortment of useful skills that will assist in making wonderful sewing creations.
This program is full of useful sewing instruction and tips that will inspire and teach seamstresses of all levels. From pillow cases, to baby blankets, to blouses, skirts and rag quilts, viewers will learn a host of techniques. If you are just starting out, or expanding your skills with new tips and ideas, The Art of Sewing is the perfect tool.
Order Franklin Springs’ latest DVD in the Homestead Blessings series Today!