I’ve been known to say papercrafting is my type of “art” because all you have to know how to do is cut and paste. That isn’t too far from the truth. So far in this series we’ve looked at paper, the key component in papercrafting, and adhesives, the pasting part. Today we’re going to look at the 3rd part of that equation, the cutting, and a handful of other basic tools for paper crafting.
Cutting is necessary for most paper crafts, and if you’re a lot better than I, perhaps you can do it with just a pair of scissors. But most everyone uses a more accurate and faster tool, a paper trimmer. Quick, straight and accurately measured cut lines from a paper trimmer make paper crafting easy. You’ll still want a good, sharp pair of scissors for more detailed (and more rough) cuts, but for most of your cuts, that are just straight lines, get a paper trimmer.
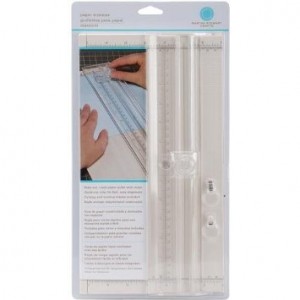 The most common, and usually least expensive, type is the sliding blade trimmer. These trimmers have a small blade that slides up and down in a groove that lays over the paper. It can cut paper and cardstock, but not thicker materials, and usually not more than a couple layers at a time. Many of these trimmers are narrow and have a swing out arm for measuring larger cuts (up to 12×12″ paper). They are light weight and portable, fast and easy to use, and accurate. You can also make partial cuts with them, just part way down the paper, or even only in the middle of the paper, with the measurements down the length. Some of them come with a separate plastic “blade” that can be inserted when you only want to “score” (crease), not cut the paper, (or you can use a bone folder in the groove to make score lines also.) The blades on these trimmers need to be replaced, pretty often if you use them a lot. They will leave a ragged edge when they are getting dull. But blades are inexpensive and easy to replace–just always keep spares on hand. Some feel that the swing out arms don’t give real accurate measurements on larger pieces. (The one pictured, and that I own, has a pull out arm which I think is more accurate.) Most people start with sliding blade trimmer, and usually keep one on hand, even if they add and use the other types.
I own the the Martha Stewart trimmer pictured, and also a Fiskars, perhaps the most well known brand. My Fiskars is older and not as accurate, in my opinion. My Martha Stewart has both cutting and scoring blades, a full length slide out arm, and a small magnifier on the blade holder that magnifies the measurements down the length of the blade guide. I really like the way it works, but its blade seem to dull faster than any of my other trimmers.
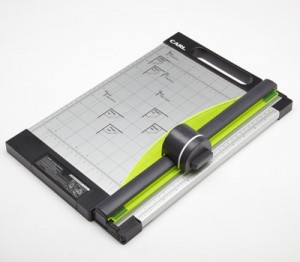 The next type of paper trimmer is the Rotary Paper Trimmer
. Many of these look much like the sliding blade trimmers but the blade is round and rolls down your paper along the guide. Rotary trimmers can be found with both the swing out measuring arm like most of the sliding blade trimmers, or full width. These trimmers usually cost a bit more than the sliding blade type, but are available in all price ranges. They are very accurate, cut very clean edges and can make very small cuts. This is what I use when I need to take off “just a sliver”. It somewhat bothers me that the entire bar area isn’t see through, like on the sliding blade trimmers, making it harder to cut narrow papers, in my opinion. Also with the round blade, it is harder to make accurate partial cuts, stopping at the exact spot you’d like. Be sure to get a rotary trimmer with plenty of measurement markings down the length by the blade (mine, not pictured, doesn’t). Rotary blades last longer than sliding blades, but cost a bit more to replace. Rotary trimmers also have a narrow cutting mat under the blade that has to be replaced occasionally, when it’s cut up. A bad cutting mat results in inaccurate cuts. Some of the rotary trimmers have optional blades that make various decorative cuts.
My rotary trimmer is a Carl brand (same brand as pictured). I love it’s accuracy and ability to make clean sliver cuts. I love that I can cut (at least) medium weight chipboard with it.
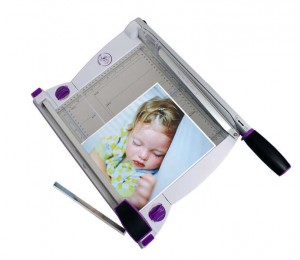 The least common paper trimmer is a guillotine type. This is the type of paper cutter used in offices and schools. It can cut through layers of paper and thicker cardboard and such, and you never have to change the blade. But some find it not as accurate for small, short cuts, or feel it takes up too much room, is too heavy to be a portable take-along, and potentially too dangerous. Others love it as their primary trimmer. It is limited to only making full cuts, from one end of the paper to the other. The one pictured is a combo trimmer that has a rotary trimmer on the other side. The 2 sides also can come apart. I don’t have a guillotine cutter.
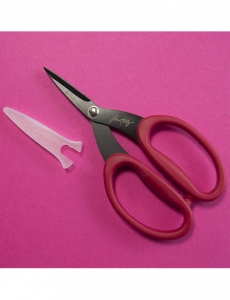
Along with your paper trimmer, you will also want a good, sharp pair of scissors. To get started, a pair of 8″ basic paper/craft scissors will be fine. Later, you may want to add a pair of precision or specialty scissors, such as the Tonic Studios Tim Holtz non-stick short blade scissors, or Cutter Bee precision scissors. Some people also enjoy having various decorative edge scissors.
There will no doubt be times you will be glad to have an X-acto knife and mat, for cuts your trimmer can’t do, or do well. I also prefer to use my large rotary cutter (and a mat) for cutting thick materials, like chipboard.
In addition to cutters, you will also need measurers. A regular ruler is a necessity–I like my metal X-acto ruler, and perhaps not a necessity but very handy, a centering ruler. A centering ruler has 0 in the middle and then goes out both ways, and is very handy for lining up all the things you want to center on a page or project.
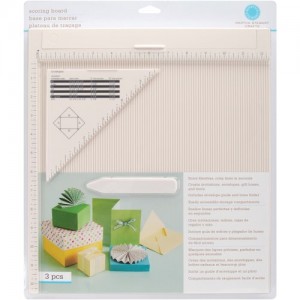 Cutters and rulers are very familiar to you, but above I mentioned 2 things that may be unfamiliar to you, scoring and a bone folder. Scoring prepares paper for creating even and crisp folds, without the paper cracking. Although scoring can be done with some trimmers, or even a ruler and bone folder, most paper crafters use the fast, easy and most accurate way, a scoring board. A scoring board has narrow channels–for making straight crease lines on your paper to fold on, at measured distances for making all your lines quickly and accurately. You make these score lines with a bone folder, a tool with a blunt pointed end for scoring and smooth edges for making your folds crisp and sharp after you fold your scored lines, without marring your paper. The score boards I’ve seen all come with a bone folder. You can also buy bone folders separately, if you prefer a different style. Some people also use a stylus for creating their score lines on a scoring board.
I own the Martha Stewart Scoring Board pictured. I like that it has scoring channels every 1/8″, and the envelope tool for lining up your paper to make diagonal scores. It also has a compartment for storing your bone folder. Tip! I ran colored permanent markers down various channels at the measurements I use most often, to give me quick to find visual guides.
Our last tool today is a non-stick, heat resistant craft mat. It will protect your work surface from adhesives, heat and ink. These are different than cutting mats, and are usually made of silicone or teflon material. They work great for protecting your desk from the heat of glue guns or embossing heat guns, and wipe up clean from gluing/taping/mod podging and stamping/inking. I prefer silicone as it’s non-toxic.
These are the basic tools you’ll need for paper crafting. Other tools are specific to specific types of work you do in paper crafting. I will cover those as I cover their area of technique. So to get started, 5 basic tools are needed. You may even already have 2 or 3 of them. You’ll need a paper trimmer and scissors, a ruler, a scoring board and a craft mat, add that to you basic supplies of paper and adhesives and you’re ready to get paper crafting.
Now that we have the basics covered, I’ll be back with add-ons, for other techniques and embellishments you may want use, in the Papercrafting Supplies 201 series.
Check out more DIY projects on Kathy’s blog at Teaching Good Things.
[subscribe2]


