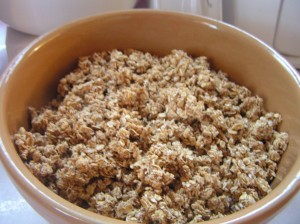
Good for You-Naturally! training

Me & My House has 2 opportunities for you to receive instruction in eating Good for You-Naturally!™ The first is a local LIVE Seminar, where you’ll learn the what, why and how of eating for health – and get to try great tasting Good for You-Naturally!™ foods and see how easily they are made. The second is an Online Course & Community, where we’ll walk you through, step-by-tiny-step, in applying those principles – and you’ll enjoy a 1-Year Membership to the site, for continued review and encouragement.


We’ve just had a couple spots come open in the Freedom & Simplicity™ of Good for You-Naturally!™ LIVE Seminar. Their loss is your gain. So if you are able to get to North Platte, NE this Saturday, November 5, 2011


Come Join us for a full day of training and tasting!
* How & Why to eat for health from a Biblically principled perspective
* plenty of Freedom & Simplicity™ food prep demos
* a wide variety of Good for You-Naturally!™ foods to try
* a tasty, Good for You-Naturally!™ Lunch included


Don’t Miss It – Register NOW –  $35 (More info here.)


If you aren’t able to make it to the local, LIVE Seminar, Join us Online for the Good for You-Naturally!™ for Life Online Course & Community. Get more info and a Free 2 Lesson Preview at the link.


Tuesday Tip ~ Bread Kneading

Have you ever made bread that just didn’t raise like you wanted it to? You know your yeast was active and you didn’t kill it. What went wrong? One possible answer is that it wasn’t kneaded well enough.


This post isn’t on how to knead, but rather how to know when you are done kneading. If you don’t know the technique for kneading, that is better shown in a video, and I don’t have one made. But will put one up for you another day.


Especially when kneading by hand, it can seem hard to know when the gluten has been developed enough to raise the bread properly. You usually stop when your arms are about to fall off or you get really tired of doing it. Recipes may not be a bit help by giving a certain number of minutes, considering that one may knead very vigorously and another just half heartedly or just plain without the strength.


Actually it is very easy to tell when the gluten is well developed, no matter how you knead. Pinch off a small ball of dough, about the size of a walnut. Gently stretch it out into a square/rectangle (in 4 directions, not just side to side in 2 directions.) If you can stretch it out until it is thin enough that you can see light through it without it breaking, the gluten should be good and stretchy enough to give you a good rise. This is called the window pane test. And it is an easy way to know if you need to knead more or not.


Another tip that may help those that are kneading by hand. You don’t have to do all of the kneading at one time. If your arms are getting tired, or if you need to attend to other things before the dough is completely kneaded, you can stop for a few minutes and come back to it.


Friday Food – Coconut Kefir

Do you like a little fizz? Carbonated beverages are so NOT Good for You. But I found a coconut kefir I liked – I splurged on vacation for this Good for You fizzy drink – so I decided I’d give it a shot to make it myself. I can’t afford to buy those things often – and even though the ingredients were “good”, I knew they weren’t all necessary in a homemade version.

The fizz isn’t the main reason for drinking kefir though (and they aren’t as bubbly as soda pop). Kefir is Good for You because it is loaded with probiotics that help build gut health. Many (most) Americans have destroyed, or at least significantly weakened their gut flora by diet and anti-biotics. Eating and drinking fermented foods with Live cultures is a good way to help restore them. This Coconut Kefir is one of the best tasting ways, IMO, (as is raw goat milk yogurt).

I used a kefir starter packet (because that’s what I had access to. I hope to get some kefir grains sometime when I can find them, to give them a try). [Update 2016: I have now been using water kefir grains for a few years. Will post an update on my Good For You-Naturally! blog.] Anyhow, you just add the kefir starter to fresh (or I’ve heard canned works too – but I want fresh) coconut water (from a young Thai coconut, not the old “mature” brown ones). And let it sit. How “Freedom & Simplicity” can you get?!


Good for You-Naturally!™ “Pop”
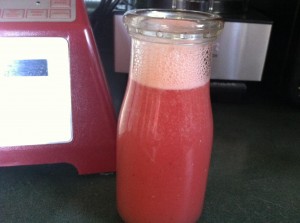
  • 1 packet kefir starter (a little over 1 Tbl. in my packet)
  • 4 cups fresh coconut water ( to the 1 packet for the brand I used. Check your brand for correct proportions.)
Yes, just 2 ingredients. A couple optionals are below.

Open Young Thai Coconuts and drain water into glass container. You should get between 1 and 1.5 c. of water per coconut. So you’ll need 3-4 coconuts to get a quart of water. (You may want to empty the coconut water into a larger container and then pour into your Mason jar or whatever you are using to ferment in.) (Find a youtube video to show you how to open it. I cut the husk off the top, then give it a good whack – or a few – with a sharp heavy knife, and pry the top open.) Scoop the Coconut meat out and use in your Green Smoothie, or freeze in an airtight bag to use in a recipe later.

Stir kefir starter into coconut water in a glass jar – with a NON metal spoon. (The experts say to heat to 92° first. Room temp works just fine for me.) [Or just put your grains in. You’ll need 2 Tbl. water kefir grains per 2-4 cups coconut water.] Leave some head room. Cover – but don’t screw a lid on. This gets fizzy/bubbly, and could potentially blow. Let set, on the kitchen counter is fine, for 24-48 hours, until milky/cloudy and bubbly. (The experts say 70°-78°.) (It may take longer. I’ve heard 4-6 days for canned coconut water.) I don’t stop just when I see bubbles starting, but wait until the top is pretty foamy looking. It will get more tangy the longer it ferments.

At this point you can drink it or screw the lid on it and put in fridge or add fruit and ferment it longer. In the refrigerator it should last a few weeks. But I never have it that long.

You can drink it straight, or add fresh fruit to it – strawberries (3-4 per serving), or lemon ( a few slices – or juice of,) or whatever fresh or dried fruit you’d like. I like strawberries blended with the coconut kefir in the blender. If you want it sweeter, you can add a truly natural sweetener, like couple drops of SweetLeaf stevia extract (or real, green stevia leaf powder,) in it before drinking.

You can also do a double ferment, by adding about 1/4 c. fruit, and letting it sit on the counter (covered) another day or 2 – even more bubbly. Strain or blend before drinking. When refrigerated, the fizz may be reduced  if left in the fridge very long. But the probiotics are still in there, alive but not as actively growing.

Before adding fruit, refrigerating, or drinking it all! – remove 1/4 cup to start a new batch. [If using grains, you just strain out the grains and add the grains to new coconut water.] Add about 4 c. fresh coconut water to the 1/4 cup “starter” kefir [or grains], stir and follow as before. The packet starters are suppose to give 6-7 or more batches before they fizzle out. I’m going to need more starter (or find grains) AND buy more coconuts real soon. I may have to try to make water kefir in the meantime.

[To keep your grains healthy and growing well, every week or so refresh them by culturing in filtered/spring water with 1/4 cup coconut sap sugar instead of fresh coconut water. I warm the water to dissolve the coconut sugar, then cool before adding the kefir grains.]

Do you make kefir? What about any other fermented/probiotic drinks or foods? Comment below.


Learn to make another Good for You-Naturally!™ cultured/probiotic food in our Freedom & Simplicity™ Guide to Yogurt Making.


Friday Food – Crunchy Granola

fridayfood2.jpgAs per request, here is my favorite granola recipe. Get this and over 60 other Good for You-Naturally!™ family-friendly, easy to make, budget conscious recipes in Good for You-Naturally! Weekly Menu & Recipes – Level 1. See demos of many of these recipes – and TASTE them too, at the Good for You-Naturally!™ Seminar LIVE!


Good for You-Naturally!™ Maple-Almond Granola

  • 1 cup pitted Dates
  • 1/2 cup Purified Water
  • 1/4 cup Real Maple Syrup
  • 1/4 cup Raw Coconut Oil
  • 1 tsp. pure Maple Flavoring (or organic Vanilla)
  • 1 tsp. ground Cinnamon
  • 1 cup Raw Almonds
  • 8 cups Rolled Oats
  • 1/2 cups dried, shredded Coconut

granola• Blend (or process in food processor) Dates, Water, Maple Syrup and Coconut Oil until smooth. (Add a little more water if you need to, to keep it blending. Medjool Dates will blend creamier than drier dates, like Deglet Noors.) Stop and scrape down the sides as needed. (Food Processor actually works better if you have one. But, add the water a little at a time, or it may splash out at the beginning.)

• Chop Almonds. (If you have a food processor, you can add them to your Date mix, after processing it, and process again until nuts are small chunks.)

• Blend or mix in Maple Flavoring/Vanilla and Almonds.

• Stir Oats and Coconut together in a large bowl.

• Mix Date mix into Oats and Coconut, with hands is easiest.

• Crumble onto solid sheets for dehydrator (or cookie sheets if you don’t have a dehydrator).

• Dehydrate at 105-110° overnight (or so, until dry) for raw granola. If you don’t have a dehydrator, dry in oven at lowest temperature, 45 min. to a couple hours, until dry. (This will depend on what your oven’s lowest temp is.) Stirring every 10-15 minutes.

• Cool and break into clumps.

• Store in air tight container.

• Serve with Raw Almond or Goatʼs Milk

 This is just one of the over 60 Recipes in Good for You-Naturally! Weekly Menu & Recipes ~ Level 1, a family-friendly menu plan and recipes to help you gently transition to a lifestyle of eating for your health. It also includes and shopping guide for real foods and so much more!


Friday Food – Maple Oatmeal-Raisin Cookies

These super yummy cookies are considered “raw”. They are dehydrated at low temp, rather than baked, to retain all their nutrition goodness.

If you follow a high raw lifestyle of eating, or if you just want to increase your intake of yummy Good for You-Naturally! foods for better health, give them a try.

Lisa’s (Raw) Maple Oatmeal-Raisin Cookies

2 cups whole oat groats (organic)
3/4 cup pure maple syrup (organic)
2 Tbl. raw EV Coconut Oil (organic) (melted or not)
1 tsp. ground cinnamon
1/4 tsp. ground nutmeg, optional
1/4 tsp. ground allspice, optional
1 cap/tsp. vanilla
1 cup organic raisins
1/2 cup chopped raw walnuts, optional (organic)


  • Soak oat groats in more than double the amount of pure water (4+ cups), overnight.
  • Drain well.
  • Process oat groats and maple syrup in food processor (or Blend in blender) until semi-smooth.
  • Mix in coconut oil, spices, vanilla and raisins (and nuts.)
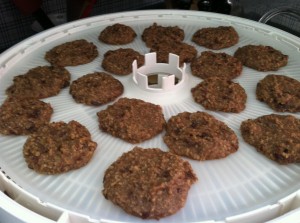
  • Drop by spoonful on dehydrator solid tray and flatten.
  • Dehydrate overnight at 105°.
  • Turn over onto mesh screen and dry a few more hours until desired chewiness.

These are awesome cookies that taste like “regular” oatmeal raisin cookies (and look like them too, just not “browned”.)

You can use raw honey or pitted soft dates (or raw agave nectar), if you prefer, but the maple syrup gives a GREAT taste to these.

I usually add just cinnamon to my oatmeal cookies, but these other spices added a bit different flavor that is good too.

If you don’t have a dehydrator yet, click here to see what to look for when buying a dehydrator and the ones we recommend.

from my Good for You-Naturally! for Life online course


Tooth Powder Recipe

Are you looking for an alternative to harmful, chemical laden toothpastes? We’ve used several natural toothpastes. But if you’d like something much cheaper that you can make yourself, homemade toothpowder to the rescue. Also, although a “natural” ingredient, glycerin (in many “natural” toothpastes) has been found to not be the best for helping prevent tooth decay.


Whether you’re looking for a healthy alternative, a cheap alternative or just something “on hand” to get you through a pinch, homemade toothpowder is a good choice. Super simple, cheap, convenient, and works great.


Of course, you could just use plain baking soda. That would be great all on its own. But if you want a bit more complex recipe, with a few more benefits, like helping prevent tooth decay, tasting great, and giving you minty fresh breath, read on.


Good for You-Naturally! Tooth Powder

1 Tbl. baking soda

1/4 tsp. unrefined/sun dried sea salt

3-4 drops On Guard Essential Oil

6-8 drops Peppermint Essential Oil  – both from  doTerra

Mix the salt into the soda well. I use a toothpick to stir. Add the oils and mix in well. Store in a small container with an air tight lid, preferably a glass container ( but plastic, like a Tupperware mini midget or a small bottle with a flip top, small hole in lid with an over-cap, also works.)

(If you don’t use doTerra essential oils, be sure the oils you use are safe for ingestion. We choose doTerra for their supberb therapeutic-grade quality and safety. IOW, they work–not just smell good.)


August Smoothie

Today I’m trying the perfect Smoothie for this time of year–Cantaloupe and Nectarine/Peach.

The cantaloupe was really large so I only used 1/4 of it, 1 nectarine, a large handful of baby spinach, a couple large handfuls of ice, and enough water to blend it all up.

Very yummy.

20110823-033054.jpg

I’m also trying posting from my WP mobile app. So not perfect formatting I’m sure.

Friday NOT Food – Lisa’s Lemon ???

Today I’ve got a different kind of recipe for you. I love finding organic, natural home and body care products but many of them are pricey. Thankfully it is super easy, and inexpensive, to make some cleaning products for your home and body, that are great for them too.


I’ve tried a few different body/face scrubs that I’ve liked, one that I used years ago and loved, but is no longer available. So I decided to try to replicate it. I did it and I love it. It works great. It’s good for my skin. Perhaps you’d like to try it too.


Lisa’s Lemon Salt Scrub

Add a couple Tablespoons or so of Extra Virgin Olive Oil to approx. 1 cup unrefined sea salt. Add 1 Tablespoon oil at a time and stir. You want it to just hold together. Not too dry. Not too runny. Stir in the juice of 1 Lemon and a few drops of  Lemon Essential Oil from doTerra. That’s it. Store in a sealed container (such as Pyrex or a jar with a screw top lid.) It keeps well and will last you a month or more (as a face scrub).

See our essential oil website for more info on Certified Pure Therapeutic Grade™ Essential Oils.


Green Smoothie Know-how

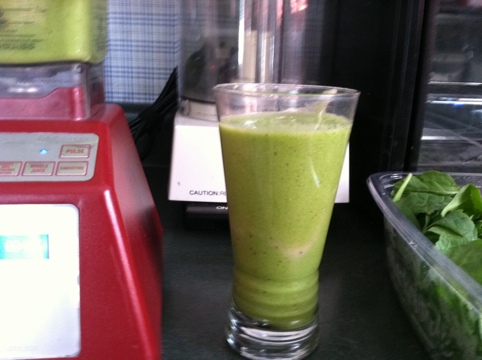
When making Green Smoothies, I rarely use a Recipe. I grab whatever we have on hand that sounds good. I aim to include a combination of more greens than fruits. Some recommend 40% fruit 60% greens, and for beginners to start with a reversal of this percentage, 60% fruit 40% greens, then work up to the other way around. If even “40% greens” is too much for you to begin with, start with less and gradually work your way up. In real life, this is not a “science”, we’re talking close to equal amounts, a little more, a little less.  I say, just put in 2-3 fruits and a couple large handfuls of greens, to fill your blender up, starting with just 1 large handful if you need to.

The other “rule” is to have a variety. It is important to “rotate” your greens (and fruits), and not have the same one every day. However, I acknowledge that 1) when beginning to eat more Greens, people usually prefer the more mild tasting ones. 2) when shopping in local grocery stores, it may be next to impossible to find much variety that is organic (and remember lettuce is one of the “Dirty Dozen”.) Baby Spinach is very mild and easy to find organic, so it is most often included by “newbies”. However, we encourage you to branch out. Romaine is also usually available organic. (It’s not one of my faves in Smoothies though, but maybe it will be yours.) Baby Spring mix is the other kind of lettuces that is easier to find organic. Kale is also commonly used in Green Smoothies, but may not be easy to find organic.

In addition to your fruits and greens, you can also include other add-ins. Fresh almond milk, almond butter, other nuts, flax, chia or other seeds, raw coconut oil, raw nut or goat milk yogurt, carob powder, or “superfoods”.

Learn more about Green Smoothies in Green Goodness ~ A Freedom & Simplicity™ Guide to Green Smoothies.

Have fun creating your favorite Green Smoothie today!


Why Carrot Juice?

Rev. George Malkmus, founder of Hallelujah Acres, shared his story this week on how his colon cancer was completely cured 35 years ago, with no medical modalities, only a change to God’s original diet for man, including fresh raw juices – from those foods God gave. Part of his story (the beginning of the article is quoted below,) click the link at the end to read the rest of it.

What’s So Special About Carrot Juice?

Thirty-five years ago, when I was told I had colon cancer, Evangelist Lester Roloff encouraged me to eliminate all animal foods (both flesh and dairy) from my diet, along with refined sugar and refined grains.

He went on to encourage me to consume lots of carrot juice if I wanted to restore my health. Not understanding all the reasons why, I took his advice.

Within days of making these dietary changes my rectal bleeding had stopped. Within less than a year the tumor in my colon had disappeared – all without any help from a doctor or the use of any chemotherapy, radiation, or surgery.

After this experience I rationalized that if carrot juice could help my body recover from colon cancer, it might be good to continue consuming it order to help me remain well. And I have done just that.

read the rest of the article at Hallelujah Acres

For Me & My House,
Lisa

Keep in touch by “Liking” us on Facebook @ MeAndMyHouse and subscribing to our free monthly email newsletter, Me & My House musings, as well as subscribing to our feed here.