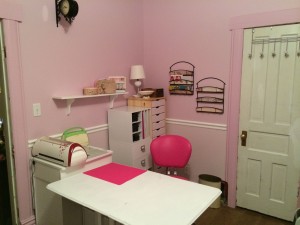
I’ve been working on my Design Studio a bit again. Have got a few things hung: my double-sided clock, a shelf, and a couple “letter racks”. So I wanted to post an updated picture, and also a couple organization tips. (A second shelf will go above the first, when I decide how much higher.)
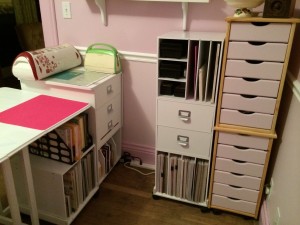
This is the crafting area of my studio, primarily paper crafting. I love that all my supplies are within reach, and that they are all modulars that can be changed around if need be–both moved around easily on wheels, and stacked in different ways. I also love that most everything is in drawers, shut away from sight but easily accessible, and I don’t have to dust every little piece. I’ve added a couple more modular pieces since my last update.
Within the drawers/shelves is further organization to make it easy to find what I’m needing quickly. The top drawer of the craft station (where my Cricut and Cuttlebug sit) holds my most used tools–scissors, rulers, (pick, tweezers, …) and most used adhesives (ATG, Scor-Tape, glue dots, Tiny Attacher). My paper trimmer, scoring board, cutting mat, and Envelope Punch Board slide into slots at the top of my modular stack. My ink pads are in repurposed cassette tape boxes on the shelves next to those. My patterned paper is on the bottom shelf of the modular stack, and my card stock in another modular on wheels (under my desk).
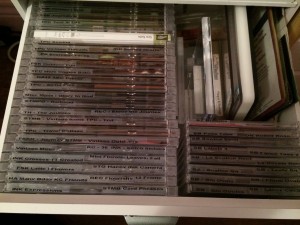
In between the paper and the ink is my newest organization update project–in the second modular in the stack. It now holds my stamps (all but wood mount) and dies, in DVD and CD cases. I love the uniformity of this storage. It takes up so much less room, makes things easier to find and easier to get to–and was far less expensive than other storage solutions. I also don’t like the bulk of storing in 3-ring binders, so knew that wouldn’t be the right solution for me. I’m loving this.
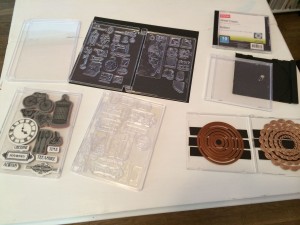
The CD cases are standard size (not slim,) standard cases with the tray insert. (Staples) I removed the trays. The others are DVD size jewel cases, that don’t have the hub (knob) inside. Both of these are GREAT for this type of storage/organization. Clear and rubber cling stamps will both cling to the inside of these cases. For the metal dies, I first attached a couple strips of magnetic tape on each side to hold the dies in place. I like that way best, but the magnet on the tape is not very strong. So I tried a strip of double-sided tape, since I figured that is what they are on in the package. We’ll see which way works out best in the long run.
Clear stamps and dies will fit 2 layers in the cases–one inside the front, one inside the back of case. Cling rubber stamps will fit only 1 layer. I used a label maker to label the spines. You can also adhere a picture of what’s inside to the front if you want.
I chose to use both DVD and CD cases because my drawer fits a DVD case next to a CD case across the width. So I started by putting my stamps in DVD cases and my dies in CD cases. My stamps all fit the row so far, but when I get more the extras will be put in CD cases to complete that row.
Clear plastic VHS cases are the perfect size for holding wood mounted stamps, but I only need 2 or 3 of them, and to buy them without the hub (which I haven’t been able to find to repurpose) they come in bulk (10, 25, 50, +). I don’t want a bunch of empty VHS cases sitting around, (or to pay the shipping that is more than the cases for 10) so my wood mounted stamps are still in cigar boxes (and may remain there.)
What tips do you have for inexpensively organizing your crafting space?
[subscribe2]


