Search Results for: yogurt

My Weekly Yogurt Post

🙂 Yep, I’m posting on yogurt again. I told you last week I’d let you know how the raw goat milk yogurt comes out. Delicious! (Click here for more traditional yogurt making instructions.)

.
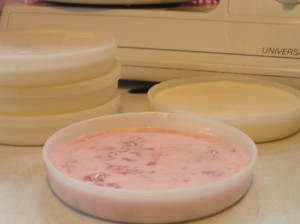
Raw Goat Milk Yogurt - plain and strawberry

Raw Goat Milk Yogurt – plain and strawberry

Here’s how I did it.

Raw Goat Milk Yogurt

Prepare containers and utensils. Wash, rinse very well, pour boiling water over/into them.

1 qt. raw goat milk – heat gently on stove to 110°F. on candy or other food thermometer. (No more. You want it to remain raw.)

Whisk in: 3-4 Tbl. organic, natural plain yogurt with live cultures or recommended amount of dry yogurt culture.

Dump water out of yogurt containers and pour yogurt in. I used the containers that work in my dehydrator since that is where I cultured my yogurt this time. You can use a quart glass jar or smaller glass jars or a wide mouth glass or stainless steel thermos. Put lid(s) on.

Put in warm place to culture. You need a place that will keep a steady temp of 95-110°F. As I said, this time I used my dehydrator, that has a thermostat control on it. Culture 8-10 hours, until it sets up. Other ways you can culture yogurt are listed in a previous post on yogurt that has complete instructions and various uses.( I DO NOT find a crock pot, even on keep warm with the lid off to hold a low enough temp.) More yogurt posts here.

My additions for flavored yogurt per serving – all optional. Add 1 or more. (adjust amounts to your liking):

  • 1/2 tsp. raw organic agave nectar (or raw honey)
  • a couple drops of pure organic vanilla extract/flavoring
  • 2-3 fresh or frozen (thawed) strawberries, mashed up – or 1-2 Tbl. other fruit

Enjoy! I am.

OK,  you do need a source of raw goat’s milk for this. You can substitute raw cow’s milk if you have a source/use cow’s milk. (I recommend not, but raw IS SO MUCH better for you than pasteurized, homogenized, chemically, feed-lot raised, …)

Want more help for yogurt making? Get our dirt-cheap Freedom & Simplicity™ Guide to Yogurt Making.

Yogurt Again

I posted a little over a week ago that I was making yogurt – trying some new experiments. 🙂 It wasn’t done at the time I posted my pics of the rest of my kitchen time – but…

.

My goat milk yogurt set up fine, but I was not happy with the agar agar addition to it. It made it set up more like jello.  Yesterday I made soy yogurt again and it worked great. (Yes, just my one lonely picture so far.)

yogurt

.

Now just waiting for dh to bring more fresh goat’s milk home so I can try raw goat milk yogurt again – straight, without the agar agar. I’ll let you know how it goes. Now off to flavor the soy yogurt for breakfast.

.

See other yogurt posts – including instructions.


Want more help for yogurt making? Get our dirt-cheap Freedom & Simplicity™ Guide to Yogurt Making.

Yogurt Making – Soy Update

update from Making Yogurt

We’ve tried making the soy yogurt. It didn’t work. It did work. Here’s our limited experience so far.

Our first batch was from homemade soy milk. It never set up. I don’t know if that was strictly from being homemade. (I’ve heard that homemade doesn’t work, but also from others that it can – I don’t remember if they said you had to add SOME store bought in too though.) The other possibility is that all of my equipment wasn’t “sterile” enough. I thought I handled everything properly, but it was very busy in the kitchen that day with many of the children involved, so who knows.

This is one VERY IMPORTANT point. You don’t want to grow any other bacteria than your yogurt (acidophilus type) in your yogurt. Wash everything that will touch your milk/yogurt in hot water and rinse well, then pour boiling water over/in them all. Don’t put your finger in your milk/yogurt to test it.

The next time I made soy yogurt I tried store bought soy milk. It worked beautifully! I had read that soy yogurt doesn’t set up as firmly, so I added a bit of agar agar (1/2 tsp. powder to one quart of soy milk**). It set up very nicely. It has great flavor. And we are enjoying it in several different ways.

We’ve eaten it plain.

We’ve made Strawberry and Strawberry/Banana yogurt – about 3-4 large fresh or frozen strawberries (thaw the frozen ones), 1/2 – 1 tsp. honey, a couple drops of real vanilla flavor, (optional about 1/3 – 1/2 banana). Blend really well in a food processor. (This isn’t a large enough amount to blend in the blender.) Stir into 1 pint plain yogurt.

We’ve used it to make Ranch Dip, and in salad dressing. (Recipes another day, or in my Good for You – Naturally! Salads recipe book.)

We’ve used it as a sour cream substitute in Stroganoff.

It’s about time to make more. I am going to try with homemade milk again next time I try soy yogurt. But I may try goat milk yogurt first.

** agar agar needs to “dissolve” – so stir it into at least part of the soy milk about 10 min. before heating, for best results.


Want more help for yogurt making? Get our dirt-cheap Freedom & Simplicity™ Guide to Yogurt Making.

Making Yogurt

Before I even start, let me tell you – you don’t have to have a yogurt maker to make yogurt! Yogurt is VERY easy to make. No long list of ingredients or steps to follow. 2-3 ingredients and heat, stir, pour, incubate. That’s it.

I haven’t done it in a while – since we went off “real”/cow’s milk. (I haven’t tried it with the alternative milks yet. Soy milk* is said to work well. Update: I’ve now made raw goat’s milk yogurt. Click for instructions.) I had an individual yogurt maker in the past and for several years used the yogurt making kit that goes with my dehydrator. (It’s time to pull it out and try our own soy yogurt.)

If you don’t have a yogurt maker and want to make yogurt, here are some other sources you can use to hold the right temp. I’ve used them all in the past when I didn’t have a maker.

You need:

Milk (raw, store bought, powdered milk mixed to proper proportions, or soy) about 4 cups (but you can make as much or little as you want.) Heat, in a heavy saucepan over low heat, to a bit under a boil. (Be careful not to scorch it!) Then cool to 115°. My old candy thermometer didn’t go low enough, my new one does. I’ve used a fish aquarium floating thermometer for this and my sourdoughs.

Optional, for “thickening power”. Homemade yogurt is sometimes a little thinner than store bought, more like European yogurt. –

Powdered Milk. You can add extra powdered milk for a firmer yogurt – either regular powdered milk, or soy. I’ve heard that with the “other” starter, linked below, you don’t need to add this. If you do add it, add 1/2 – 1 c. per 1 qt. of milk before heating milk.

Or agar agar powder – dissolve 1 tsp in 1/2 cup water and bring to a boil (watch closely) add to milk.

Live Yogurt Cultures. Stir into the milk AFTER it has cooled to 115° or you’ll kill them! –

From either a Yogurt Starter – I’ve used Yogourmet, I’ve heard of another one that is good for a thicker yogurt. Use the amount listed on the package.

Or from Plain Yogurt with *live, active* cultures. Use 2-4 Tbl. plain yogurt for 1 qt. of milk.

Pour yogurt mixture into perfectly clean containers. (A good way is to pour boiling water into washed and rinsed containers, then empty them.) Small glass jelly jars make a good individual size, or pint or quart jars are fine. My yogurt maker came with small plastic containers with lids.

Incubate – You want a steady temp of 95-115°. Use your thermometer to check that it maintains this temp.

It will take anywhere from 3-9 or so hours for your yogurt to set up. Test it by tilting the jar a bit. Refrigerate as soon as it is set.

Here are some ways you can incubate your yogurt without a yogurt maker:

Pour milk/culture mixture that’s at 115° (or just slightly lower) into an insulated thermos and wrap with a thick towel.

Or place a folded towel on top of a heating pad turned onto low and place yogurt containers on top of it and cover with another towel. Or put containers in a covered box on top of the heating pad.

Or in a box (or styrofoam cooler) with a small light bulb in it. ( I built one of these – cooler with light bulb – for my sourdoughs.)

Or in a gas oven (turned off) with a pilot light.

Or in a ceramic crock, wrapped in a blanket, or placed in an insulated cooler.

Or place containers in a water bath in an electric skillet or slow cooker/crock pot on low. If you do this be sure to test it out with a thermometer in a jar of water (instead of yogurt) to make sure it holds the correct temperature over that length of time. I have not found newer crock pots to hold the proper temp. My newer one, on keep warm setting, still needed the lid off to maintain a temp of 115-120. Also water (of proper temp) needed to be added several times, since it evaporates with the lid off.

Or any other place you can keep a steady proper temp. This is the key thing, find a place that you can test out to make sure it holds the required temp steadily.

My fave place in my dehydrator that has a thermostat control. I can set it at 105-110° and know it is going to stay right there the whole time. But I’ve also had good results with a heating pad on low with a thick (double layer) towel between it and the jars and another towel thrown over it all.

What can you do with your yogurt? (Stir in any additions after the yogurt has incubated.)

You can eat it plain.

You can sweeten or flavor it – with fresh fruit, or fruit only spreads, or honey or agave nectar or vanilla or maple syrup, etc.

You can make awesome smoothies with it and fresh or frozen fruit.

You can make “ice cream” (frozen yogurt) with it.

You can use it in place of buttermilk in recipes. Just stir it to thin it a bit.

You can use it in breads – especially good in sourdough types.

You can use it in place of sour cream or even creme cheese. Put it in cheesecloth and pull up the corners of the cloth and hang over a bowl or the sink to drain/drip overnight. This will make a thicker yogurt, perfect as a substitute for either of these, depending on how thick you get it. Use this on baked potatoes, in dips and dressings, and other recipes.

*Note: Homemade soy milk will need a “sugar” of some type added to it for the culture to feed off of in order to set up. Honey and maple syrup won’t work. (Since I haven’t made this yet, I’m not sure yet what I will use.)

(See update on Making Soy Yogurt)


Want more help for yogurt making? Get our dirt-cheap Freedom & Simplicity™ Guide to Yogurt Making.

For Me and My House ~ At Jesus’ feet,
Lisa @ Me and My House ~ Discipleship for Life!
Order Christian & Home Ed Resources here

Get future posts to this blog by email:

Friday Food – Coconut Kefir

Do you like a little fizz? Carbonated beverages are so NOT Good for You. But I found a coconut kefir I liked – I splurged on vacation for this Good for You fizzy drink – so I decided I’d give it a shot to make it myself. I can’t afford to buy those things often – and even though the ingredients were “good”, I knew they weren’t all necessary in a homemade version.

The fizz isn’t the main reason for drinking kefir though (and they aren’t as bubbly as soda pop). Kefir is Good for You because it is loaded with probiotics that help build gut health. Many (most) Americans have destroyed, or at least significantly weakened their gut flora by diet and anti-biotics. Eating and drinking fermented foods with Live cultures is a good way to help restore them. This Coconut Kefir is one of the best tasting ways, IMO, (as is raw goat milk yogurt).

I used a kefir starter packet (because that’s what I had access to. I hope to get some kefir grains sometime when I can find them, to give them a try). [Update 2016: I have now been using water kefir grains for a few years. Will post an update on my Good For You-Naturally! blog.] Anyhow, you just add the kefir starter to fresh (or I’ve heard canned works too – but I want fresh) coconut water (from a young Thai coconut, not the old “mature” brown ones). And let it sit. How “Freedom & Simplicity” can you get?!


Good for You-Naturally!™ “Pop”

  • 1 packet kefir starter (a little over 1 Tbl. in my packet)
  • 4 cups fresh coconut water ( to the 1 packet for the brand I used. Check your brand for correct proportions.)
Yes, just 2 ingredients. A couple optionals are below.

Open Young Thai Coconuts and drain water into glass container. You should get between 1 and 1.5 c. of water per coconut. So you’ll need 3-4 coconuts to get a quart of water. (You may want to empty the coconut water into a larger container and then pour into your Mason jar or whatever you are using to ferment in.) (Find a youtube video to show you how to open it. I cut the husk off the top, then give it a good whack – or a few – with a sharp heavy knife, and pry the top open.) Scoop the Coconut meat out and use in your Green Smoothie, or freeze in an airtight bag to use in a recipe later.

Stir kefir starter into coconut water in a glass jar – with a NON metal spoon. (The experts say to heat to 92° first. Room temp works just fine for me.) [Or just put your grains in. You’ll need 2 Tbl. water kefir grains per 2-4 cups coconut water.] Leave some head room. Cover – but don’t screw a lid on. This gets fizzy/bubbly, and could potentially blow. Let set, on the kitchen counter is fine, for 24-48 hours, until milky/cloudy and bubbly. (The experts say 70°-78°.) (It may take longer. I’ve heard 4-6 days for canned coconut water.) I don’t stop just when I see bubbles starting, but wait until the top is pretty foamy looking. It will get more tangy the longer it ferments.

At this point you can drink it or screw the lid on it and put in fridge or add fruit and ferment it longer. In the refrigerator it should last a few weeks. But I never have it that long.

You can drink it straight, or add fresh fruit to it – strawberries (3-4 per serving), or lemon ( a few slices – or juice of,) or whatever fresh or dried fruit you’d like. I like strawberries blended with the coconut kefir in the blender. If you want it sweeter, you can add a truly natural sweetener, like couple drops of SweetLeaf stevia extract (or real, green stevia leaf powder,) in it before drinking.

You can also do a double ferment, by adding about 1/4 c. fruit, and letting it sit on the counter (covered) another day or 2 – even more bubbly. Strain or blend before drinking. When refrigerated, the fizz may be reduced  if left in the fridge very long. But the probiotics are still in there, alive but not as actively growing.

Before adding fruit, refrigerating, or drinking it all! – remove 1/4 cup to start a new batch. [If using grains, you just strain out the grains and add the grains to new coconut water.] Add about 4 c. fresh coconut water to the 1/4 cup “starter” kefir [or grains], stir and follow as before. The packet starters are suppose to give 6-7 or more batches before they fizzle out. I’m going to need more starter (or find grains) AND buy more coconuts real soon. I may have to try to make water kefir in the meantime.

[To keep your grains healthy and growing well, every week or so refresh them by culturing in filtered/spring water with 1/4 cup coconut sap sugar instead of fresh coconut water. I warm the water to dissolve the coconut sugar, then cool before adding the kefir grains.]

Do you make kefir? What about any other fermented/probiotic drinks or foods? Comment below.


Learn to make another Good for You-Naturally!™ cultured/probiotic food in our Freedom & Simplicity™ Guide to Yogurt Making.


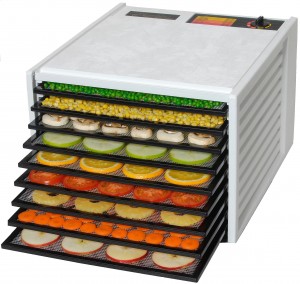
Excalibur Dehydrator

We are excited to announce… that we are now an Authorized Affiliate of Excalibur dehydrators! There are 2 dehydrators that we really recommend, that line up with the standards we have for choosing a dehydrator that really works. Each has its own pluses. (See our Dehydrator Resources & Recommendations to see those “what to look for” guidelines.)


The Excalibur was the first dehydrator I used, 25 or so years ago. The biggest plus (in my opinion) that the Excalibur has over our other top pick is its large drying compartment, allowing you (when you take trays out) to put larger items in, like dishes or jars, for making “raw food” recipes – like yogurt or bars, raising bread, or even drying bouquets or other craft projects. The other thing I really like about it is the front door and slide in trays (like an oven). That makes it really convenient to add and remove foods. The Excalibur also has square trays  with no hole in the middle, which is handy when you want/need a solid square shaped food. And, without the motor/fan on the bottom, crumbs and spills are more easily cleaned up. No danger of harming your motor/fan from food getting in it.


Other features, that it shares with our other top pick, for good dehydrating are:

  • adjustable thermostat, (from 85°-145°,) for the right temperature setting for the various things you dehydrate,
  • air flows horizontally across each tray for more even drying and no flavor mixing (i.e. you can put different foods on different trays),
  • opague (not transparent) for nutrient retention

The Excalibur also:

  • is Made in the U.S.A. – all parts and assembly
  • is Durable – backed by a 10 year warranty
  • is the Top rated dehydrator by many in the “raw food” community – people who do a LOT of dehydrating, as well as used by many gourmets, Culinary Institutes and Universities
  • has 15 Sq. Ft. of drying space (on the 9 tray model)
  • has a 26 Hour Timer (option)


 Learn more about the Excalibur or purchase here.


Bottom Line: I’m not ready to fully give up our other dehydrator nor our recommendation for it. (It has features I love too.) But I am excited to offer the Excalibur as another excellent option. Take a look at both and see which will work best for you.


 Who needs a dehydrator?

Gardeners: Put up that produce for the winter – the fast, easy, and cool way that takes far less space and weighs far less than canned or frozen, and retains far more nutrients. Even if you don’t garden, stock up and dehydrate when foods are in season and on sale.

Outdoorsmen(women)/Hunters: Turn that meat into jerky. Again, it’s the easy way to store it in less space and with less weight. Don’t hunt? Like the non-gardener, buy when on-sale and make your own for far less money and far better nutrition than store-bought. Also make light weight foods to take with you for the campground or snacking along the way.

The Generally Health Conscious: Make easy healthy snacks for you and your children, for a fraction of the cost and better nutrition. Dried fruits, vegetable chips, leathers/roll ups, etc. with no added ingredients you don’t want in them.

Hobbiests: Whether you’re drying flowers, herbs, craft projects, or making doggie treats you’ll love a dehydrator.

Living Foods Eaters: Those on a high raw diet will love the Excalibur for preparing “gourmet” raw dishes, dehydrating snacks, and more – with the ability to set the temperature low enough to retain the viability of the “life force”/enzymes in the food.

YOU!


Green Smoothie Know-how

When making Green Smoothies, I rarely use a Recipe. I grab whatever we have on hand that sounds good. I aim to include a combination of more greens than fruits. Some recommend 40% fruit 60% greens, and for beginners to start with a reversal of this percentage, 60% fruit 40% greens, then work up to the other way around. If even “40% greens” is too much for you to begin with, start with less and gradually work your way up. In real life, this is not a “science”, we’re talking close to equal amounts, a little more, a little less.  I say, just put in 2-3 fruits and a couple large handfuls of greens, to fill your blender up, starting with just 1 large handful if you need to.

The other “rule” is to have a variety. It is important to “rotate” your greens (and fruits), and not have the same one every day. However, I acknowledge that 1) when beginning to eat more Greens, people usually prefer the more mild tasting ones. 2) when shopping in local grocery stores, it may be next to impossible to find much variety that is organic (and remember lettuce is one of the “Dirty Dozen”.) Baby Spinach is very mild and easy to find organic, so it is most often included by “newbies”. However, we encourage you to branch out. Romaine is also usually available organic. (It’s not one of my faves in Smoothies though, but maybe it will be yours.) Baby Spring mix is the other kind of lettuces that is easier to find organic. Kale is also commonly used in Green Smoothies, but may not be easy to find organic.

In addition to your fruits and greens, you can also include other add-ins. Fresh almond milk, almond butter, other nuts, flax, chia or other seeds, raw coconut oil, raw nut or goat milk yogurt, carob powder, or “superfoods”.

Learn more about Green Smoothies in Green Goodness ~ A Freedom & Simplicity™ Guide to Green Smoothies.

Have fun creating your favorite Green Smoothie today!


Friday Food – Granola

Nuts. Flakes. And Fruits. Granola is known as the “health food”. But beyond that granola can be a great Good for You-Naturally!™ food for our health. It is super simple to make, and has endless variations – according to your tastes or what you have on hand.

Granola begins with grains – traditionally flakes, that is rolled oats, but more healthy is soaked/sprouted and dried oat groats or buckwheat. Soaking releases enzymes inhibitors that are in the grain to keep it dormant, (from sprouting,) to preserve it. Soaking will once again awaken it to life, and our health, providing better digestibility. If you prefer, you can leave the grains out and use nuts and seeds only.

Nuts and seeds are the next key ingredient. We stick to raw ones, for their health and life giving factors. Ideally, these should be soaked and dried too, to release the enzyme inhibitors. If you have tree nut allergies, leave those out and just include seeds that you are able to tolerate.

Sweetener and fat are the next ingredients. These can also help hold the granola together, and are both somewhat optional. Dates are a great natural sweetener that also help bind the other ingredients together for a crunchier/chunkier granola. Raw honey and pure maple syrup are other good options, if you use them. Raw coconut oil is our good fat of choice. Of course, the nuts and seeds also provide good fats. Flax seed is a great seed to include that also provides good fat and acts as a binder. While adding these liquid ingredients, you may add a bit of water too.

Seasonings are our next ingredients. Any of your baking spices may be appropriate, such as cinnamon, nutmeg, allspice, even ginger if you really like it. I also like to add real vanilla and/or maple flavors.

Finally we get to that third category, fruits. I’m listing them last, because all the other ingredients are mixed together and dried or baked before adding dried fruits. Dried coconut shreds are a staple in our granola. Raisins, dried apples, apricots, or most kinds of dried cherries or berries – strawberries, cranberries, blueberries, raspberries, etc. –  can be added. You could also add fresh apple bits, or even a bit of applesauce as a binder, before dehydrating/baking.

OK, I’ve said it twice, dehydrating or baking. We recommend dehydrating, at low temperatures, for retention of nutrients. If we’re going to make a good healthy food, we want to keep as many of the nutrients as we can intact. Cooking destroys far more nutrients than dehydrating at low temps does.

That’s it. Mix it together and dehydrate it at about 105°-110°, until dry. Store in an air right container. Preferably glass.

What about proportions. Use what you like. there is no right way. But below are some proportions we like – and in parenthesis one of our fave mixtures. All amounts are approximate. This one is more traditional and uses the more common rolled grains, which are steamed, not completely raw, but still a good whole grain.

Lisa’s Good for You-Naturally!™ Granola

7 cups flakes (rolled oats 5 c., rolled barley 1 c., rolled rye 1 c.)

1-1.5  cup raw nuts and seeds – any combination you like (1 c. almonds, 1/4 c. sunflower seeds, 1/4 c. sesame seeds)

1/2 – 3/4 cup sweetener/water  (1/3 c. maple syrup, 1/3 c. water)

1/4 c. fat/oil (raw coconut oil)

1/4+ c. ground flax seed (These are full of really good fats that we are all so lacking, always add them.)

1-2 tsp. spice (1.5 tsp. cinnamon)

1-2 tsp. flavoring (1 tsp. vanilla, 1 tsp. pure maple flavoring)

Mix all together and dehydrate. When dry mix in:

1+ c. chopped dried fruits (1/2 c. coconut, 1/2+ c. raisins, dried apples or strawberries.)

Store in air tight container.

Serve with milk, or in/on yogurt, or just by the handful!


[subscribe2]

White Chicken Enchilada Bake

It’s not Food Friday, but it’s been a long time since I posted a recipe, and this one was requested.

Lisa’s White Chicken Enchilada Bake

Cook:

  • 1 whole chicken – either boil on the stove or cook in crock pot with some water. Cool, debone and shred. (You need 2 c. shredded chicken for this recipe. 1 Chicken – at least the size we get – will make about 3 pans of Enchiladas.)

Make Green Chili White Sauce:

  • 1/4 c. butter
  • 1 onion (diced)
  • 1/4 c. (fresh ground) whole wheat flour
  • 2 c. chicken stock

Melt butter and saute onion in it. Add 1 1/2 c. chicken stock and bring to boil. Shake flour with remaining chicken stock, and whisk into the boiling stock. Cook till thick.

Stir in:

Shred:

  • 2  c. jack or cheddar cheese – we use raw goat cheddar.

Slice 12 (sprouted) corn tortillas into strips.

Preheat oven to 400°.

Layer into a 9×13″ pan as follows.

  1. 1/3 of the white sauce (approx. 1 c.)
  2. 1/2 of the tortillas
  3. 2 c. shredded chicken
  4. 2/3 of the cheese
  5. 1/3 of the white sauce
  6. rest of the tortillas
  7. rest of the white sauce
  8. rest of the cheese

Bake for 30 – 40 min.

Serve with Mexican Salad, Spanish Rice, (and opt. Corn Bread w/ honey butter.)