Now the fun comes! You have your basic supplies of paper, measuring and cutting tools, and adhesives from the Papercrafting Supplies 101 series, and it’s time to move on to the decorating supplies. Although you could probably put together a plain album and even a decent card if you’re able to do nice writing or calligraphy on it yourself, most people are going to want to add a little extra pizzaz to their paper crafting projects.
What you actually buy, for all of these extras, is going to depend totally on personal taste. You know you and your paper crafting needs and desires. No one else does. What do you like? What type of paper crafting are you doing? Who are you doing it for? If you are making products for others, children’s birthdays, albums for friends and family members, etc. their needs and taste will also come into play for what you buy.
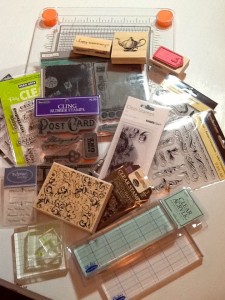
For that “extra”, again we’ll look at 3 categories: stamps and inks, punches, and embellishments. I’m classifying stamps and inks as one category, as you can’t use stamps without inks, but will be presenting separate posts for them, so they don’t get too long. (This one on stamps is going to be pretty long anyhow.)
I divide stamps into 3 types of designs, of which you’ll probably want some of each: sentiments, single design (which I generally call decorative, though of course all of them are decorative,) and background. There are also 3 basic kinds of stamps: mounted rubber, cling rubber, and cling clear. Let’s start with the types of designs.
Types of Designs
Sentiments are word sayings, like Happy Birthday, With Deepest Sympathy, Just Because, etc. You can buy sets with an assortment of sentiments for various occasions, so you can probably start out with just one set. That will probably be cheaper than buying many individual stamps, but if you want to totally customize your collection, you can buy individuals. You may also want to branch out, (at least over time, after getting your initial set,) to several variations of the ones you use most, such as several types of birthday greetings, either in one “birthday” set or various single stamps. But perhaps you aren’t making cards. Do you still need word sayings? Probably. There are also stamps that say things used in albums, such as, Memories, Family, Summer Fun, etc. and other word stamps that are useful on your other paper projects. Look for sets or individual stamps that cover your paper crafting needs.
Single design, or decorative stamps are used to add a focal point. These are designs such as a flower, or a clock, or a suitcase, or a cake, or a person, … You will use these types of stamps on nearly all your work, and they’re the ones you will buy the most of. Again, you can buy singles or sets with several single designs that relate to each other. Many times a set will have several single designs and a sentiment or two that goes with them. Build your collection over time based on what you like and what is needed for the types of projects you do. Small mini sets can be picked up for $1, large sets may be $25 or more. But consider what you are getting in the set. (This and the following apply to Sentiments also.) For the number and size of stamps, as well as quality, it may be worth it to get a few more expensive sets, than many cheap sets/individuals. Besides, the big box craft stores have frequent sales marking stamps down 40-50%, or with a coupon for one item 40% off.
The last design type is background stamps. These are large stamps that cover a whole area, such as the entire front of a card. You may or may not choose to use background stamps. They are not as necessary as the other two types, but some people enjoy using them. Unless this is something you really enjoy using, you will probably only have a couple background stamps for occasional use, if any at all. Choose a couple of good multi-functional designs.
Kinds of Stamps
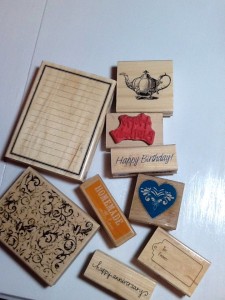 There are 3 basic kinds of stamps. Mounted rubber stamps are the traditional type. These are an etched piece of rubber that is mounted on a cushion on a wood block, usually with the design stamped on the top of the wood, making placement easier. Rubber stamps provide a crisp, clear impression, even with fine details. They can be used with nearly any type of ink, and are quite durable and will last a REALLY long time, a lifetime or much more. They are really high quality stamps and only have a couple of cons. Since you can’t see through the wood mount, you can’t see exactly where your stamp will be. (There is a solution for that called a stamp jig.) Also as your collection grows, it will take up quite a bit of storage room. Also rubber stamps tend to cost more than the other options (because of their quality). Wood mounted rubber stamps are usually sold individually. Occasionally you’ll find a few mini’s in a set, and of course small alphabets come in a set.
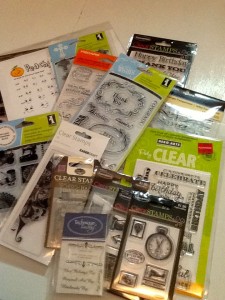
More recently, the newer clear cling stamps have gained much popularity. These can be made of photopolymer resin or (more commonly) vinyl, and they are unmounted. To use them you temporarily mount them to an acrylic block, that they cling to, while you ink and stamp with them. In fact you can mount several at once, to stamp a complete design, of sentiments and decorations in one stamping. Therefore they are super for getting everything lined up just as you want it. Then you clean them (see below), take them off the mount and return them to their package. I love clear cling stamps because you can see exactly where you are stamping your design, since they are see through, and because of their popularity there are a lot of great designs available. But clear stamps have their cons too, and their quality varies greatly.
Photopolymer stamps are better quality, sturdier, and closer to rubber in hardness and performance than vinyl stamps. They are usually made in the USA. Vinyl stamps are usually cheaper (in quality also), usually made in the Orient, and may not produce as sharp an image, tending to wobble more and to cause the ink to bead up. (But there is a wide variety of quality available.) Because they are more flexible than rubber, you need to only press lightly or your image may smear. But you do need to gently press evenly, all over the stamp, to transfer the image. Also a plus is, because clear stamps are flexible, you are able to bend them to do stamping around a curve, a fun technique. Most clear stamps come in sets, large or small, unless they are a background stamp in which case they may come individually.
The problem some (many?) clear cling stamps have is ink beading. The ink may not spread evenly over the whole stamp, but rather bead up on the stamp. That may be fine if you’re going for a distressed look, but not so nice if you want a crisp clear sentiment stamped. Different brands and qualities of clear stamps, as well as different inks used, are better or worse at beading. (Cheap stamps may also tear easily or break down over time. Never use acetone, bleach, or oil based inks with clear stamps. Solvent based inks, such as StazOn will also cause them to deteriorate.) Good quality clear stamps will serve you well for years, but perhaps not decades.
Back to beading. There are 3 ways you can reduce beading on your clear stamps. First, your clear stamps (especially vinyl ones) should be conditioned by washing them with mild soap and water before using, to get manufacturing residue off them. A second step, that some recommend for all clear stamps and others only resort to if the washing doesn’t remove all the residue, is to go over them with a (good old pink pencil) eraser, then rinse, before using. Other crafters sand them lightly with an emory/manicure board, rather than using an eraser. (I’ve had to do this on some.) The third step some do (instead of the second for some, in addition to it for others) is to first “prime” clear stamps by inking with a pigment or VersaMark ink. Some just do this before using the stamp the first time, and leave the ink on the stamp to dry. Others stamp it into VersaMark before stamping it into a dye ink, each time. This leads us into, the types of ink you use also can make a difference. (I’ll talk about that in the post on Inks.) Others claim the only conditioning a clear cling stamp needs is stamping a few times onto scrap paper. With a little TLC, clear cling stamps can be a good choice, especially if you get photopolymer ones, but even vinyl (which you will find far many more of than any other kind) can be worth adding to your arsenal.
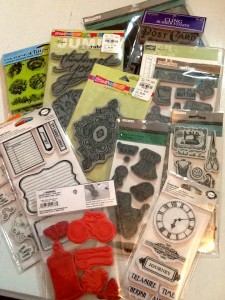 The third kind of stamps are unmounted or cling rubber stamps. These are kind of the best of both worlds. You get the sharp, crisp images and durability of a rubber stamp and the convenience and ease of a cling stamp. Unmounted rubber stamps are just like wood mount rubber stamps, without the wood. You put them onto an acrylic block when you want to use them, just like the clear cling stamps, making much less storage space needed. Although you still can’t see through the stamp itself, it is mounted to an acrylic block that you can see through, making placement easier, and allowing for mounting multiple stamps at once for a complete image. Although these stamps themselves (not the images they produce) don’t look as “cool” as the clear stamps (usually grey foam cushion), they really have the benefits of the other two kinds combined, making them an excellent choice. (Just a quick note about using multiple stamps on one mount. You need to be sure all the stamps are the same thickness. Clear cling and rubber cling are not the same, and some brands of clear cling may not be the same as other brands of clear cling. Doing a test stamp is always a good idea anyhow.)
My personal preference for stamps, if I can find similar stamps at close to similar prices, leans toward the photopolymer as a first choice. (I just really like that see through design.) Cling rubber is second. Although wood mount is what I began with, (all there was back then,) I really try to stay away from them because of the storage issue and placement issue. Although I’ve had my share of frustrations with vinyl stamps, and they probably come in as my least favorite; because they are the most plentiful, readily available and cheapest, I have the most of them.
Stamp Mounts
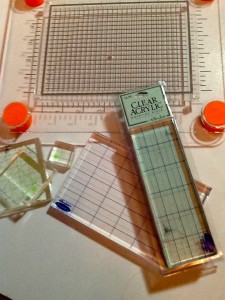 You will need an acrylic mounting block to use both your clear cling and unmounted rubber stamps. You can get thick block or thin blocks, plain blocks or blocks with grid lines, straight edged blocks or wavy edged (for finger grip). You can even get a stamp press that has foam corners that raise it off your work surface, suspending the stamp in mid-air. You just press it down, for even stamping and no shifting. I recommend either the stamp press, and/or thick blocks for getting a good hold on them, and ones printed with a grid for making it easier to line your stamp up straight. I also prefer the straight edged blocks to make it easier to line up straight with your paper edge, but that’s totally personal preference.
There are many different sizes of acrylic blocks. Your block needs to be larger than your stamp; but you have better control over it, if it is not too much larger. Therefore having a few different sizes is handy, at least a 2×6″ and a 4×6″. I’d probably add a 2 or 3″ square also. Another option is to get the Fiskars Stamp Press. It can be used with stamps of all sizes, yet you still get nice even pressure.
The surface you stamp on will also make a difference in how clear your stamping is (as well as how you ink your stamp). Some recommend stamping with a mouse pad (or special stamping mat, or even a magazine or a few layers of newspaper) under the paper for a clearer impression. Others say you should stamp on a hard surface. In general, the pad is more needed for the clear cling stamps, as they don’t have the cushion built-in that rubber stamps have. Experiment to see what works best for you. Whichever you do, be sure your surface is flat and stable. As for inking, gently tap your stamp on your ink pad (or, many prefer, ink pad onto your stamp, especially for large shaded areas) a few times. You can also give a gentle twist, if you want. Do not press too hard or you can over ink your stamp and cause smudging.
One final note, on cleaning your stamps. Mild soap and water works great. Wood mount stamps, of course, should not be submerged in water. Many people use baby wipes, but be sure to get ones with no alcohol and no aloe in them, and no anti-bacterial wipes. I use my homemade wipes that are made with a mild soap and other gentle ingredients. A bit of glycerin (with your soap and water) in your cleaner (homemade wipes) can be helpful for reconditioning rubber stamps. There are also specialty stamp cleaners, if you want to spend the money for them.
Stamps are a fun and easy way to add some pizzaz to your paper crafting projects, and there are so many different designs available. Start looking at stamps and find ones you like, and I’ll be back soon to talk about Inks.
[subscribe2]


