Design Studio Update 2

I’ve been working on my Design Studio a bit again. Have got a few things hung: my double-sided clock, a shelf, and a couple “letter racks”.  So I wanted to post an updated picture, and also a couple organization tips. (A second shelf will go above the first, when I decide how much higher.)

My Studio Update ~ from Me & My House

This is the crafting area of my studio, primarily paper crafting. I love that all my supplies are within reach, and that they are all modulars that can be changed around if need be–both moved around easily on wheels, and stacked in different ways. I also love that most everything is in drawers, shut away from sight but easily accessible, and I don’t have to dust every little piece. I’ve added a couple more modular pieces since my last update.

My Studio Update ~ from Me & My House

Within the drawers/shelves is further organization to make it easy to find what I’m needing quickly. The top drawer of the craft station (where my Cricut and Cuttlebug sit) holds my most used tools–scissors, rulers, (pick, tweezers, …) and most used adhesives (ATG, Scor-Tape, glue dots, Tiny Attacher). My paper trimmer, scoring board, cutting mat, and Envelope Punch Board slide into slots at the top of my modular stack. My ink pads are in repurposed cassette tape boxes on the shelves next to those. My patterned paper is on the bottom shelf of the modular stack, and my card stock in another modular on wheels (under my desk).

In between the paper and the ink is my newest organization update project–in the second modular in the stack. It now holds my stamps (all but wood mount) and dies, in DVD and CD cases. I love the uniformity of this storage. It takes up so much less room, makes things easier to find and easier to get to–and was far less expensive than other storage solutions. I also don’t like the bulk of storing in 3-ring binders, so knew that wouldn’t be the right solution for me. I’m loving this.

Stamp & Die Storage ~ from Me & My House

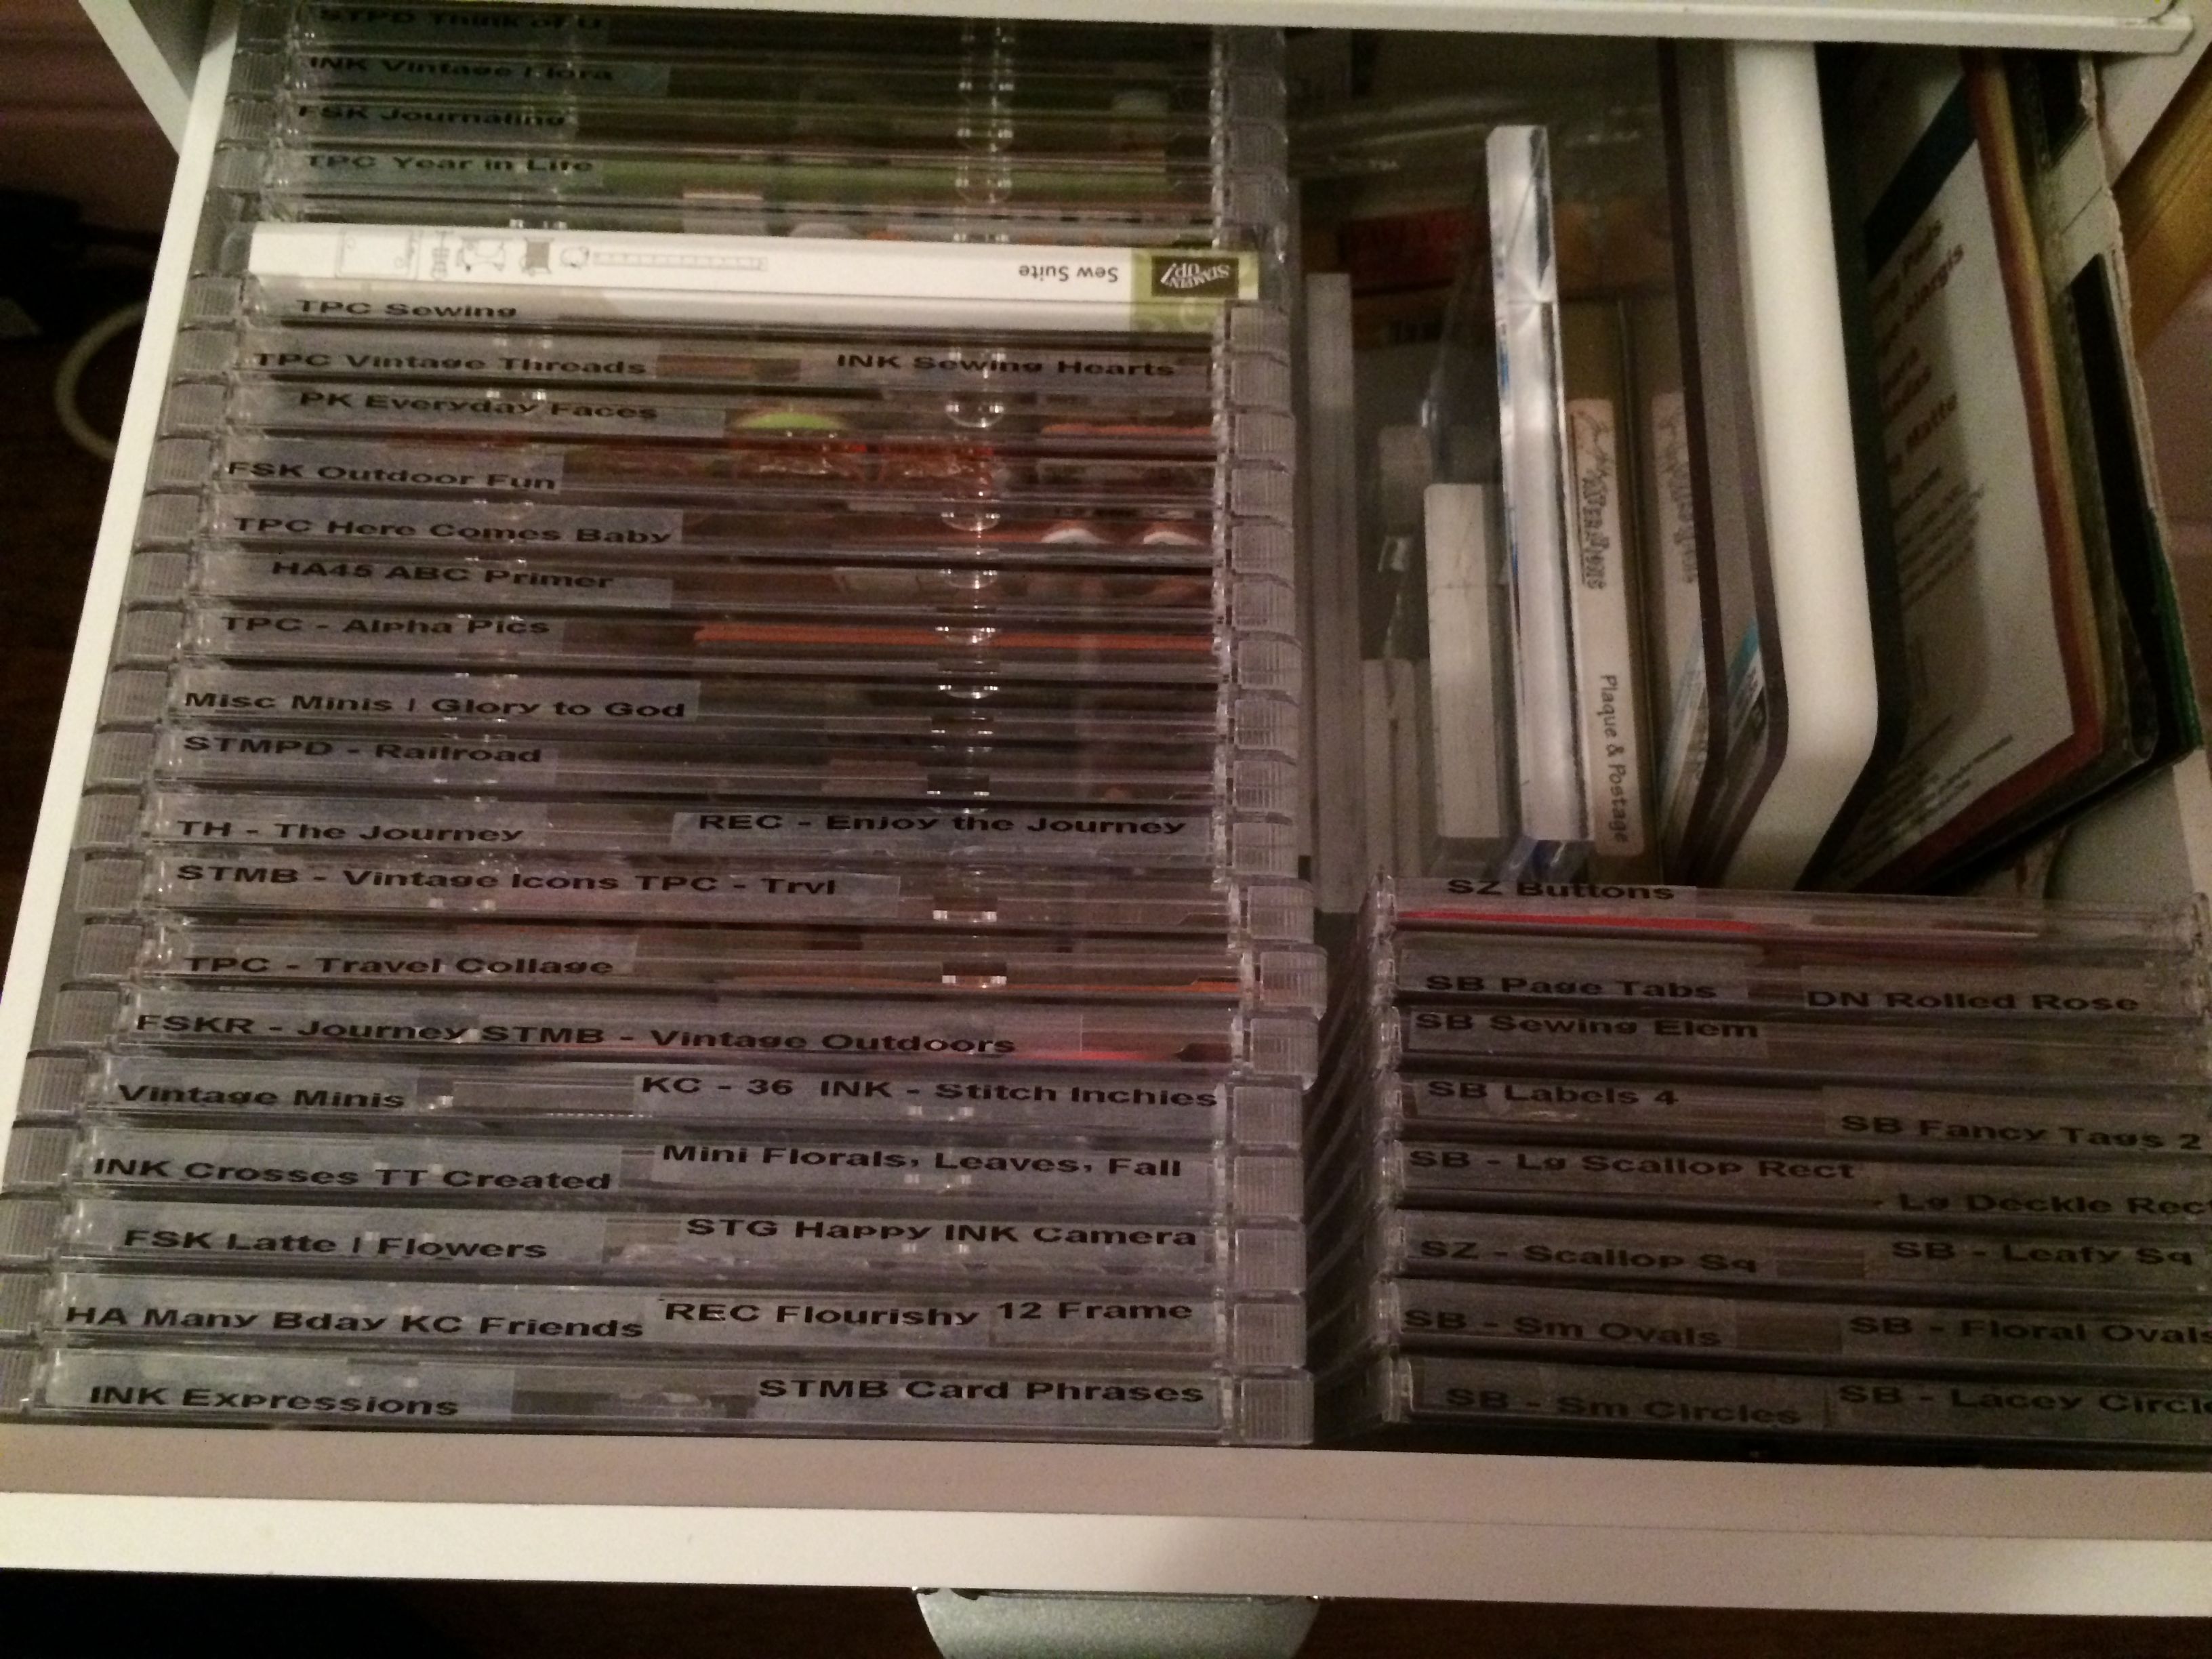
The CD cases are standard size (not slim,) standard cases with the tray insert. (Staples) I removed the trays.  The others are DVD size jewel cases, that don’t have the hub (knob) inside. Both of these are GREAT for this type of storage/organization.  Clear and rubber cling stamps will both cling to the inside of these cases. For the metal dies, I first attached a couple strips of magnetic tape on each side to hold the dies in place. I like that way best, but the magnet on the tape is not very strong. So I tried a strip of double-sided tape, since I figured that is what they are on in the package. We’ll see which way works out best in the long run.

Stamp & Die Storage ~ from Me & My House

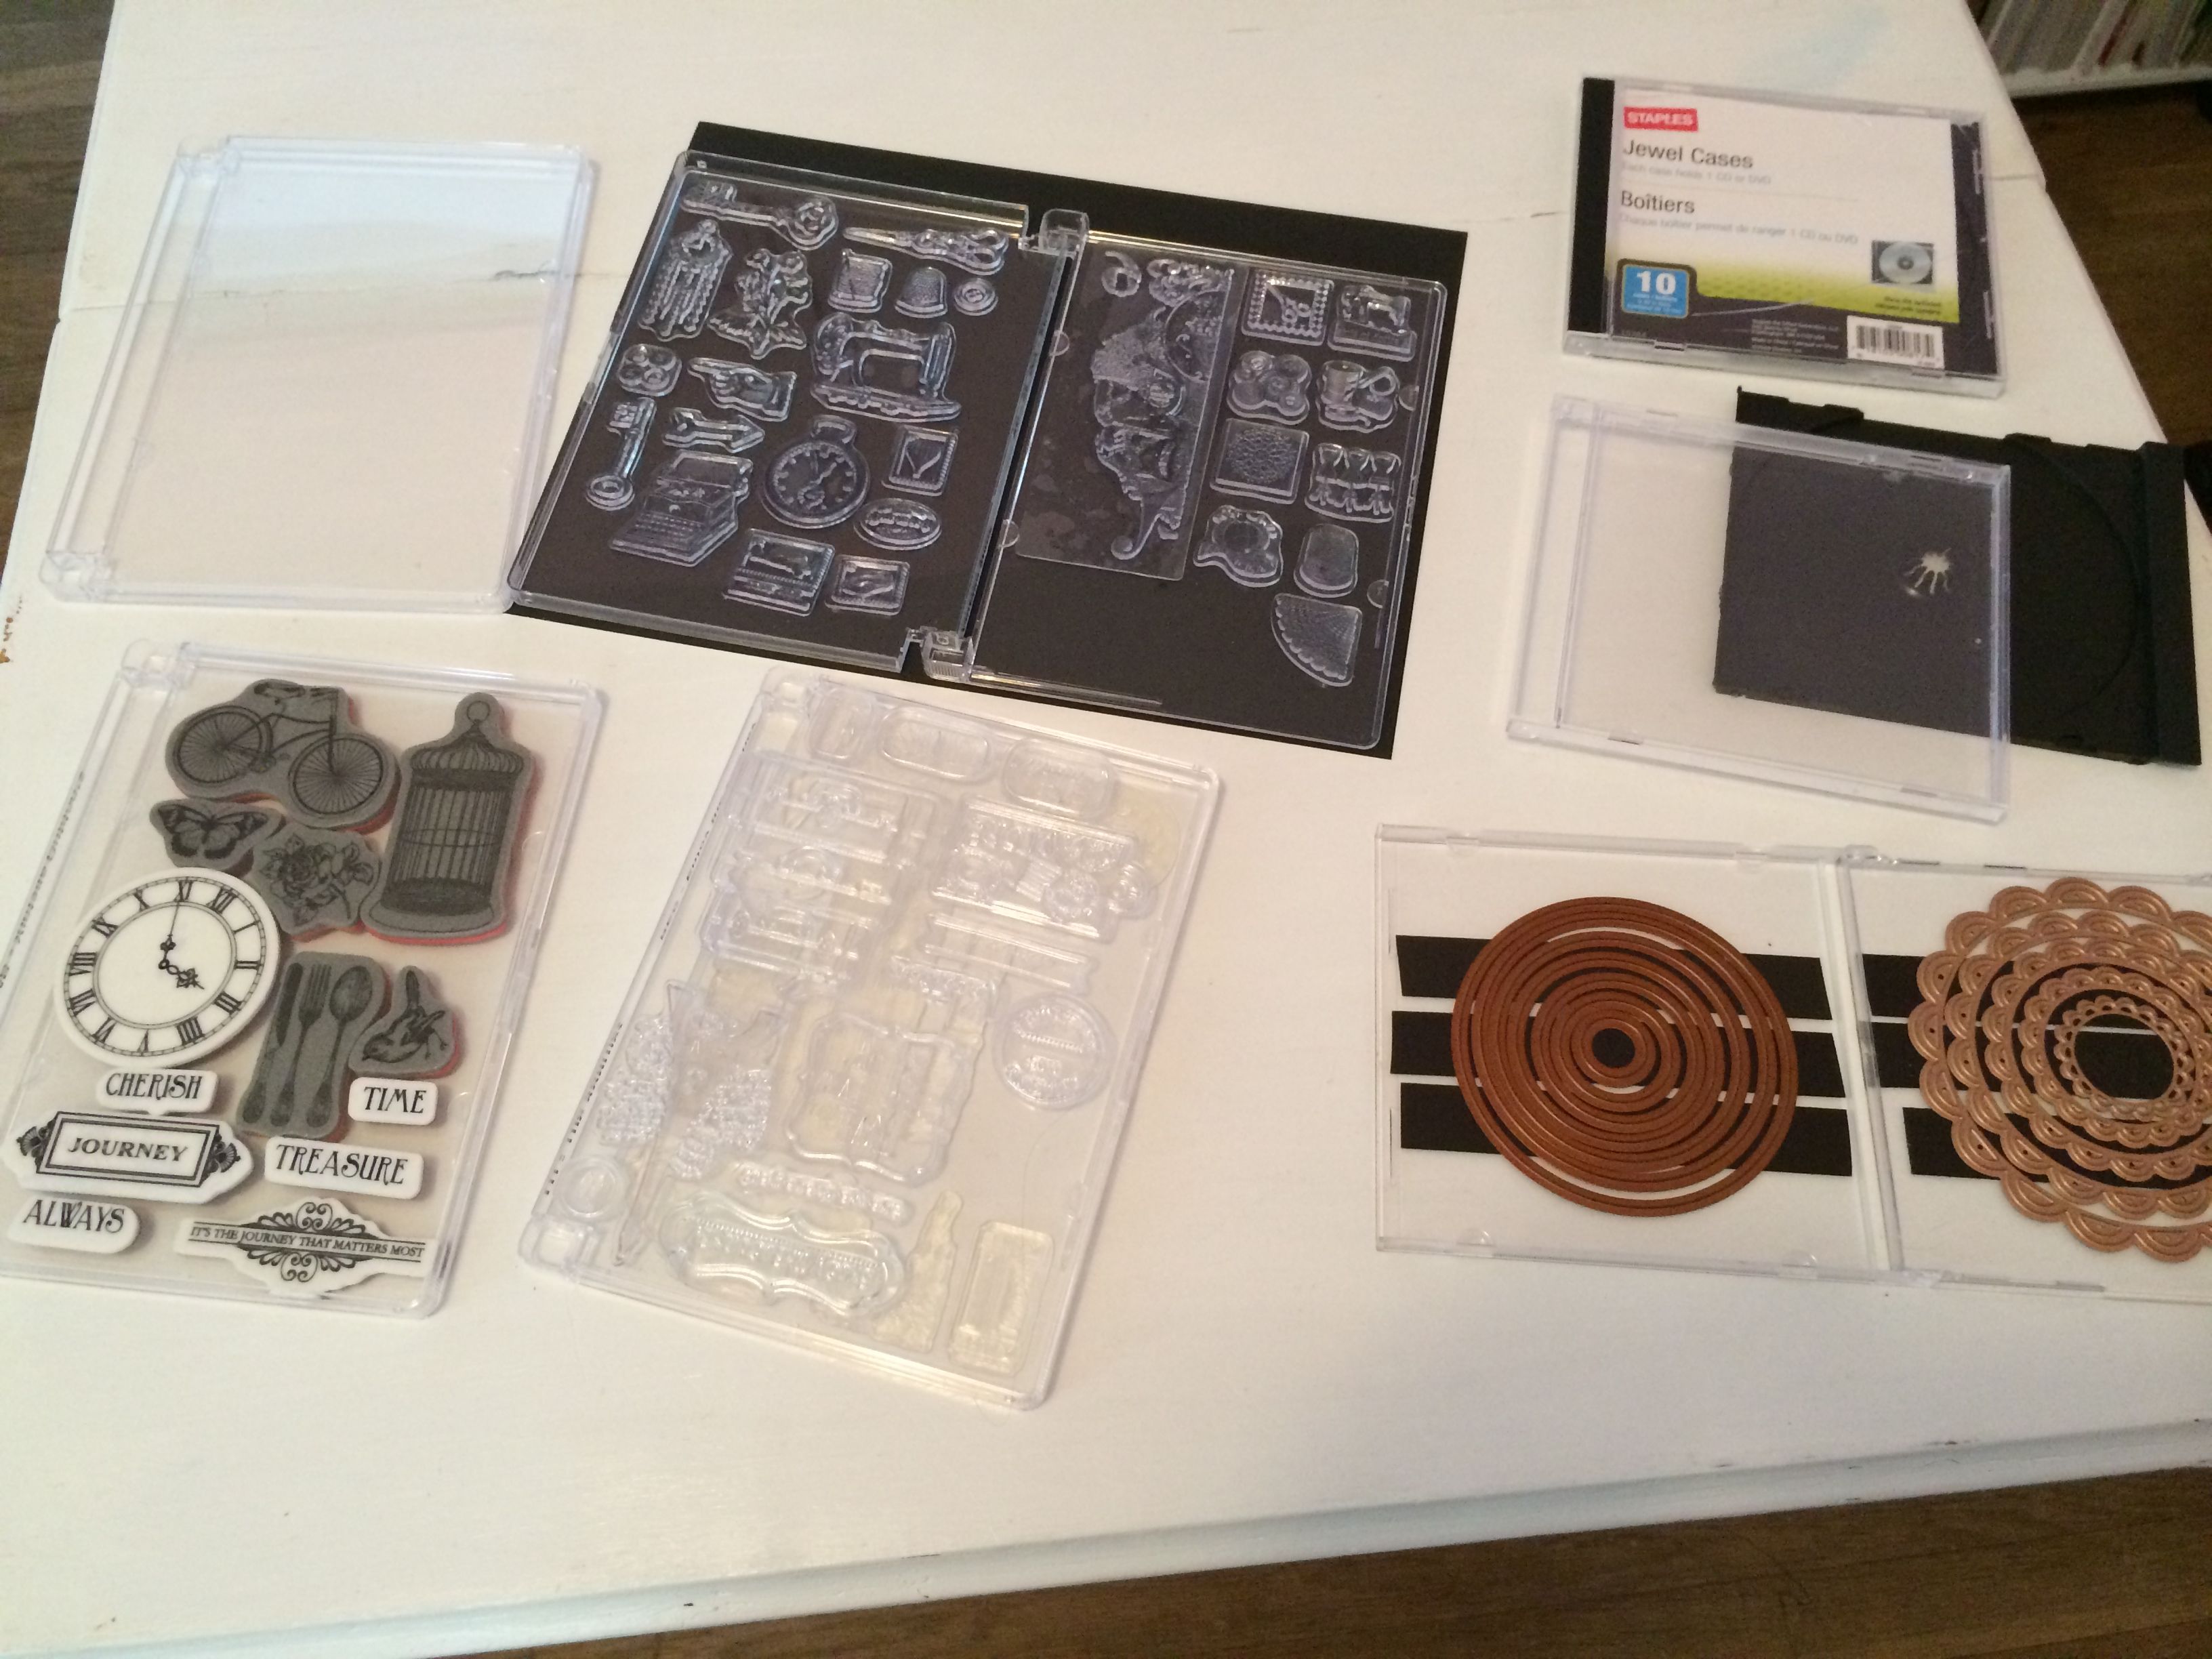
Clear stamps and dies will fit 2 layers in the cases–one inside the front, one inside the back of case. Cling rubber stamps will fit only 1 layer. I used a label maker to label the spines. You can also adhere a picture of what’s inside to the front if you want.

I chose to use both DVD and CD cases because my drawer fits a DVD case next to a CD case across the width. So I started by putting my stamps in DVD cases and my dies in CD cases. My stamps all fit the row so far, but when I get more the extras will be put in CD cases to complete that row.

Clear plastic VHS cases are the perfect size for holding wood mounted stamps, but I only need 2 or 3 of them, and to buy them without the hub (which I haven’t been able to find to repurpose) they come in bulk (10, 25, 50, +). I don’t want a bunch of empty VHS cases sitting around, (or to pay the shipping that is more than the cases for 10) so my wood mounted stamps are still in cigar boxes (and may remain there.)

What tips do you have for inexpensively organizing your crafting space?


[subscribe2]


SaveSave

SaveSave

Helpful Hearts

I’m taking a little detour from paper crafting in this post. The cards I need for this month are done, and I need to prepare for a crochet class I’m teaching. In keeping with the Valentine’s theme that I started with cards last month, (but didn’t get pics of,) I’ve designed a fun Valentine’s project.

I’ll be teaching beginners how to crochet, and we’ll be making Heart Coasters. They’re easy enough for anyone who has learned the basic stitches, and a fast project for beginners to complete without getting overwhelmed. And they provide a handy, furniture-saving place to put your glass or mug. They’re crocheted with Peaches & Cream cotton yarn.

Crocheted Heart Coasters ~ from Me & My House

You can make some too. Download my instructions here. FREE to use, just don’t copy, repost, or claim it as yours. Instead provide a link to this post (not to the file). Thanks.

Hope you enjoy them.

Entered at the All Things Valentines Link Up at Joyous Notions. Check it out for All Things Valentines.


[subscribe2]


Flash Cards

I’ve been having fun making flash cards this week – and I don’t mean the kind you drill children in educational facts with. I’ve been making greeting cards with the Flash Card and Flash Card 2.0 templates by Connie Stewart. Flash Cards are rectangles of card stock that you pre-cut and have on hand to create cards in a flash. You’re able to create 8 cards from 1 sheet of colored card stock and 1 sheet of neutral card stock (plus card bases).

I’ve created a few of each – modifying Connie’s designs to fit my supplies and likes. Take a peek at some of them.

Flash Cards

"Flash Cards" made with Connie Stewart's template ~ from Me & My House

Connie’s videos that provided inspiration for these: left to right –  (gatefold)  Tri-Fun Fold, (shadowbox) Stand-Up.

Flash Cards 2.0

"Flash Cards 2.0" made with Connie Stewart's template ~ from Me & My House

Top row, my own design. Links to Connie’s videos that provided inspiration for cards on the bottom row, left to right: Amazing FriendSoft n SweetHappy Valentines.

Where do you get inspiration, when making cards? Have you ever used Connie’s Flash Card templates. If so, post below.


[subscribe2]

For a Friend

This past week, a friend of mine was in great need of encouragement. I wanted to do something special for her, so of course, I first made her a card.

Floral and Butterflies Garden Encouragement Card ~ from Me & My HouseThis pretty flowers and butterflies pattern paper seemed like a good place to come for comfort, along with the Scripture, “Come to Me, all you who are weary and burdened, and I will give you rest.”

But I didn’t want to stop there, so I found a printable tag for a bookmark, stamped a Scripture on the back, Mod Podged it (for sturdiness), and added some hemp twine. (And added more Scripture and my sentiment, and a cross inside the card.)

Bookmark tag & Encouragement Card inside ~ from Me & My House

I couldn’t just put these in a plain envelope, and besides I wanted to add some chocolate for her. I love the clutch purse-look boxes, made with the Envelope Punch Board, but have never seen one to fit A2 (standard size) cards. It was time to put on my design thinking cap. This is what I came up with and I LOVE it! It is the perfect size for an A2 card, and holds a few goodies too. And I love the look. I’ll (hopefully) share a tutorial with you for it soon.

Adorable Clutch Purse Box/Envelope ~ from Me & My House

The Clutch Purse Box/Envelope was made on We R Memory Keepers’ Envelope Punch Board
from 1 12×12″ sheet of double sided card stock, from Pink Paisley Spring Jubilee collection. The ribbon is 5/8″ satin ribbon from Walmart, the gem Vintage Floral from Paper Studio/Hobby Lobby, and the sides have 2 pearl brads from Kathy Davis Designs Happiness Collection.

The printable tag is from Eclectic Anthology, Free Printable Romantic Gift Tags.

The card base is Cream card stock (Recollections/Michael’s), design papers Kirby Teesdale Studio, and Kellerkurtz & Company (both PaperStudio/Hobby Lobby). Punches used were scalloped scallop edge, journal plate and bracketlarge flourish square, and circle, all from EK success. The sentiment is stamped on a rectangle cut unconventionally with the deckled rectangle die (Spellbinders Nestabilities.) Stamps are all wood/rubber – both Scriptures from Stampabilites, “thoughts & prayers” Hero Arts (similar), Cross from Michael’s dollar bin I think. Inks are all Tim Holtz Distress Inks. Metal flower from Queen & Co. with a flat back pearl in the center.

[subscribe2]

Some affiliate links within this post. Buying through them will get you good prices and help support Me & My House ministries.

Children’s Birthday Cards

Following the 2 cards already this month, for adults, we had 2 children’s birthdays so far this year. More card making!

The first was for a boy, but could be for either. Very colorful and fun! I also cut his name out on my die cut machine with a ballon font and put it inside with our greeting. So fun.

Colorful Kid's Birthday Card - from Me & My House

Card two was for a little girl. It was used more as a package tag. I wanted to add a fun element for her, and pink of course, yet keep it clean and simple. The polka dot lady bug was perfect.

Little Girl's Polka Dot Lady Bug Card ~ from Me & My House

Supplies used for boy’s card: Card base white card stock (GP/ Walmart), Eat Cake design paper stack (Paper Studio/ Hobby Lobby), red baker’s twine (Celebrate It/ Michael’s), Deckled Rectangle die (Spellbinders Nestabilities),  “Happy Birthday” rubber/wood stamp (Stampabilities/ Hobby Lobby), Barn Door Distress Ink (Ranger/Tim Holtz). Xacto corner rounder.

Supplies used for girl’s card: Card base white card stock (GP/Walmart), pink card stock layer Pink Buttons (Recollections/Michael’s), polka dot prints The Basics (Paper Studio/Hobby Lobby), black card stock (Paper Studio), lady bug die Doodlecharms (Cricut cartridge). EK Success mini scalloped edge.

[subscribe2]

Men’s Cards – Birthday & Sympathy

The beginning of the new year brought a birthday and a death that we wanted to send our thoughts and prayers for, both for men. I designed the cards in a similar way, and with some of the same supplies, but appropriate for each. Both were simple, classic, “manly” designs.

Simple, classic, Man's Birthday Card ~ from Me & My House

Sympathy card - masculine, simple, classic - from Me & My House

I really like the deckled rectangle dies (Spellbinders Nestabilities) for using on men’s cards in particular. The classic vertical and horizontal lines work well for men’s cards also. Embellishments are kept very non-intrusive, leaving the sentiment to take the focal point.

Products used for these cards are:

Top card: Cream card stock (Recollections) base and rectangle, green plaid layer and woodgrain vertical strip from Christmas & Winter Stack DCWV. Memento Rich Cocoa ink. Inakadinkado stamps: “Crosses Inchies”, and “Birthday Wishes” sentiment.

Bottom card: Pure Chocolate Card base, Cream layer and rectangle, Old World Card Stock Stack layer (DCWV), Heirloom Stack (DCWV) vertical strip. Rich Cocoa ink. Stampabilities “Card Phrases” sentiment. Brown satin 3/8″ ribbon.

[subscribe2]

27 Unique Christmas Cards

Perhaps normal people, that don’t have a lot of “spare” time, would opt for making a simple, easy to assembly-line card – making them all the same. (Or buying cards.) But I guess I don’t fit the categories.

When I sit down to create, I like seeing what I can do with what I have. When I sit down to create, I usually also think, “I don’t have any ideas. What am I going to do?” A couple days of “free time” work later, this is what I have. 27 different, unique! Christmas cards. Many of the same elements used here and there, but no card just like another. And just when I think I’m done with a card (or other project), I think of a way I can enhance it, make it better. I also wonder, “What if I tried this?” Sometimes I do. Sometimes I don’t.

Handmade Christmas Cards ~ from Me & My House


Creativity is something that grows. You have to use it to gain it. It isn’t always brilliant, or jaw-dropping wonderful. I doesn’t have to be. It just has to be a growing expression of your ideas. Sometimes you’ll love it, sometimes not. I found, in doing this many cards at once, that even if I loved a design, I still didn’t make another card exactly like it. I continued to think of ways I could improve it. There were no designs I hated or scrapped. (And I hope that everyone that received these cards enjoyed them and the creativity that went into them.)

More Christmas Cards 2013 ~ from Me & My House

I encourage you to make 2014 a year of creativity. Take time to let ideas flow, to produce whatever you enjoy making. It may be in making up new recipes. It may be in re-decorating your home. It may be in making handmade cards.

Let me know where your creative juices are flowing.


If you’d like to know what the cards are made with:

Card bases are Recollections Cape Cod Collection (blues), Shades of Red (red), Cream, and plain ol’ Georgia Pacific white from Walmart.

Patterned papers are from DCWV Christmas & Winter Stack, (and maybe some from Winter Solstice.)

Embossing folders: Paper Studio Holly, Snowflakes, and Sizzix Textured Poinsettia.

Dies: Sizzex Scallop Squares, and Spellbinders Classic Ovals.

Punches: EK Success circles, scallop circle, journal label, flourish square and scalloped scallop border; Paper Studio star, Martha Stewart Arctic snowflake. We R Memory Keepers Corner Chompers (plain and decorative), and Xacto corner rounder.

Inks: Ranger’s Tim Holtz Distress Inks (various colors). Versa Mark – and “Glitz”, “Snow”, and “Silver” embossing powders from Michael’s, and Zap! heat tool.

Stamps: (clear) Inakinkado “O Holy Night” set, (cling rubber) Stampendous “Nativity Carol” set, Magenta holly and poinsettia, (wood/rubber stamps) Stampendous “Glory to God”, Inkadinkado “O Come Let Us Adore Him”, Stampabilities “Holly Berry Border”, “Glory to God”, “Intricate Snowflake”, “Itty Bitty Blake”, Hand Drawn Holly”, “O Holy Night”.

Darice hemp twine, Celebrate It baker’s twine, and various holiday ribbons from Hobby Lobby and Walmart. Wood stars from Recollections (Michael’s).


[subscribe2]

Wet Sock Treatment

It’s not a very smart thing to allow your immune system to get run down – with junk food, little sleep, and over busyness – especially when there’s a “bug” in the air, and fresh air is at a premium due to the temps outside. But that’s usually what happens over the Holidays.

‘Tis the season for a lot of coughs, colds and flu, and much of it has been going around here. But I don’t have time to be sick, 🙂 so I just kept plugging along in preparations for our Celebration of the Incarnation of our Lord and Savior. I knew once I slowed down I needed to be careful or I’d catch it too. And sure enough, once I took a couple days to relax after the holiday, I started to feel a cold coming on. But I wasn’t going to let it get me.

So what’d I do? Started fighting it in all out force before it could actually get ahold of me.

Some of the natural treatment preventative remedies we use are Certified Pure Therapeutic Grade™ Essential Oils from doTerra, Grandma’s Onion Syrup, GOCO, Herb Teas (not as effective as the EOs, but the sooth and feel good going down, and do have the same benefits, just not as efficient), and the Wet Sock Treatment. I’ve written about the others before, but I’ve never put the WST here before. So here it is.

I learned of the Wet Sock Treatment from a friend when our older children were little. She learned of it from her Naturopath/Homeopath Doctor. As it’s name says, it involves wet socks.

The Wet Sock Treatment is an immune stimulating treatment recommended by Naturopaths and other holistic doctors. The hydrotherapy (going from hot feet to cold socks) increases circulation and stimulates the immune system, so it’s good for cold, flu, fever, sinus, ear ache, sore throat, upper respiratory, infections, etc. I’ve even heard migraines. (But I’m not a doctor, prescribing anything to you, just telling you what we do that we’ve learned from doctors.)

WET SOCK TREATMENT


woolsockYou need a pair of very light weight Cotton Socks and a pair of heavy wool socks – cotton socks at least 90% cotton, wool socks at least 90% wool. Put cotton socks in a bowl/sink of very cold water. Soak your feet in as hot of water as you can stand for 10 minutes or more (or take a hot soaking bath). I add my EOs to my foot soak water (like OnGuard).  Immediately (after getting out) take the cold wet cotton socks out of the cold water and put them on. Then pull the dry wool ones over them. Go straight to bed and cover up. Leave the socks on all night. Keep covered. Rest well.

It’s best to do the WST at the beginning of coming down with something. As with everything, catch it fast to ward it off. But even later in the course it will be helpful. You may need to do it 3 days in a row, if the crud is already getting to you.

Try it. For your health! It may save you from the crud this winter.


[subscribe2]

Celebrate the Incarnation of the Christ

Have a Blessed Celebration of the Incarnation of our Lord and Savior, Jesus the Christ!

For unto us a child is born, unto us a son is given: and the government shall be upon his shoulder: and his name shall be called Wonderful, Counsellor, The mighty God, The everlasting Father, The Prince of Peace. Of the increase of his government and peace there shall be no end, upon the throne of David, and upon his kingdom, to order it, and to establish it with judgment and with justice from henceforth even for ever. The zeal of the LORD of hosts will perform this. – Isaiah 9:6-7


Glory to God in the highest, and on earth peace, good will toward men. – Luke 2:14


Veiled in flesh the Godhead see;
Hail the incarnate Deity,
Pleased as man with men to dwell,
Jesus our Emmanuel.


Then peeled the bells more loud and deep. God is not dead nor does He sleep; the wrong shall fail, the right prevail, with peace on earth, goodwill to men.


Yes, to those near and dear, “Christmas” cards are coming.

SaveSave

25 Free (or Almost) Advent Activities Part 4

This post is a continuation of a series on Advent. These are just some ideas for inspiration. Take what works. You can’t juggle these around as much since 3 of the 4 days are specific to that day. Have a great time helping your children prepare their hearts to celebrate the coming of Emmanuel, God with us.

2013 Nativity ~ from Me & My HouseHere are my last 4 suggestions:

22. Light at the 4th candle, the angle of Love, and either continue to read your Advent devotional, or read John chapter 1. Sing (and learn about) Love Came Down at Christmas, Coventry Carol, or another carol you haven’t read about yet.

23. Go look at Christmas lights and/or go caroling.  Make a choir of angelsor triangle box angels, or crocheted, or printable, or paper cone angels, or any others I may have added to my Pinterest Advent board.

24. Light the white candle. And read the story of Jesus’ birth from Luke 2:1-40. You can also include Matthew chapter 2, in between vs. 38 and 39 of Luke, or save it for tomorrow. Sing Away in a MangerSilent Night (and others. Read the histories of them, if you have time.)

Go to Christmas Eve Communion, if your church has a service.

Add the manger and baby Jesus to your Nativity.

25. You could read Matthew chapter 2 this morning (instead of the evening of the 24th). Sing Joy to the World!, Go Tell it on the Mountains, and others. Rejoice in Jesus our Savior!


What other ideas would you like to add in? Getting family pictures taken? More home decorating? More easy children’s crafts? More baking? Making/preparing and sending Christmas cards? Make gift tags and/or bags? More projects to make for the wildlife?

Remember, other ideas have been posted on my Pinterest Advent board, and several Christmas crafts/activities on my other boards: Misc. DIY and Papercrafts and Printables.

Enjoy preparing your heart and home for the celebration of His Incarnation, and just spending fun times with your children.