


If you’ve been a reader of my ‘from me’ blog long-term, you know I have several yogurt making posts there. I’ve also written a Beginner’s Handbook for Yogurt Making. But it’s time to experiment again.
Dairy-free yogurts tend to not set up as well without additives. I don’t really like my yogurt texture to be jello-like. Homemade soy milk yogurt does better and we’ve liked it. I prefer a raw yogurt if possible though. So I began looking again for options.
A “raw milk” I’ve made in the last few years that wasn’t on my radar back when I made my original yogurt posts and book is Coconut Milk. Now, I’ve never bought coconut milk; I don’t like the list of ingredients in it, same with other commercially made “not milks”. But I have made fresh Coconut Milk. Raw Almond Milk, our usual, is made quickly and easily at home, and we love it. But it doesn’t make a great yogurt on its own. A couple ideas got my brain re-thinking on successfully making not milk yogurts, and it’s time to experiment with the first.
I love young Thai coconuts. (Find them locally at a Asian grocer, Whole Foods, HyVee, or order through Azure Standard–all much cheaper than this link.) My favorite thing to do with them is to make fresh Coconut Water Kefir. (I’ll add an updated post on this blog and link it here.) Yummy, probiotic drink, great for the gut. I put it in smoothies a lot, and you can make fizzy fruit “pop” with it. We also love to just drink the raw coconut water fresh. The younger boys love to drink straight from the coconut itself. Sometimes (not often) make fresh coconut milk.
Generally, I use the meat in green smoothies or recipes. But the daily (or every other) making of coconut kefir water goes through more water than we use of the meat. That, having extra in the freezer, can be great for the occasional recipe that calls for larger amounts of coconut meat. But … What else could I do, on a more regular basis?
What is needed for yogurt, especially thicker yogurt? I knew the natural sweetness and fat content in the coconut would both be helpful. The key would be to make my own coconut milk so I could control the consistency of the yogurt, since I knew it wasn’t going to get much thicker than when I put it in.
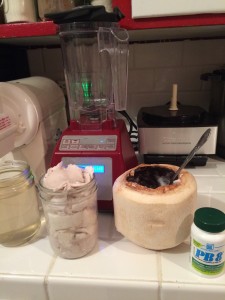
3 young coconuts provided 2 cups of coconut meat for me to experiment with, and way more coconut water than I knew I’d use in the yogurt. (Of course, the rest is for Coconut Water Kefir.) I decided to add a bit of my homemade Vanilla. And used probiotic capsules for my culture; as they were all I had on hand at 11 at night.
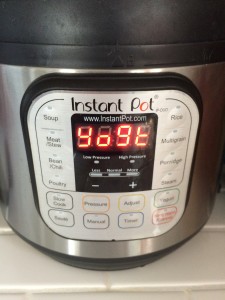
I culture yogurt in many ways. My dehydrator is my favorite because it’s the easiest and it’s always on my counter and usually running. But, since I started using an Instant Pot, and it has a Yogurt feature and I hadn’t tried it yet, I decided to go that way this time.
Here’s how I did it–and my notes.
- 2 cups young coconut meat
- 1/2-1 cup fresh coconut water
- 1/2 Tbl. homemade vanilla extract
- 2 PB8 probiotic capsules — opened and only the powder inside used, not the capsule itself
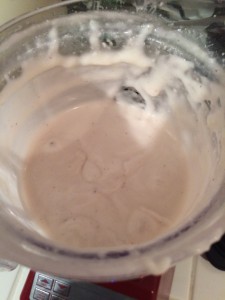
- Blend all together till creamy. Start with the smaller amount of coconut water, add as needed until desired consistency. (May take more than 1 cup.) I added the PB after the rest was creamy and just pulsed it in.
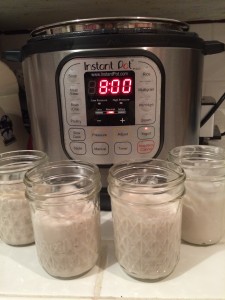
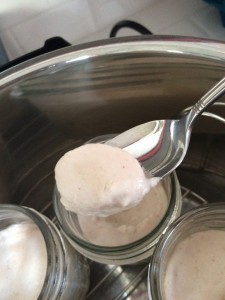
- Pour into serving size jars or these (that have lids) and culture at approx. 105° for 8-10 hours. Do not fill jars completely full, as it will expand as it cultures.
- Cap and refrigerate.
Notes:
- My coconut meat was pretty firm in 2 of my coconuts and very soft (and scant) in 1. I used 3/4 cup coconut water and will use more next time. (I was a bit afraid of getting it too runny.)
- I’m not real happy with the other ingredients in the PB8, and will look for a better option before I do this again. But don’t know if there is a better or not.
- As noted, the yogurt does expand and get a bit bubbly. (You know the culture is working and creating goodies for your gut.)
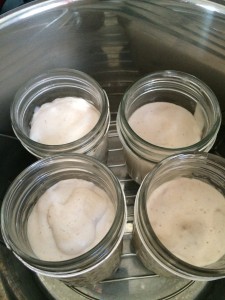
- To culture in the Instant Pot, you really do just set your jars in and hit the Yogurt button, and put the lid on. I did put my jars on a trivet, just in case the bottom of the pan may get a bit too warm. It doesn’t matter if you use the pressure lid, or a glass lid. It doesn’t matter if the vent is open or closed. You don’t have to put water in the bottom. The yogurt function will not get to the high temp to create pressure.
- You can culture yogurt anywhere that you can maintain a steady temp of approx. 105° for the tire needed to culture. Under 95° and the cultures won’t grow to create yogurt. Over 115° and the cultures will be killed, and not make yogurt. If where you are culturing your yogurt doesn’t have a thermostat, be sure to get a thermometer (that measures the right range–a yogurt or aquarium thermometer) to monitor the temp.
Here are some other ways you can culture yogurt:
- On a folded towel on top of a heating pad turned onto low and covered with another towel. Or in a covered box on top of the heating pad.
- In a box (or styrofoam cooler) with a small light bulb in it.
- In a gas oven with a pilot light (turned off).
- In a ceramic crock, wrapped in a blanket or placed in an insulated cooler.
- In a water bath in an electric skillet on low. If you do this be sure to test it out with a thermometer in a jar of water (instead of yogurt) to make sure it holds the correct temperature over that length of time. It used to be recommended to use a slow cooker/crock pot on low. I have not found newer crock pots to hold the proper temp. Perhaps getting it to the right temp, turn off crock pot and wrap in a blanket to hold temp.
- A yogurt maker. 🙂
Do you make non-dairy yogurt? What method do you use? Comment below!
[subscribe2]


 doTerra Essential Oils