Friday Food – Crunchy Granola

fridayfood2.jpgAs per request, here is my favorite granola recipe. Get this and over 60 other Good for You-Naturally!™ family-friendly, easy to make, budget conscious recipes in Good for You-Naturally! Weekly Menu & Recipes – Level 1. See demos of many of these recipes – and TASTE them too, at the Good for You-Naturally!™ Seminar LIVE!


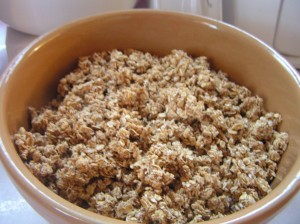
Good for You-Naturally!™ Maple-Almond Granola

  • 1 cup pitted Dates
  • 1/2 cup Purified Water
  • 1/4 cup Real Maple Syrup
  • 1/4 cup Raw Coconut Oil
  • 1 tsp. pure Maple Flavoring (or organic Vanilla)
  • 1 tsp. ground Cinnamon
  • 1 cup Raw Almonds
  • 8 cups Rolled Oats
  • 1/2 cups dried, shredded Coconut

granola• Blend (or process in food processor) Dates, Water, Maple Syrup and Coconut Oil until smooth. (Add a little more water if you need to, to keep it blending. Medjool Dates will blend creamier than drier dates, like Deglet Noors.) Stop and scrape down the sides as needed. (Food Processor actually works better if you have one. But, add the water a little at a time, or it may splash out at the beginning.)

• Chop Almonds. (If you have a food processor, you can add them to your Date mix, after processing it, and process again until nuts are small chunks.)

• Blend or mix in Maple Flavoring/Vanilla and Almonds.

• Stir Oats and Coconut together in a large bowl.

• Mix Date mix into Oats and Coconut, with hands is easiest.

• Crumble onto solid sheets for dehydrator (or cookie sheets if you don’t have a dehydrator).

• Dehydrate at 105-110° overnight (or so, until dry) for raw granola. If you don’t have a dehydrator, dry in oven at lowest temperature, 45 min. to a couple hours, until dry. (This will depend on what your oven’s lowest temp is.) Stirring every 10-15 minutes.

• Cool and break into clumps.

• Store in air tight container.

• Serve with Raw Almond or Goatʼs Milk

 This is just one of the over 60 Recipes in Good for You-Naturally! Weekly Menu & Recipes ~ Level 1, a family-friendly menu plan and recipes to help you gently transition to a lifestyle of eating for your health. It also includes and shopping guide for real foods and so much more!


Newest in the Kitchen – It will blend, even better!

I am so excited about the new Twister Jar for the BlendTec. This jar will do your thickest concoctions, like nut butters, easy peasy. Load it up with up to 16 oz. of nuts and in 35-45 seconds, nut butter (as compared to 4-5 minutes in the regular square jar.) The Twister Jar is $99.99, and there is Limited supply on this first run of jars, so hurry quick if you want to get started blending your thick recipes like nut butters, Hummus, baby foods, dips and dressings, even FASTER! Click for more info or to order. However, this introductory first run of Twister Jars is not BPA free – the second run will be. So I am waiting to order mine.


Excalibur Dehydrator

We are excited to announce… that we are now an Authorized Affiliate of Excalibur dehydrators! There are 2 dehydrators that we really recommend, that line up with the standards we have for choosing a dehydrator that really works. Each has its own pluses. (See our Dehydrator Resources & Recommendations to see those “what to look for” guidelines.)


The Excalibur was the first dehydrator I used, 25 or so years ago. The biggest plus (in my opinion) that the Excalibur has over our other top pick is its large drying compartment, allowing you (when you take trays out) to put larger items in, like dishes or jars, for making “raw food” recipes – like yogurt or bars, raising bread, or even drying bouquets or other craft projects. The other thing I really like about it is the front door and slide in trays (like an oven). That makes it really convenient to add and remove foods. The Excalibur also has square trays  with no hole in the middle, which is handy when you want/need a solid square shaped food. And, without the motor/fan on the bottom, crumbs and spills are more easily cleaned up. No danger of harming your motor/fan from food getting in it.


Other features, that it shares with our other top pick, for good dehydrating are:

  • adjustable thermostat, (from 85°-145°,) for the right temperature setting for the various things you dehydrate,
  • air flows horizontally across each tray for more even drying and no flavor mixing (i.e. you can put different foods on different trays),
  • opague (not transparent) for nutrient retention

The Excalibur also:

  • is Made in the U.S.A. – all parts and assembly
  • is Durable – backed by a 10 year warranty
  • is the Top rated dehydrator by many in the “raw food” community – people who do a LOT of dehydrating, as well as used by many gourmets, Culinary Institutes and Universities
  • has 15 Sq. Ft. of drying space (on the 9 tray model)
  • has a 26 Hour Timer (option)


 Learn more about the Excalibur or purchase here.


Bottom Line: I’m not ready to fully give up our other dehydrator nor our recommendation for it. (It has features I love too.) But I am excited to offer the Excalibur as another excellent option. Take a look at both and see which will work best for you.


 Who needs a dehydrator?

Gardeners: Put up that produce for the winter – the fast, easy, and cool way that takes far less space and weighs far less than canned or frozen, and retains far more nutrients. Even if you don’t garden, stock up and dehydrate when foods are in season and on sale.

Outdoorsmen(women)/Hunters: Turn that meat into jerky. Again, it’s the easy way to store it in less space and with less weight. Don’t hunt? Like the non-gardener, buy when on-sale and make your own for far less money and far better nutrition than store-bought. Also make light weight foods to take with you for the campground or snacking along the way.

The Generally Health Conscious: Make easy healthy snacks for you and your children, for a fraction of the cost and better nutrition. Dried fruits, vegetable chips, leathers/roll ups, etc. with no added ingredients you don’t want in them.

Hobbiests: Whether you’re drying flowers, herbs, craft projects, or making doggie treats you’ll love a dehydrator.

Living Foods Eaters: Those on a high raw diet will love the Excalibur for preparing “gourmet” raw dishes, dehydrating snacks, and more – with the ability to set the temperature low enough to retain the viability of the “life force”/enzymes in the food.

YOU!


Friday Food – Maple Oatmeal-Raisin Cookies

These super yummy cookies are considered “raw”. They are dehydrated at low temp, rather than baked, to retain all their nutrition goodness.

If you follow a high raw lifestyle of eating, or if you just want to increase your intake of yummy Good for You-Naturally! foods for better health, give them a try.

Lisa’s (Raw) Maple Oatmeal-Raisin Cookies

2 cups whole oat groats (organic)
3/4 cup pure maple syrup (organic)
2 Tbl. raw EV Coconut Oil (organic) (melted or not)
1 tsp. ground cinnamon
1/4 tsp. ground nutmeg, optional
1/4 tsp. ground allspice, optional
1 cap/tsp. vanilla
1 cup organic raisins
1/2 cup chopped raw walnuts, optional (organic)


  • Soak oat groats in more than double the amount of pure water (4+ cups), overnight.
  • Drain well.
  • Process oat groats and maple syrup in food processor (or Blend in blender) until semi-smooth.
  • Mix in coconut oil, spices, vanilla and raisins (and nuts.)
  • Drop by spoonful on dehydrator solid tray and flatten.
  • Dehydrate overnight at 105°.
  • Turn over onto mesh screen and dry a few more hours until desired chewiness.

These are awesome cookies that taste like “regular” oatmeal raisin cookies (and look like them too, just not “browned”.)

You can use raw honey or pitted soft dates (or raw agave nectar), if you prefer, but the maple syrup gives a GREAT taste to these.

I usually add just cinnamon to my oatmeal cookies, but these other spices added a bit different flavor that is good too.

If you don’t have a dehydrator yet, click here to see what to look for when buying a dehydrator and the ones we recommend.

from my Good for You-Naturally! for Life online course


Tooth Powder Recipe

Are you looking for an alternative to harmful, chemical laden toothpastes? We’ve used several natural toothpastes. But if you’d like something much cheaper that you can make yourself, homemade toothpowder to the rescue. Also, although a “natural” ingredient, glycerin (in many “natural” toothpastes) has been found to not be the best for helping prevent tooth decay.


Whether you’re looking for a healthy alternative, a cheap alternative or just something “on hand” to get you through a pinch, homemade toothpowder is a good choice. Super simple, cheap, convenient, and works great.


Of course, you could just use plain baking soda. That would be great all on its own. But if you want a bit more complex recipe, with a few more benefits, like helping prevent tooth decay, tasting great, and giving you minty fresh breath, read on.


Good for You-Naturally! Tooth Powder

1 Tbl. baking soda

1/4 tsp. unrefined/sun dried sea salt

3-4 drops On Guard Essential Oil

6-8 drops Peppermint Essential Oil  – both from  doTerra

Mix the salt into the soda well. I use a toothpick to stir. Add the oils and mix in well. Store in a small container with an air tight lid, preferably a glass container ( but plastic, like a Tupperware mini midget or a small bottle with a flip top, small hole in lid with an over-cap, also works.)

(If you don’t use doTerra essential oils, be sure the oils you use are safe for ingestion. We choose doTerra for their supberb therapeutic-grade quality and safety. IOW, they work–not just smell good.)